Skip navigation

Category Archives: miscellaneous

The G400 was Matrox’s “Gamer card”. For years the company was known for producing graphics cards like the Matrox Mystique and G200 which offered superior 2D image quality but generally fell behind the competition when it came to producing high FPS or reliable and compatible drivers. The G400 released in 1999 was Matrox’s answer to this and offered 16 and 32 bit color modes in the excellent image quality Matrox was known for as well as touting an AGP x4 interface. The high end of the G400 family was the G400 MAX with 32MB of 200mhz SGRAM and a core clock speed of 150mhz giving competition like the TNT2 and Voodoo 3 a run for their money.

One feature the G400 featured that the competition did not was hardware support for EMBM or Environmental Mapped Bump Mapping. This is a method of detailing textures which a few games at the time supported. Some of these games like “Expendable” also known as “Millennium Soldier: Expendable” could only be run with EMBM mode on by a Matrox card of the G400 family as well as a few other Matrox cards. In this article I want to take a look at the fastest of the G400 family, the G400 MAX as well as the game Expendable and just show what the EMBM did as well as discus at the end a recent patch that allows you to experience this effect on non Matrox cards.

First lets take a look at the card in question.

g400max

Readers may recognize this image as I once had my G400 MAX installed in my dual Tualatin machine. The MAX is the fastest of the G400 cards which includes later versions such as the G450 and thus was the preferred card to play games such as Expendables with EMBM enabled. The G400 MAX is usually fairly easy to spot among other G400 cards on places like EBay due to the fact that unlike the other cards it came with a cooling fan stock. The G400 MAX only comes in AGP form so make sure your motherboard that your using has an AGP slot.

As I said before the hardware EMBM feature of this card was supposed to be a big selling point as other cards on the market were not able to perform this ability. Nvidia didn’t have EMBM features until the Geforce 3 several years later. Unfortunately the list of games that supported this feature is short and usually the effect isn’t used to a large extent and many times limited to making water look more realistic. I’ve read gamers have really struggled to see any difference when EMBM is activated in a number of games.

Here is an old list from Matrox of games that were slated to support EMBM, though if all of these titles did implement it is questionable.

Ace of Angels™
Aquarius™
Battlezone II: Combat Commander™
Battle Isle: The Andosia war
BITM
Carmageddon®: TDR 2000™
Colin McRae Rally 2
Descent 3™
Descent 3™: Mercenary
Destroyer Command™
Drakan™
Dungeon Keeper™ 2
Echelon®
Echelon®: Wind Warriors
Expendable™
F1 World Grand Prix
Far Gate
Fur Fighters
Hard Truck II™
Hired Team™ Gold
Hired Team™: Trial
Incoming Forces
Parkan: Iron Strategy™
Ka-52 Team Alligator™
Kyodai
Off Road: Redneck Racing
Offshore2000: Pro Surf Tour
Planet Heat
PowerRender™ engine V 3.0*
Private Wars™
Rollcage® Stage II
Silent Hunter II
Silent Space (cancelled)
Silex engine
Slave Zero™
Speed Busters™
Spirit of Speed 1937
Sub Command
Jugular® Street Luge Racing
Totaled™
Warm Up
Wild Metal Country™*

Command & Conquer Renegade also used it for water effects but it was not restricted to using Matrox cards and that’s the catch with EMBM. It’s not that later cards could not perform the feature but many times the game executable would search for a Matrox card when executed and if one was not found the game would not run or would not run with EMBM enabled even if you had a EMBM capable card installed like the Geforce 3. This is what made having something like the G400 MAX in a collection interesting since it was the only means to fully experience some of these titles. Now lets talk about the game in question. Expendables was released by RAGE in 1999 and was an arcade port. From what I understand it was only released in “big box” form in Europe and not North America. I had to import my version from the UK. Expendable is an example of a game that put EMBM to decent use and it’s very noticeable in the water effects as well as some other game textures when activated. For a long time it was also a game that could only run with EMBM effects enabled if run on a Matrox card.20160822_231222

20160822_231233

The game is a Win 98 game but will run on later operating systems. There is also a Dreamcast port of the game titled “Millennium Soldier: Expendable” but from what I can tell it is graphically inferior to the PC port with no EMBM effects, lower resolutions and missing a few effects such as the video billboard seen in stage 1.

The game itself comes with a minimal storyline about aliens or some such thing but really the story isn’t important as the game is just a fun overhead run and gun shooter. The game is done all in 3D polygons but has actually aged pretty well and looks good in my opinion. It’s one of those mindless games where you just shut your mind off and shoot stuff up. On the downside the controls are horrible. Maybe this control scheme works fine on the Dreamcast controller but on a PC it’s frustrating and creates a lot of unneeded difficulty. The best I can describe it is sort of like Resident Evil tank like controls where up and down move you forward and back but left and right rotate your character. The game gives you plenty of options form keyboard and mouse to gamepad but I cant seem to get the full hang of the controls leading to many instances of inadvertently walking into laser fences or onto land mines. Despite the often times infuriating controls the game is still a lot of fun to play and has many levels and interesting bosses.

EMBM though is not activated by default but requires a patch. before that though let me go over the system I used to play this game.

The system I put together for this game almost deserves an article of its own. The motherboard I went with is a very late socket A board, the Asrock K7VT4A PRO. This board sports all the features of a late socket A board such as ATA 133, SATA, AGP X8, DDR memory support and support for Barton core socket A CPU’s.

20160614_195124

For a CPU I went with the Barton core AMD Athlon XP 2500+ running at 1.833mhz and sporting 512kb of L2 cache on the CPU. When looking at the Pentium II requirements for Expendable this is quite an overkill but I wanted to make sure I maxed the Matrox GPU out and left some power to experiment later with non Matrox cards. I’m also running Windows 98SE, 512mb of DDR 400 RAM and a Maxtor ATA 133 hard drive with DMA activated. I’m also running a Diamond Monster MX300 sound card that uses the Vortex2 chip since Expendable takes advantage of this sound chip and its 3D positional audio.

Once you have your setup ready and installed Expendable from the CD you need to do a few things to get the game running with EMBM enabled. first off make sure your using an older version of the Matrox video drivers else you may encounter issues with selecting resolutions. I used drivers ver. 5.52.015

Once those are installed I also suggest getting PowerStrip version 2.78. PowerStrip is a graphics utility that lets you make all kind of tweaks. Go into advanced settings and disable V-sync. disabling this will boost your framerate but increase the possibility of screen tearing though in my many playthroughs of Expendable with V-sync disabled I noticed no tearing.

Next you’ll need to download the EMBM patch from here. From there you simply unzip the patch into the main Expendable directory and your pretty much set. You will get two executables one labeled Expendable and the other “Go”. Run the Expendable.exe first to setup your game. Keep in mind that due to the limit of 32MB of RAM on the G400 MAX you are limited to playing in 1024 x 768 resolution in 32 bit color mode. Anything higher and your game will crash. This is also where you setup your audio so if your using a Vortex2 chip be sure to select that. After this exit out and run the Go.exe and your game should start. keep in mind the patch is oddly picky. I kept getting crashes and memory errors until I updated my motherboards chipset.

So what does all this work get us? the turning off of V-sync helps offset the FPS hit we take from enabling EMBM while enabling EMBM improves textures on some vehicles as well as adds effects such as tread marks in the ground and most notably changes the look of water effects. They go from being a muddy almost mist look to wavy blue.

NO EMBM ENABLED
exp


EMBM ENABLED
expembm


There’s also a few other very minor changes such as the video billboard will now also display the Matrox logo.

So as I mentioned earlier many of these games such as Expendable could only be played on Matrox cards that supported EMBM due to the fact that the game checked for the presence of a Matrox card in the system. Recently a member over at the Vogons forum put together a modified patch that will trick the game into thinking a Matrox card was installed thus letting one use later cards like the Geforce 3 and 4 that have EMBM capabilities but also faster GPU’s and vastly more RAM.

this patch can be found here.

I’ve tested this patch on this same system with a Geforce 4 ti4200 and the game played perfectly. below are some benchmarking results I took using the games built in timedemo. the results compare a Matrox G400 MAX at 1024 x 768 with EMBM enabled and my Geforce 4 ti4200 at 1920 x 1440 with EMBM enabled.

Keep in mind that many of the other early EMBM capable games may also require a Matrox card and have not been patched to use other brand cards so it still may be worth keeping a G400 MAX handy depending on what you want to play.

The time demo for Expendable can be enabled by making a shortcut to the “go.exe” file and entering properties and editing the shortcut by adding -timedemo

G400 MAX, EMBM ENABLED, NO V-SYNC

Running at  – 1024 x 768 x 32
Total Time  – 234 Seconds
Gameframes  – 11226
Lowest FPS  – 17 fps
Highest FPS – 85 fps
Average FPS – 47.957265 fps

GEFORCE 4 TI4200, EMBM ENABLED, NO V-SYNC

Running at  – 1920 x 1440 x 32
Total Time  – 147 Seconds
Gameframes  – 11226
Lowest FPS  – 21 fps
Highest FPS – 131 fps
Average FPS – 76.258503 fps

dlc3

Previously on this blog we have discussed both what I think is an “ultimate” or at least near “ultimate” 386 PC in the Anatomy of a 386 article and we also talked about pushing certain sockets beyond their intended scope such as with the 486 and Socket 3 motherboards and pushing their limits  and I wanted to do something similar with the 386. In this article were going to take a look at the Cyrix 486DLC chip, a drop in replacement chip meant to upgrade a 386 class motherboard with a 486 class CPU. Were going to look at one of the more common DLC chips, the Cyrix DLC-40, run some benchmarks and put it up against the king of the 386 chips the AMD 386-40.
First lets take a look at the test PC and then the CPU’s will be testing.
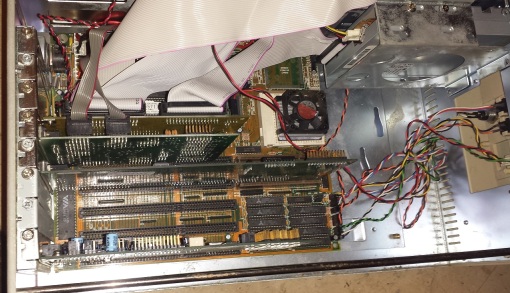
dlc4

This is the 386 PC will be testing the CPU’s on.

dlc7

I could not identify the motherboard but it’s based off the Opti 495XLC chipset and is loaded with 128kb of L2 cache and 8MB of FPM RAM. For video I am using a Tseng Labs ET4000 ISA video card and I have a Sound Blaster 2.0 installed as well although it will be unused for the benchmark tests. My memory settings are fairly standard and I didn’t mess with them much from the defaults. AT bus divider set at 5, memory timings set at 2-1-1-1 and wait states set to 1.

So lets take a look at the two CPU’s will be testing today.

First up is the king of the 386 chips, the famous and beloved AMD 386DX-40.

dlc6

The 386DX-40 was a very reliable 32 bit 386 chip made by AMD and is very well regarded for its speed and reliability. This is the fastest true 386 made and is overall very capable. It though, like all true 386 chips has no L1 cache memory on board.

The second CPU we will be putting it up against is the Cyrix 486DLC-40.

dlc5

The DLC-40 created by Cyrix was intended to be a drop in upgrade CPU for 32 bit 386 class motherboards which in essence gave 386 PC users a 486 CPU upgrade. It essentially is a supped up 386 with 486 code inserted and 1kb of L1 cache added on the chip. There was also a more common 33mhz version like this guy.

dlc33m

as well as later DLC chips made by Texas Instruments and IBM which added even more L1 cache. The fastest of these chips is an IBM triple clocked DLC rated at 100mhz that supposedly is about equal to an Intel 486DX-66. Due to licensing agreements though I believe IBM was only able to sell these chips imbedded as part of a motherboard or upgrade kit.

There are also SLC variants which are 16/32 bit hybrids designed to be more compatible with older motherboards where as DLC variants are true 32 bit.

The on board L1 cache memory of the DLC is a huge advantage over the AMD 386-40 so on all the benchmarks I tested the DLC chip twice, once with the cache enabled and one again with it disable so we can see how much of a difference this makes.

The unidentified 386 class motherboard I’m using is a later model and supports the DLC chips in BIOS. Here is a shot of the specs as I boot up.

dlc8

Notice the BIOS recognizes the DLC chip as under “main processor” it is listed as a Cx486DLC. Many older 386 motherboards  may not recognize the DLC chip properly and simply report it as a 80486SX. You may also need to run a setup utility with these older boards to fully utilize the DLC chip.

My BIOS also has the option to enable/disable the internal L1 cache on the CPU though for reasons I cant figure out this option does not work and the l1 cache is enabled automatically regardless of how it is set here.

dlc1


Failing this you can always disable/enable the internal L1 cache via software. I used the Cyrix cx486 utility which allows you to easily enable/disable the L1 cache by the C button. Just be sure to hit W to write your choice to the registers before exiting the program.

dlc2

So without further adieu we have the benchmarks. The programs I used were all pretty standard, 3D Bench, PCP Bench and DOOM. Below is a bar chart to better illustrate the performance of the two chips and I also added a 33mhz Intel 486 results from a similarly spec’ed 486 machine using the same amount of L2 cache and the same video card to compare.

dlcgraph

The results are basically what we would expect with the DLC handily defeating the AMD 386-40. DOOM seems to benefit the most from the L1 cache as the difference between the 386-40 and DLC with cache disabled is only .6 FPS but with cache enabled its a 2.5 FPS difference.

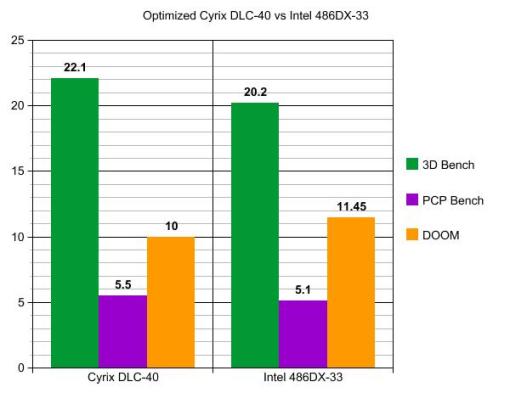
you’ll also notice the DLC does pretty well compared to the Intel 486DX-33 even tying it in PCP Bench. After some optimization I managed even more performance gain.

After setting wait states to 0 and the AT bus divider to 3 I was able to get the following results out of the cache enabled DLC-40

3D Bench    – 22.1

PCP Bench –  5.5

DOOM        –  10

You can see with these results the DLC surpasses the DX-33 in all but DOOM.

graphdlc2

The folks over at Red Hill Computing whom I often refer to in my research seem to really love this chip and claim it to be “vastly superior” to a 486DX-33 system though I would have to somewhat disagree. In a very optimized system the DLC can match or beat the DX-33 but I wouldn’t say it’s as fast clock for clock and I wouldn’t call a few frames per second advantage “vastly superior”. At the time though they would of been correct in that verbiage from a fiscal point of view as the DLC was vastly cheaper then a Intel 486DX-33 allowing the buyer to purchase more RAM.

I’m very curious how much the added cache of the later DLC chips such as the ones from TI and IBM affected performance and that may be the bases of an eventual revision to this article. The DLC does do what it claims to do and does increase performance of a 386 to 486 levels as well as being vastly cheaper then an Intel 486 but keep in mind it was still restricted by the 386 architecture and limited to the amount of RAM it could use. Possibly not a bad option for the budget user that already owned a 386 machine but holding out for the pricy 486DX-66 would of been a smarter move for the long run in my opinion.

When I frequent Goodwill’s and other thrift type second hand shops I always make a point of going through the huge stacks of old VCR and DVD players that are usually present. I do this because I’m usually on the lookout for Laserdisc or Beta players as well as the odd video game console that looks like a VCR or DVD player such as certain models of the CD-i or the Laseractive player. In these searches I often come across “combo players” or machines that can play both VHS tapes and DVD discs. These combo machines make sense as when people were transitioning over to DVD they still had large VHS collections they may of wanted to still hold onto for some time, especially since in the early days of DVD many films had not made the jump to the digital disc.

On one of my thrifting outings not to long ago I can across one of these combo machines and I had almost past it up when I had to take a second glance to confirm what I saw.

brc1

Yes, that’s right. A Blu-ray/VHS combo deck. I was immediately intrigued. After all Blu-ray came out long after the general death of VHS. The second label on the player also grabbed my attention and made me finally give in and pay the $20 some dollars on the price tag.

brc3

That’s right, VHS tapes upconverted to 1080p over HDMI, I had no idea. See back in the 1980’s and 90’s the in heydays of VHS the best video output you could hope for for your VHS tapes was s-video and this was usually only available on rather high end players. Even in Europe where RGB was an accepted standard VCR players only outputted composite and s-video over SCART.

There were tape decks with component but these were very rare and reserved only for editing and broadcast commercial uses and I suspect never sold on a commercial market. I only ever saw one of these players and it was a forum sale over at the Neo Geo forums. Later VHS/DVD combo players sported component outputs for video but these only worked when playing a DVD disc so even with these players you were still limited to s-video at best.

That’s a major reason this player really interested me. The player in question is the Panasonic DMP-BD70V which seems to of been released some time in 2009.

brc2

On the back we have both HDMI and component for video output with only the HDMI being capable of displaying 1080p.

There are a few drawbacks. First off is the machines inability to record via either optical disc or VHS cassette. second is the DMP-BD70V does not support S-VHS in its native resolution but WILL still play and upconvert them. You also really want a remote control if you pick one of these machines up as the buttons on the face of the player are pretty sparse and there is no way to rewind, fast forward or move a cursor in a DVD/Blu-ray menu without one. This player also had some initial freezing issues with Blu-rays but a firmware updated solved many of these problems.

So how does it look? Pretty nice in my opinion. it obviously isn’t going to make 20+ year old VHS tapes you bought in a cardboard box for 50 cents a piece look like a brand new HD Blu-ray release but it does produce a very nice image. I would even say if you have a nice TV and a well maintained VHS tape you can achieve almost DVD like quality.

I did take a few direct captures for comparison.  The VHS player I ran the Panasonic up against is the Toshiba model W-804. This is a later model S-VHS player that supports s-video out as well as being a six head player as opposed to the more common four head.

brc4

Toshiba W-804 frontbrc5Toshiba W-804 rear

I took these captures via an Elgato capture device. The captures from the VHS player are all via s-video and the captures from the combo player are via component. Unfortunately I could not capture 1080p via HDMI because of HDCP and I currently have no means of stripping this protection. The first images in the comparisons are from the VHS player and are marked by the white track numbers.

My Great Capture Screenshot 2016-03-18 11-29-12My Great Capture Screenshot 2016-03-18 11-34-14

My Great Capture Screenshot 2016-03-18 11-29-20My Great Capture Screenshot 2016-03-18 11-34-25

My Great Capture Screenshot 2016-03-18 11-29-23My Great Capture Screenshot 2016-03-18 11-31-05

It may be hard to notice via the images or some of you may actually be preferring the VHS images. depending on your TV’s ability to upconvert the quality can be pretty close when the combo player is placed up against a high end VHS deck but the quality gap increases noticeably in the combo players favor when using lower end VHS decks. Overall I am happy I picked this player up. It’s nice to be able to play all of ones VHS, CD audio, DVD and Blu-ray media on one player and on one HDTV. That said it’s still a niche market machine and likely not very common so If you see one at a good price and need a jack of all trades player or your still holding onto a massive VHS collection grab it.

dualtully

A few years back one of my blogs first articles was about dual CPU systems. One of the PC’s I talked about was my dual CPU Pentium III Tualatin machine. In this article I wanted to go a little further into that machine and talk about some of the upgrades I did to make this PC into a true early 2000’s beast.

The Pentium III Tualatin chip is the third revision and refinement of the Pentium III CPU and earned a reputation as a speedy CPU outclassing even the early Willimette Pentium 4’s and giving the Northwood revisions a run for their money. Released in 2001 and 2002 these CPUs mostly found their way to server systems since Intel is said to of actively discouraged their use in the home market so as to make way for the arguably inferior Pentium 4. Tualtain processors are not backwards compatible with most Pentium III motherboards without the use of an adapter or pin modification.

The greatest of the Tualatin Pentiums was the 1.4ghz chip with 512kb of L2 cache. These CPUs gained a reputation of their own for speed and reliability. My Tualatin PC is a fairly typical server class setup for the time. It features dual 1.4ghz Tualatin chips running on a Tyan S2507T motherboard. This motherboard lacks the bells and whistles of a motherboard meant for an enthusiast such as any ability to overclock via the BIOS but it has been highly reliably.

20160216_181052

My CPU’s also came with two very impressive and very overkill heatsinks installed. It’s a shame this motherboard does not support overclocking because they would be perfect for it.

20160216_181021

Originally I ran this machine with Windows 98SE, 512MB of RAM and a Matrox Max video card. This severely held the true potential of the Tualatin back and I began to wonder how far this CPU and motherboard could be pushed. First of all Windows 98SE does not support dual CPUs and thus the second CPU was entirely wasted. The board also supported much more RAM where Windows 9x becomes potentially unstable with over 512mb of RAM. The Matrox G400 MAX was a fine video card and offered great features and excellent 2d quality. Unfortunately by the time the Tualatin was released it was a little long in the tooth and certainly held the CPU back.

Without overclocking options I decided to focus on RAM, hard drive and most importantly graphics card upgrades.

My first order of business was upgrading the hard drive. The hard drive I had installed was a 80GB ATA 100 IDE hard drive. certainly adequate for the time but I wanted to see if I could do better and that meant SATA and a SSD or Solid State Drive. Since this motherboard was released a few years before SATA hit the PC world in a major way I had to resort to a PCI SATA controller card.

20160216_204834

The card above worked first time without a hitch for me. SSD’s are still a little pricey but luckily I only needed enough space for the operating system so I was able to find a very small 32GB SSD from Samsung online for the OS along with a larger 80GB standard SATA hard drive for my games and data. I decided against upgrading the DVD drives to SATA since I was mostly doing this upgrade for testing but if your upgrading your own machines a SATA upgrade for the optical drives is also advised.

Next I needed to upgrade the OS from Windows 98SE to XP. Unlike 98, XP supports SMP processing, or the use of two CPU’s. Though most software of the time did not support this feature the few titles that do would see a bump in performance as well as possibly the OS itself overall.

RAM was next on the list. I doubled my RAM to a full gigabyte of PC133 SDRAM.

Lastly was the graphics card and this is what proved most tricky. My motherboard supported a x4 universal AGP slot which limited my options to AGP for the fastest video card. I am not very familiar with Radeon cards so I tend to go the Nvidia route, especially since they also tend to be slightly more compatible overall. I was going for pure speed in for this build so Windows 9x and DOS game compatibility wasn’t an issue for me either.

My first choice was the Geforce 7 series since these were the last cards released by Nvidia for AGP. Being as they are among the last cards released for the bus the higher end models can be quite expensive and it took me awhile to find one at a reasonable price.

20151110_230002

The card I settled on was a Geforce 7800 GS and although there is a somewhat faster 7800 OC and a 7850 I felt the 7800 GS was already overkill relative to the CPU. Unfortunately I failed to realize all the AGP cards of the 7 series were not truly AGP cards and used PCI-e to AGP bridge chips. On later motherboards this isn’t much of an issue but on my older VIA chipset board this caused havoc. I did finally get the card to display and run programs by disabling AGP fast writes and AGP x4 in BIOS but the results were a garbled mess as you can see in the captured video below.

With all these issues my next course was to fallback to the previous generation of the Geforce 6 cards and I acquired a Geforce 6800 OC for also relatively cheap.

20160216_204830

Like the 7800 GS I had before it the 6800 OC was not the fastest of the 6800 family. That title belonged to the 6800 Ultra but again I felt it was already overpowered relative to the CPU. There are some Geforce 6 cards that do indeed use a PCI-e to APG bridge chips but thankfully the 6800 OC branch are native AGP. I still had initial instability issues with programs freezing up but by again disabling AGP fast writes and AGP x4 in BIOS I was able to get the card to perform perfectly.

So? was the upgrade worth it? resoundingly yes. The 1.4Ghz Pentium even at stock speeds is a very capable CPU. With upgrades I think a machine like this could of had its usable life extended for quite some time and been made to play a wide range of early and mid 2000’s games and software competently. I was able to play Unreal tournament 2004 with all the highest settings staying consistently above 30 FPS. I also benchmarked the Doom 3 time demo which was considered a very demanding game for the time and got a very playable 36.7 FPS on high settings and 1024 x 768 resolution and 31.7 FPS on ultra settings and 1280 x 1024 resolution.

Here are some graphics comparing my scores with PCMark 2002 and 3DMark 2001se between my old setup and the upgraded setup.

pcmark 2002 compair

I’m not sure how PCMark 2002 comes to its score conclusion but you can see the CPU scores are barely different. This makes sense if it’s not considering the power of the upgraded graphics card. There is on the other hand a noticeable score jump for memory and hard drive speed. 3DMark 2001se though shows a very dramatic increase in its scoring with a jump of 8124 points.

3d2001secompair2

Finally in 3DMark 2003 I received a benchmark score of 7690.

3D2003

Overall a very successful upgrade. Just keep in mind when upgrading older AGP capable motherboards try to stay clear of graphics cards that use PCI-e to AGP bridge chips and shoot for native AGP cards. I did find cards using the bridge chips did seem to run fine on later AGP motherboards like my late socket A motherboard featuring a x8 APG slot.

If you want to watch a video of the entire upgrade process please check out the video below.

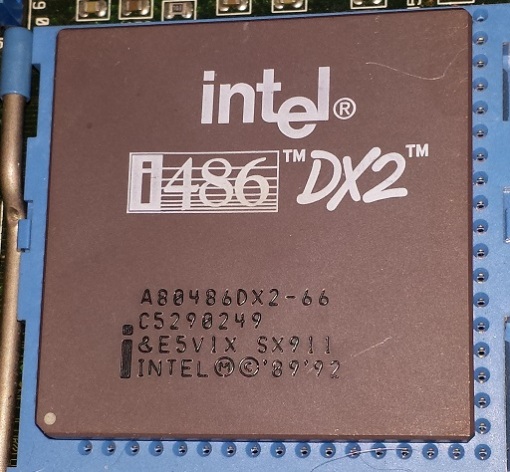
1024px-Intel_i486_dx_50mhz_2007_03_27(Image from Wikipedia commons)

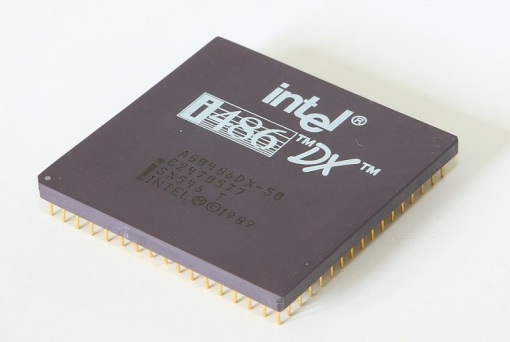
The Intel 50mhz DX chip, released in the summer 1991 was the first 486 CPU designed to run on the then blazing fast 50mhz front side system bus. For a very quick and simple explanation, front side bus or FSB is in a very simplified sense the speed at which the various components of the motherboard such as the chipset, RAM and so on communicate.  If the CPU is to be thought of as the brain of a computer then the FSB would be the nervous system. The higher the number the faster the machine is overall. Generally the CPU ran at the FSB of the motherboard, thus if you had a 486DX-33 CPU running at its stock speed your FSB would be 33mhz as well. the 486DX-50 promised blazing fast speeds in a time when most 486 motherboards were running a FSB of 33 or even 25mhz. Unfortunately the majority of motherboards at the time simply could not cope with a 40mhz FSB let alone 50mhz and PC systems running a 486DX-50 quickly gained a reputation for being a very unreliable setup. This reputation was compounded by the fact that the faster VLB or VESA slot cards especially had a hard time running on the 50mhz FSB since this slot was tied directly to the CPU.

With that said I wanted to to take a look at the nowadays uncommon 50mhz DX chip and see if I could put together a stable running PC. I also wanted to compare it to a few of its contemporaries, especially the 486DX2-50 which also ran at 50mhz but on a much more stable 25mhz FSB via “clock doubling”.

So due to that last sentence I think we need to take a very quick look at what “clock doubling” is to help us better understand this era of CPU’s. I’m going to quote the Red Hill guide here on how they explain clock doubling.

While it is relatively easy to make a CPU run faster, it’s much more difficult to do it for a whole motherboard…. you will remember that the IBM AT (286) decoupled the expansion bus, so that the video and I/O cards could run at a safe, conservative 8MHz even though the motherboard and CPU were zipping along at 16 or 33MHz. But even the best motherboards were limited to about 40MHz in those days, so to make a 50 or 66MHz CPU work reliably, the motherboard had to be decoupled as well. This is a mixed blessing. It allows a faster CPU, but looses performance because access to anything off-chip (RAM in particular) is limited to motherboard speed — in this case, 25MHz.

So CPU clock doubling is really motherboard clock halving. In itself it doesn’t make the CPU run any faster, it just lets the motherboard run more reliably with a fast CPU.”

So in a nutshell a 486DX-50 is running both the motherboard AND the CPU at 50mhz where for example a 486DX2-50 is running the motherboard at 25mhz and the CPU at 50mhz but how great of a difference does this really make? My reading suggests a DX-50 in a well setup system can rival the famous DX2-66 which is a 66mhz CPU running on a 33mhz FSB but that remains to be seen.

First off lets look at the setup I will be using.

50dx1

Specs are as follows

Motherboard – FIC 486-GVT U2?

The motherboard is a slight mystery to me. It identifies itself on the board as a 486-GVT or on some chips a 486-GVT U2 but from looking on the internet the jumper layouts of similar boards don’t seem to quite match up. There seems to be a few layouts for the 486-GVT 2 but they don’t exactly match this board though I was able to figure out were the jumpers that control FSB were and discover the settings via experimentation. This board is actually pretty nice featuring both 30 and 72 pin RAM slots and two VLB slots as well as a lithium coin battery for the CMOS so I would guess this is a later model motherboard for the era.

50dx2

50dx3

CPU’s – for testing I will be using all Intel CPU’s. a Intel 486DX-33, Intel 486DX-50, Intel 486DX2-50 and lastly the legendary Intel 486DX2-66.

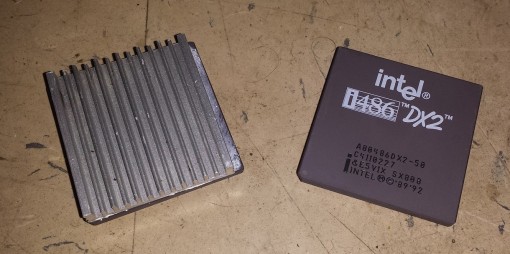
50dx4(DX-50 on left with heatsink I added)

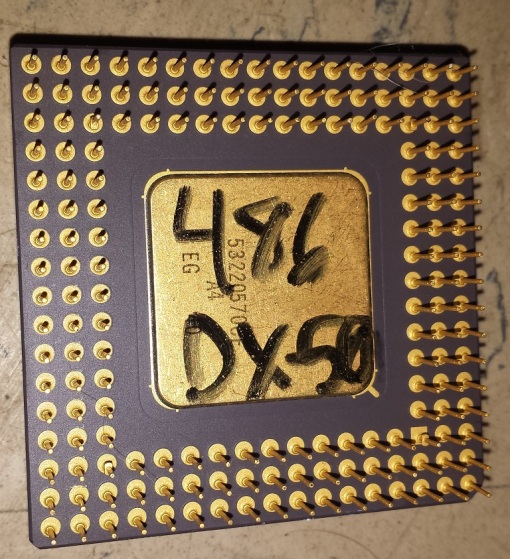
50dx5(bottom side of Intel 486DX-50)

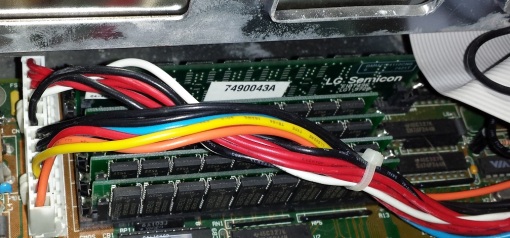
RAM and cache – for RAM I’m not using anything special just 24MB total of 30 and 72 pin RAM, for L2 cache I’m using 15ns chips totaling 256KB

50dx6

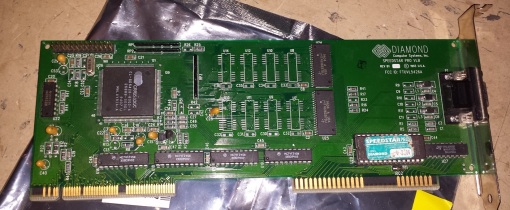
Video and sound – for video I’m using a 1MB VLB Diamond Speedstar Pro card based off the Cirrus Logic CL-GD5428 chipset. Cirrus Logic was mostly known for their mid range graphics card offerings but near the end of the 486 era did put out a few of the fastest video chipsets. the GD5428 is no slouch and is a very competitive 2D DOS video card.

50dx7

 the sound card really doesn’t come into play here with the CPU benchmarks but for the sake of telling it is a sound blaster 16 Vibra model.

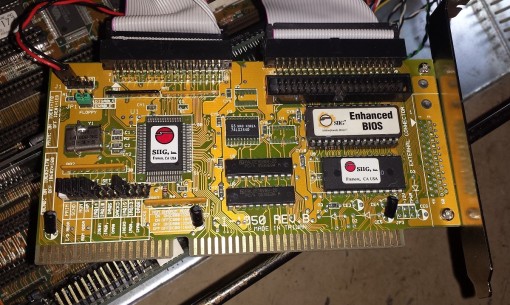
I/O – for I/0 ports and IDE control I’m using two separate cards. for serial and parallel ports I’m using a generic 8-bit SIS controller card and for my floppy and IDE controller I’m using a SIIG CI-1050. One problem I’m having with the SIIG card is my CD-ROM drive is not being detected which I haven’t taken the time to trouble shoot since I did not need it for these tests. It also does not work with other CPU’s installed so I’m chalking it up to an issue with the SIIG card. for  a hard drive I’m running an old 1.1GB Quantum fireball 1080.

50dx8

 The main thing one needs to watch out for on 486 machines if your using 40mhz or higher FSB is the number of VLB cards you have installed. Since they are tied to the CPU they can be very sensitive to the bus speeds. The general rule is the less VLB cards the more stable. Your usually safe running two cards on a 33mhz bus system but on a 40mhz bus system you will likely hit instability using two or more VLB cards. It’s not uncommon to have one or another card refuse to work, corrupt data ect. On a 50mhz bus system even getting one VLB running reliably can be a challenge. The safest bet for the type of card to use in a VLB slot is a video card as this is the type of card the slot was originally intended for.

With this in mind I limited myself to strictly one VLB card to use for video. Many times PC builders had to cherry pick cards to find one that ran reliably in these high FSB system but luckily my Diamond Speedstar Pro has run perfectly at 50mhz.

Which leads me to the reliability of my machine. Although I don’t use it daily I did run it extensively prior to writing this article and played quite a few games on it without any issues. I don’t doubt the frustration I’ve read about with 50mhz FSB 486 boards but it appears I got very lucky with this build. I haven’t had any of the usual issues such as data corruption, crashes or refusals to post. The one problem I did encounter though is that I cannot confirm my L2 cache is working. Cachechk crashes when attempting to run it and Speedsys also detects no L1 or L2 cache to test. This seems to be a usual issue to very fast 486 systems. Faster cache RAM may help solve this issue.

I have compared benchmarks though with multiple other users of 50mhz 486 systems on Vogons and my numbers seem spot on with those systems with slight variations.

So, does the 50mhz Front Side Bus speed pay off in the end? Well, no, not really.

I ran several benches on the exact same machine with the only differences being the CPU and FSB and in the end the results were usually the same regardless of the test. The 66mhz DX2 running on a 33mhz FSB always smoked the 50mhz DX chip. Also the 50mhz DX and DX2 were usually somewhat close in performance despite the FSB of the DX2 being half that of the DX version. In theory programs only using the CPU’s internal cache should run about the same speed wise but those that are I/O intensive should see a noticeable speed bump and my VLB video card running with 0 wait states SHOULD be blazing fast under the 50mhz bus speed. keep in mind results seem to vary depending on the motherboard and chipset as well.

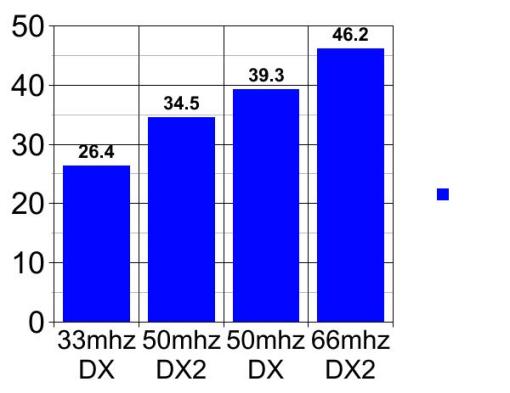
here’s two graphs to illustrate. First is 3DBench a popular 486 era benchmark test.

3DBench

3dbench results

Results are mostly as we would expect. the 33mhz DX lags well behind while the 66mhz DX2 beats the 50mhz DX by roughly 7 points while 4.8 points separate the 50mhz DX and DX2.

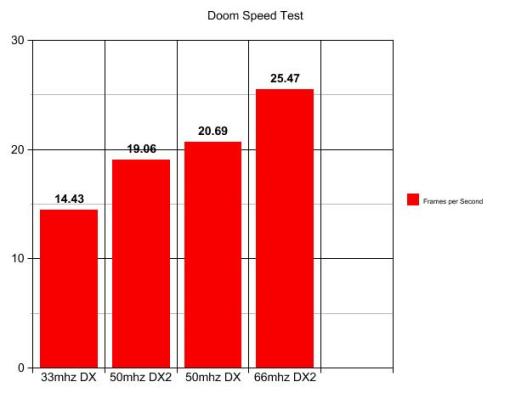
This is largely repeated in the Doom speed test as well.

Doom Speed Test

Doom st

In the Doom speed tests the DX and DX2 are even more evenly matched it appears with the 66mhz DX2 pulling well ahead again and the 33mhz DX falling well behind. I made a comparison video of both these tests running here as I think a video better represents the various CPU’s.

So in the end, yes you can get a 486 system with a 50mhz DX chip and a VLB card running reasonably stable with a little luck and the right parts. Is it worth it? Again, my answer is no, at least in my opinion. Sure having a 50mhz system has a kind of retro cool factor but despite what Red Hill seemed to say I don’t think it comes close to the 66mhz DX2 at least from what my testing and running both CPU’s has shown me. I have also looked at benchmark results as I said earlier from other users that compared systems and the 66mhz always seems to come out on top in these other tests as well. I’m sure there are instances where the 50mhz bus system may run faster but those instances seem few and far between. When looking at both 50mhz 486 chips and comparing to the DX2 version, sure, it’s a little faster but its really not that significant especially when put up against the hassle of finding the right parts to make a DX system run reliably.

Shortly before Christmas of 2015 there seemed to be a lot of buzz about the coming of “Steam boxes”. Overpriced pre built PC’s with a new Steam OS installed. Its seemed many people were treating them as their own sort of console which honestly sort of baffled me. This got me thinking and as much as I dislike it the world moves on. Physical game releases are looking to go the way of the Dodo bird and as much as I dislike supporting digital only downloads I would be doing myself a disfavor by not playing some of great indie games that have come out on steam as digital download only or with very limited physical release thanks to something like Indie box.

I decided I wanted to see if I could make my own budget “Steam Machine”. My taste in steams library though tends to be very specific. I like retro style games on the service and in my opinion these type of games are the ones that feel most correct on a TV with a game controller. These are games generally designed in the style and look of 2D 8 and 16 bit graphics. Games that do not take a whole lot of processing power or that require a fancy graphics card. This machine could also be used as a home theater PC for streaming. Some examples of the games I intended to play were Rouge Legacy, Breath of Death VII: the beginning, Retro City Rampage and Bro Force.

I wanted to achieve this as cheaply as possible with my first task being to secure a small case and motherboard. Thankfully I was able to acquire a case at a local swap meet for $3.

rsb1

This is the case I used for my project. I like it because it’s a smaller case designed for micro ATX motherboards but it’s not to small so I can use full height cards. This case can be used in desktop or tower configurations and supports two external 3 1/2 bays as well as an internal 3 1/2 bay and a 5 1/4 bay. I could live without the silver color and would have preferred black but for $3 I couldn’t turn it down. The floppy drive came with the case but realistically it won’t be seeing any use. The same can mostly be said for the DVD drive which I took from an old P4 Gateway PC. It’s hard to come across silver optical drives and at first I wasn’t sure about the curved bezel but it actually works to give the PC a interesting look. The drive is IDE even though the motherboard supports SATA but seeing as this machine is largely for streaming I’m not concerned.

rsb3

On the back you can see I did not have a back plate for the motherboard which doesn’t particularly bother me. The PSU is a 500 watt micro ATX supply I purchased off eBay for about $20. So far its worked without issue.

The motherboard was one I already had, A Intel DG31PR. This board though not a high powered gaming motherboard fit my needs perfectly. It had most everything I needed built in as well as built in VGA and audio for backup options and 4 onboard SATA connections. A PCI-e connector was my biggest priority due to the need for a semi modern video card.

rsb10

rsb5

rsb4

The specs are as followed.

OS – My first choice was to try Steam OS but I just wasn’t to impressed with it. I know its still in Beta but I felt I could do just as well with a more traditional OS choice so I went with Windows 10. Privacy concerns aside Win 10 is a pretty sleek OS in my opinion and looks very much at home as the OS for a media center. This machine is also more then powerful enough to run Win 10 so don’t feel like you need to only install it on PC’s with really high specs just because it is new.

CPU – I went with the fastest socket 775 CPU I had on hand which was a 2.5ghz dual core quad. Though no longer a powerhouse I felt the 4 cores was more then enough to run the style of games I intended to play as well as drive some older 2008 era PC games if I choose to play them on this machine. Remember I didn’t create this machine to play Witcher 3 or Fallout 4 on Ultra settings, this was for light streaming and “retro style Steam games”.

RAM – my motherboard only has two RAM sockets supporting a maximum of for GB or two  2gb sticks of DDR2. I always want more RAM in a modern machine but so far 4GB has worked just fine. I did have some slight issues with non low profile ram though because of the fact the sled for the hard drive is under the optical drive where the RAM goes.

Storage – For this machine I went with two hard drives. One for the OS ONLY and the other for data. The first drive I went with for the OS was a small solid state drive. I chose a SATA II 64GB drive that I was able to find on eBay for around $20. smaller SSD’s are getting very cheap and I found Windows 10 fit snugly on it with about 30GB to spare. The SSD fit nicely in the second external 3 1/2 bay under the floppy drive.

rsb11

rsb9

I don’t foresee the size being an issue as I’m basically done adding anything to the drive and I doubt patches are going to take up the remaining 30GB. I really love how fast this drive gets the machine to desktop after powering on and really makes it feel like more of a console under the TV.

The second drive is a more traditional hard drive. It is a 250GB SATA drive I have in the bay under the optical drive.

rsb8

I know 250GB isn’t a lot these days but for small indie retro style games I think it serves is purpose fine. I will upgrade in the future if needed but since this drive was free for me I can hardly complain.

Video – The video card selection was the toughest part for me. My number 1 priority was a card that could output audio over the HDMI port. This ruled out older but powerful cards like the Nvidia 8000 and 9000 series that required a additional audio cable to run from the motherboard to the card. I also wanted a card that required no additional power and could run from the PCI-e buses power alone. My first choice was an Nvidia 630 GT. which  is actually a very capable entry level card but due to some issues with my possibly defective card such as constantly losing the video signal I had to use the next most powerful card I had on hand which was an entry level Radeon HD6450.

rsb6

rsb7

This card is certainly no powerhouse but again our goal was not to playing Crysis 3 at 4K or anything like that. The card installed without an issue and does have a few benefits. first off it was free since I already had it, it can output audio through its HDMI port without any fiddling, it uses no extra power connectors and also is passivly cooled and does not require a fan so that cuts down on noise.

Thus far the card has run flawlessly and has run the games I mentioned earlier and more without issue. It also streams from YouTube and other sources just fine. In the future I would like to upgrade to a better card but for now this one seems to be serving its purpose.

Lastly I wanted to mention controllers. As far as game controllers go I initially used a older Gravis gamepad pro but many games failed to support it so I picked up a third party Rock Candy Xbox 360 controller from the local Walmart for $19.99.

rsbcon

I have had no issues with this controller and all games thus far have recognized it, sometimes even listing it as a Rock Candy rather then a generic 360 controller. It’s a pretty solid controller for the price and I’d recommend it for light gaming.

Since putting this “Steam machine” together two weeks ago I have greatly enjoyed it. I’ve had no issues playing the games I want to play on my 50 inch LG 4K LED TV in the main room as far as seeing any slowdown or crashes. games seem to run fine at 720p and 1080p though some games do look a bit blurry in spots as if they were smeared lightly with Valvoline but nothing very serious. I’m unsure if this is the games themselves or the video card or results of upscaling to the TV.

Overall I’m very happy with this project and it cost me under $100 to put together. If you have lots of spare money to burn or don’t have a proper PC then I guess splurge on a retail Steam Machine but don’t be to intimidated by the specs of these machines. If your on a budget and your tastes aren’t for the most demanding graphical games on Steam you can certainly get by with something lesser powered.

rsbend

beta1My SL-HF600 Super Betamax player

Ah, the Beta player. Sony’s creation to battle the formidable VHS format in the 1970’s and into the 1980’s. I’ve known about Betamax for a very long time but never owned or saw a player in stores growing up. As a matter of fact no one I knew owned a Betamax player, not even my uncle who was very into movies and A/V type electronics. Of course by the time I was old enough to care about things like video formats it was well into the very late 80’s and early 90’s. Long after Beta’s heyday had past. I only knew about it since it was often referred to in jokes of the day. For instance on the popular Married with Children I remember the Bundies only had a Beta player and thus when they went to rent a movie they were left with a rather lacking selection. This was funny at the time because as we all know Beta failed in its format war against VHS and was relegated to obscurity in the consumer sector. Owning a Beta player was seen as “backing the wrong horse” much like if you went out and bought an expensive HD DVD player not to long ago.

Now I say it failed in the commercial market and not just failed because  not to many people know Beta is actually still produced, although Sony announced it will be stopping production in 2016. This is because even though VHS dominated the home market in the 80’s and 90’s Beta was widely used in the commercial sector and in some places may still be used. This would be broadcast studios, new studios, professional video editing businesses and such places.

I won’t go into details since specs can be easily looked up via Wikipedia but Betamax was known to deliver a better image quality then VHS and offer slightly higher resolution. This partially the reason it was embraced by professionals. Like VHS and SVHS, Beta was upgraded over time and in 1985 super betamax was introduced and eventually in 1988 Extended Definition Betamax which supposedly had a better resolution then even Laserdisc, reaching DVD like quality. Beta failed in the end despite arguably better image quality. It’s often cited that the price of player/recorders as well as a lesser recording length compared to VHS were the chief causes.

The player I have above is a Sony model SL-HF600 from 1985. This was a mid-high end player and retailed for $700-$1000. It featured the then new Super Betamax standard as well as various options such as frame by frame, slow motion and hi-fi audio. I picked this player up at Goodwill for a few bucks and I’m rather happy with it. It fired right up and played a tape without any issues.

beta2

beta3

Despite being slightly higher end the rear of the player isn’t to fancy and simply has composite video in/out as well as RCA stereo. There is also a switch for the hi-fi audio option.

beta4

Some months later at a swap meet I did come across a box of Beta tapes and a cleaning kit.

beta5

The tape I ended up buying for less then a dollar was a demo tape for Super Betamax. I assume this tape would be used for demonstration reasons in a storefront and looped to show off the new Super Betamax standard.

beta6

beta7

As you can see above, Beta tapes were quite similar to VHS but were overall smaller then their VHS counterpart. Likely another reason professionals like news cameramen may of favored them.

So should you buy a Beta player? well….no. If your really really into outdated video formats and can find one for a few bucks working then I guess so but honestly their use is pretty limited. The style is neat and they can offer better image quality over VHS but its hard to endorse Beta when Laserdisc is such a better option then Beta. LD’s are arguably “cooler” and many more movies and special feature editions of movies were leased on LD. Some films that still haven’t been brought to DVD or Blu ray have thier best versin on LD. yes Extended Definition Betamax introduced in 1988 did offer virtual DVD quality images but very few players with this capability were ever produced as it was marketed to professionals. I don’t even think from my research any commercial films were produced in ED Beta format. I haven’t been able to even find a single film that was only released in Beta format or only VHS/Beta but not any other format such as LD or DVD to justify owning a player. So in the end they are neat but hardly practical in usefulness terms to own, even for the retro enthusiast.

If you think I’m wrong please let me know in the comments. I always love hearing compelling reasons to make use of old tech.

colon8088

The Ultima and Wizardry series are heavy hitters of the early CRPG days and generally considered must plays for anyone even remotely interested in the early days of PC RPG’s. Unfortunately if you want a physical copy many of these early games are not only hard to find but also command a hefty price. Fortunately for us collections of both these series were compiled on CD-ROM in the late 90’s and although these collections also go for a hefty sums these days they still not only represent the better value but you have the piece of mind of having all the games on a convenient CD. But what about us purists that long for the experience of these games on early 1980’s 8088 based hardware from the time they were released? After all these collections were released in the era of Windows 9X and were surly expected to run under that environment. Are these collections of any use to us? Well friends, read on to find out.

Will start with Wizardry Archives.

wizarch

Wizardry Archives was released in CD-ROM format in 1998 and contained the first seven games in the series as well as Wizardry Gold. The original Wizardry games were released on 360kb floppies and were PC booter games. This means that no operating system such as DOS was needed. simply put the floppy into your machine and power on. When it comes to the Wizardry Archives there is good and bad news.

The bad news is you cannot copy the games from the CD to floppy and play them as you would an original copy. On the archives collection Wizardry 1 through 5 are broke into three files, wiz1.com, wiz1.dsk and a save1.dsk the wiz1.dsk is exactly 320kb, Wiz1.com 2kb and finally save1.dsk is 640kb. Obviously these files will no longer fit on a 360k floppy.

This is because the games in the archive, amusingly enough, have been officially modified with a 3rd party, gray-area software loader (wiz1.com) to run off of a hard drive which is very good news for us. The modified files automatically advance through prompts where switching disks would otherwise be required. Of course there is the negative of not being able to play as originally intended off a floppy disk but I myself think it’s a good trade off for the ability to play and save straight from a hard drive and have the greater reliability that comes with that medium. I wouldn’t want to trust a floppy disk these days with save data for an RPG you may of just dumped hours upon hours into.

Unless you have a CD-ROM drive installed in your early 80’s PC (unlikely) your going to need a method to transfer the files. Your also going to need a hard drive in your machine to copy the games to, obviously. This will likely be an MFM drive but there are more modern methods such as using a 8 bit IDE controller card and an IDE hard drive. There are several other methods to transfer the files such as via a network connection or ZIP drive (if you have a NEC V20 or later installed) but I prefer a 720kb floppy drive as it is a very easy method and chances are you already have one installed. If not I would advise installing a 720kb floppy drive to make things very easy. Almost all floppy controllers can recognize 720kb floppy drives. Also you can use the cheap and abundant 1.44mb floppy drives on a older controller and have it be seen automatically as a 720kb drive.

If your one of the lucky ones that have a high density 1.44mb floppy controller in your 8088, are using a 286 with a high density drive or are using a parallel port 1.44mb drive or one of the other methods mentioned you can skip this part but assuming most people will have a 720kb drive were going to need to ready a 720kn floppy disk. First off we need to ready a disk or two. If you don’t own any 3 1/3 inch 720kb disks, no problem as you can easily make a 1.44mb floppy into the 720kb sort by simply covering up a hole as depicted in the image below.

20151204_195427

The most common method is to tape over the hole. I use black electrical tape but even clear scotch tape will work. It also serves to mark which disks you have as 720kb formatted.

20151204_195341

So now that we have a disk ready we need to format it. This is very easy in Windows 95 and 98 as you can format disks for 720kb right through My Computer. Just insert the floppy disk, click on My Computer and then right click the floppy drive (likely A:) and you should be presented with a list of option. Click Format and then you should get a options screen and a pull down menu that allows you to format for 720kb.

w98f

This option however was removed from Windows XP and up so in this instance your going to need to use the command line interface to format your disk. Open a new command prompt by going to Start->run and typing CMD. Type Format A: /T:80 /N:9 and hit enter and that should do it. I haven’t tried this with Windows 7 and up but I’ve read it does work. Honestly I’ve never had luck with floppy drives and Windows 7 as they usually end up coming out corrupt.

w7cmdflop

The wizardry Archives breaks the games up into their own folders so once you have the game files on your floppy disk it’s just a matter of copying the files to your chosen PC’s hard drive via the COPY command.

That’s basically it. I made a folder called WIZ1 on my 4.77mhz 8088 PC and copied the first game there and it works like a charm. Just go into the file and run WIZ1 and it loads right up. Saving within the game works without issues as well. Now I haven’t tested the other games on the archives or tried transferring the party between games as you are required for Wizardry 1-3 but seeing as they are set up the same the process should be identical.

20150815_203549_LLSJust hit S and the game starts as normal bypassing all the Make Scenario Disk stuff.

I have played down to level three in Wizardry 1 so far and sunk well over ten hours into it without a single issue. The game runs as it should on my 4.77mhz 8088 which is the type of CPU that this game was originally intended for. I did try running the game in 10mhz turbo mode but all it does is speed the message screen up making it very difficult read information during a battle before it goes off screen. I never bothered playing the archives in a Windows  9X environment but I’m guessing theres some kind of slowdown utility included.

Now on to the Ultima Collection.

100_4439

The Ultima Collection was released on CD-ROM in 1997 and contained the first eight games in the Ultima series including several add-ons and the speech pack for Ultima VIII. All the games in the Ultima Collection as far as I can tell are unmodified in any way. These are not ports for Windows but the original DOS versions so for retro enthusiasts this is a boon as like the Wizardry Archives they will all have no issues running on period hardware. The collection does include a registered version of mo’slow to allow the games to run on faster computers but from what I’ve read Ultima VII and VIII are still virtually unplayable within Windows (though getting Ultima VII running even in DOS is a challenge and is going to be its own article).

I won’t go over again the transfer process but its basically the same as with the Wizardry archives and the games will run just fine on native era hardware for which each game was intended.

The collection includes Akalabeth which was retroactively named Ultima 0, being the very first, and primitive, Ultima game. This game was never given a DOS port and was only available on the Apple II cira 1971 – 1981. The version of Akalabeth that comes on the collection though requires a 32-bit DOS extender so will not run on a 8088 or a 286. It should run fine on a 486 or possibly a 386 but that’s about as close as you’ll get to Apple II era hardware. The game is slightly different from the Apple II version as it has color and basic midi as well as a title change to Ultima 0. It also plays much better and smoother then the original version. There is an unofficial bootleg port of Akalabeth though floating around on the internet that I’ve read will work on 8088 hardware for those interested.

akab4Playing the Ultima Collection version of Akalabeth on my Dell Dimension Pentium II PC.

Ultima Fan Upgrade Patches

That normally would be all I had to say about the Ultima Collection but I think its worth getting into the subject of fan upgrade patches. Generally I’m very picky about upgrade patches, After all why would I bother playing on original era hardware if I wanted anything but an “original” experience but in the case of the Ultima Collection I think the upgrade patches may be worth checking out for a few reason.

First off keep in mind that the Ultima 1 was not released for DOS until 1986 as Ultima I: The First Age of Darkness. This means that the first Ultima was actually released AFTER Ultima II through IV. This can be fairly jarring to retro computer game enthusiasts that are playing through the games in order as the 1986 DOS release of Ultima I was improved over the original and displayed in EGA graphics (as opposed to the rather ugly CGA of Ultima II & III DOS ports) and makes the earlier released Ultima II and III feel like pretty massive steps backwards.

100_8500

Ultima I from the Ultima Collection on my 8mhz 8086 machine

Ultima II released for DOS in 1982 especially looks bad in CGA in my opinion. There is also a map related bug in all CD versions including the Ultima Collection that makes the game unbeatable. Add this to a number of other bugs and I would say the DOS version of Ultima II included in the collection is unplayable. Thankfully an unofficial fan patch was made that converts the game to EGA but also corrects the map bug along with many other bugs.

Even being unofficial I would call this fan patch essential. It not only makes the game winnable but the EGA makeover brings the game more in line with the 1986 version of Ultima 1. Just compare below.

u2cgaOriginal CGA version

100_8591EGA fan upgrade patch

So does the upgrade patched version still run on original hardware? Absolutely.

I applied the patch prior then transferred the patched game to my 8mhz NEC V30 system and it ran without any issues. Interestingly enough though the patched game does seem to have some issues in Dosbox. The bump up to EGA does create a little more processing overhead so a 4.77mhz 8088 may run it a little slower then normal. As I stated I played through the entire game on a 8mhz NEC V30 machine and everything played just fine. I would recommend playing on such a machine or perhaps a 8088 or V20 in turbo mode (7.16mhz or 10mhz). You may need to split the game over several 720kb floppies if your transferring by that method as the file is a good bit larger then Wizardry.

The patch is available at The Exodus Project

The next fan patch I want to talk about is the upgrade patch for Ultima III released in 1983. This patch also works just fine on actual hardware. The U III patch fixes multiple bugs as the U II patch did but also introduces a wider degree of video modes for EGA to VGA and emulated color composite. The VGA mode looks pretty good but I stuck with EGA as to stay closest with the spirit of the era this game came out (even though EGA did not come out until 1984).

Another very cool feature this patch implements is music. The DOS version of Ultima III lacked any music, likely because there were no real PC sound cards to speak of in 1983. Computers like the C64 on the other hand had sound hardware built in and thus had music in there respective versions. What this patch does is take official Ultima III midi tunes from the Commodore 64 and Apple II versions and add them to the DOS port creating whats probably the definitive version. I have a sound blaster 1.5 installed in the machine running this game and it sounds great.

Speaking of CPU. Ultima III was ment to run on a 4.77mhz 8088 and the original CGA unpatched version runs fine on one but the EGA and sound of the patched version again take a toll on the CPU. With the patch installed I would definitely recommend a 286 running at least 10mhz. Even my V30 PC at 10mhz seemed just a little off and to slow so I had to install the game to my 20mhz 286 that downclocks to 10mhz via a turbo button.

The patch for Ultima III is available at The Exodus Project

There is an upgrade patch for Ultima IV but as of now I have not attempted to try it. This patch also adds music and this time upgrades the graphics to 256 color VGA. I don’t really find this patch nearly as necessary as the earlier patches and when I get to Ultima IV I probably will decline to use it.

This patch though unlike the others WILL NOT work in true DOS but requires Windows or DOSbox. well….sort off. There apparently is a pached version of the patch that does work in DOS but I have not tried it myself.

Ultima IV upgrade patch

Patched version of patch for real DOS mode play

Finally there is a upgrade patch for Ultima V which only adds music from the Apple II, Commodore 128 and Amiga versions to the DOS version. Again I have not tried this patch but it should work under true DOS.

Ultima V upgrade patch

And that concludes our look at the Wizardry Archives and Ultima Collection. Thankfully for us retro PC enthusiasts we do have a means through them to play these convenient collections of some great classic CRPG’s on real era hardware.

Previously I had written a post on pushing the limits of Socket 7 in this article. This time I’m going to explore pushing the limits of one of my favorite motherboard’s, the socket 3 board. Socket 3 motherboards were designed for the 486 CPU and represent a golden age of DOS from the early to mid-1990’s. Its no wonder then why many Retro computer enthusiasts cherish and focus on this era of PC gaming. As a matter of fact individuals attempting to see how far they can push the limits of motherboards meant for the venerable 486 is a rather popular topic in the hobby.

before I get into the article I want to point out that Feipoa, a user over at the Vogons forum wrote a very in-depth and well-researched post on the subject titled The Ultimate 486 Benchmark ComparisonThe point of this article though is to not only perform my own benchmarks and come to my own conclusions but to try and express the results in a simplified manner. As awesome and well done as the Vogons post is it is a little bit lengthy and technical and may come off as a bit overwhelming to a retro PC novice or casual user. Hopefully this article will be user-friendly and straight forward enough for the retro PC newbie as well as maybe even make for a good read to a more experienced PC user. I do encourage readers to check out the link above though if you want to read further on the subject.

First off were obviously going to need a socket 3 motherboard. In general if you’re pushing the limits of socket 3 your going to want late model boards and this means motherboards with PCI slots. PCI slot 486 motherboards can be expensive and in some cases buggy as manufacturers hadn’t completely figured out the PCI standard but it’s really your only choice for getting the most out of the higher end 4×86/5×86 CPU’s as it offers the most options in BIOS, CPU type support as well as allowing much higher speed PCI video cards to take advantage of the fast CPU.

For my testing I used a Shuttle-HOT 433 motherboard. These boards are known to be a little buggy but support a wide array of faster 486 and 586 CPU’s at higher front side bus settings.

shuthot1

For all tests I’ll be using this motherboard. I’m running 32MB of FPM RAM, 512kb 15ns l2 cache, 0 wait states with a memory timing of 2-2-2 and for the video I am using a PCI Matrox G200.

As a baseline CPU I’m using the Intel DX2 66mhz. I’m using this CPU as a baseline as it represents the quintessential 486 of the mid 90’s and was a widely used, capable and popular gaming CPU.

20150511_193627

Write-Back and Write-through memory

I also want to take a minute to talk about Write Back and Write Through memory. Starting from the 66mhz DX2 you start to see variants of chips using “Write-Back” cache such as this 66mhz DX2 below. The SX955 designates this CPU as the write-back variant.

20150521_163410

Without getting technical this type of memory is faster than standard “Write-through” memory. Generally you need to enable write-back via the BIOS configuration screen else it simply acts as write-through. The option should be available in most late socket 3 boards and look something like this.

20150925_132329_LLS

In my personal experience I haven’t noticed a huge performance jump using write-back but if you’re trying to get every ounce of performance it’s something to keep in mind. There are a few caveats to using write-back and that’s possible issues with stability much like with early EDO RAM usage. The other issue is most if not all VLB SCSI cards are incompatible with write-back settings. This means if you plan on using a  SCSI VLB card for a hard drive or CD-ROM drive your not going to be able to enable write-back cache as well. I believe I have read this has to do with bus mastering conflicts. I have read some SCSI controller cards may be compatible or have a jumper that needs set to enable compatibility with write-back cache but that is unconfirmed by myself.

High end socket 3 CPU choices

Alright, now let’s talk about your choices for a fast high-end CPU in socket 3 format. You actually have about three choices and that comes down to the Intel route the AMD route or the Cyrix route. They each have their own positives and minuses and each tackles the situation differently.

AMD 5×86

Will start by looking at the AMD 133mhz 5×86 CPU.

20150501_205855

This is the most common solution for turbocharging a socket 3 platform. The AMD 5×86 is fairly common and cheap. The name 5×86 is a bit of a lie though as this chip doesn’t have much in common with the other socket 3 5×86 chips were going to look at and is much more of a traditional 4×86 CPU. AMD’s approach was simply to turbocharge the 486 CPU and in this case they did very well. the AMD 5×86 is perhaps the mature height of the traditional 486 CPU. The image above is of an older variant that states that it requires heatsink and fan but later chips running cooler lack this requirement (though you probably should do it anyways). All AMD 5×86 chips regardless make excellent overclockers and can be overclocked to 160mhz fairly routinely by setting the front side bus to 40mhz. The AMD 5×86 at 133mhz is about equivalent to a 75mhz Pentium in speed (but not FPU functions). Overclocked to 160mhz it hovers more around a Pentium 90mhz in performance which is a significant speed boost for a socket 3 chip. remember a Pentium is superior in speed even when operating at the same clock frequency so a true Pentium 100mhz will blow an Intel 486 DX4 at 100mhz away. This chip overall is very compatible with socket 3 boards and generally runs very cool and stable even at 160mhz. I have read about a few instances of this chip being overclocked to 200mhz but this should be considered pretty advanced and nonroutine so is beyond the scope of the article.

The AMD 5×86 was produced for some time so labeling on the CPU itself differs depending on when it was made. On the far right is a later release of the chip with a year 2000 date code. Users have stated that they had better luck overclocking ADZ chips as opposed to the ADW labeled chips.

Cyrix 5×86

Next we have the Cyrix 120mhz 5×86 CPU

c5x86120

The Cyrix CPU is actually the polar opposite of the idea behind the AMD 5×86. Where the AMD chip takes a 486 and turbo charges it the Cyrix 5×86 takes their next generation 6×86 CPU and cuts it down disabling features to make it run stable on a socket 3 board. The Cyrix 100mhz chip is very common but the 120mhz chip as seen above is pretty rare. I was able to attain mine by luck off eBay about a year ago but have not seen any pop up since. There is also a 133mhz Cyrix 5×86 but this chip is very rare and for awhile it was doubted if it was even actually produced. Being that the 133mhz chip is rather unattainable we won’t be considering it for this article.

Unlike the AMD chip the Cyrix chip needs a little work to reach its full potential as programs can be obtained to re-enable some of the features that Cyrix disabled to help with stability issues. Re-enabling some of these features produces speed increases but in turn you may suffer stability wise. The only known motherboard to have built-in options to re-enable some Cyrix chip features (LINBRST and LSSER) is the infamous M919 motherboard otherwise you need to download and execute a program to reactivate these features. More information on these features and programs can be found here. I used the Peter Moss utility with my Cyrix chips and used these settings loop_en=off, rstk_en=on, lsser=off, fp_fast=on, btb_en=on while still achieving stability. your mileage may vary.

If you can’t find a 120mhz Cyrix chip there is still hope as IBM manufactured The Cyrix 5×86 under license. Due to IBM’s superior fabrication plants they were able to produce many chips rated at 100mhz that easily overclock to 120mhz. This is the chip I used for the benchmarks in this test.

20150501_202922

Though uncommon these chips turn up on places like eBay far more then the Cyrix branded 120mhz chips and many of them are easily able to overclock to 120mhz like the one above. Note that you probably will not have the same success in overclocking the Cyrix branded 100mhz 5×86 chips that seem to be common on eBay. A number of the IBM 5×86 chips may even overclock to 133mhz but mine did not and this is to considered less likely a case than not. Results with a 120mhz overclocked IBM chip should be equivalent to a true 120mhz Cyrix chip.

Intel Pentium Overdrive

Finally we have Intel’s offering which is a paired down Pentium processor modified to work in a socket 3 slot.

20150501_202946

This chip is possibly the most technically advanced of the upgrade paths but also the lowest clocked chip of the bunch coming in at 83mhz. I’ve read Intel tried to get a faster chip out there but ran into to many issues. You can overclock the Pentium Overdrive to 100mhz but it is not advisable. In my research most sources advised not to overclock the overdrive as it is a poor overclocker and is likely to damage the chip. For this reason the overclock should not be seen as routine so is not relevant to this article.

Despite the overdrive being restrained by the socket 3 architecture tests by HighTreason, another Vogons user, has shown that the 83mhz overdrive still outperforms a true Pentium 66mhz on a socket 4 motherboard in most tests. In my own comparisons benchmarks the Overdrive and Pentium 66 were fairly neck and neck each beating out the other in about half the bench tests but then I wasn’t using comparable video cards and such.

One advantage of the overdrive over the competition is its much superior floating point math processing in comparison to the AMD and the Cyrix. Its ability to take advantage of applications with optimized Pentium code is also a huge boon in some games and apps. Will see how this takes effect in the benchmarks.

The unrepresented chip

The one chip I wanted to include in testing but never got around to was Intel’s 100mhz DX4 if only because this was Intel’s last 486 chip. I doubt this chip would add too much to the tests though as its probably about equal to the Cyrix 100mhz 5×86 and a little faster than AMD’s 100mhz 486.

Benchmarks

And now that we’ve talked about the CPU options it’s on to the Benchmark tests. For the tests I’m using Phil’s benchmark’s which is a collection of four benchmark tests that include PCBench, 3DBench as well as time demos of DOOM and Quake.

Let’s look at the results via a bar graph, because I love graphs.

486cpugraph

As we can see the poor Intel dx2 66mhz lags behind in all respects but surprisingly in some tests like DOOM it actually fairs pretty well against the Cyrix 100mhz. The AMD 5×86 133mhz is fairly close in terms of performance to the 83mhz Pentium Overdrive while the Cyrix 5×86 120mhz and AMD 5×86 160mhz lead the pack. Overall the AMD overclocked at 160mhz beats out all other chips including the Cyrix 120mhz in all tests except 3dBench where it only lags behind the Cyrix by about 1 FPS. Notice that the Pentium Overdrive dominates in the Quake test beating all other chips. This can easily be explained as Quake relies heavily on the FPU math coprocessor and is optimized for Pentium code. I would assume though that if I had a 133mhz Cyrix 5×86 it may beat out the AMD 160mhz in all tests being top dog.

So my conclusion on the best chip to push the socket 3 platform to its limits? Well it depends a little bit. Without considering a Cyrix 133mhz chip the top dog is obviously the AMD 5×86 overclocked to 160mhz. The other great thing about this chip is its availability, low cost and solid stability even when overclocked. It would definitely be the first chip I would recommend.

The Cyrix definitely has a sort of “cool” factor but it does involve a little more fine tuning with enabling enhancements. due to the higher price, scarcer availability and more hassle I probably wouldn’t recommend going the Cyrix route unless you want to be different or if you don’t want to overclock and can find a true Cyrix 120mhz chip on the cheap. Again I think overall a Cyrix 133mhz would beat all competition but if it was me I would be afraid to run and wear out such a rare chip.

Last up we have the Pentium Overdrive which despite its slower clock puts up a valiant fight beating the Cyrix 100mhz in all tests and running a slight edge in general over the AMD 133mhz. Again, the motherboard compatibility with the PO is not going to be as good as the AMD but if you plan to play a lot of later DOS games or Win9x games that take advantage of Pentium coding such as Quake or Duke 3D this may be the way to go. Pentium OD chips aren’t too rare but are generally more pricey than the AMD chips or the Cyrix 100mhz chips.

In 1993 the Computer world was beginning a new era. The venerable 486 was ruling the roost and hard core PC gamers were enjoying 66mhz DX2’s and VLB bus video cards. A new era though was just around the corner featuring a world of improved 3d gaming and performance due to a new expansion slot type and a new CPU. This was the dawn of the Pentium.

This new generation of CPU’s named the Pentium (just a fancy name for Intels 5×86 chips brought about due to the fact Intel could not trademark a number) required a new socket type to support them. This socket was the socket 4. With the Pentium a new type of expansion bus was also starting to appear more and more. This was the PCI bus were all still familiar with today. The PCI bus was not exclusive to the Pentium and could be found on late model 486 motherboards but starting with socket 4 is when it began to be considered standard on motherboards.

Socket 4 supported only two chips. The first generation Pentium 60mhz and the 66mhz. Looking back they were a little underwhelming, expensive and always ran hot at 5 volts but they were the cutting edge in 1993 and they offered significantly better FPU (or floating point math) then the 486 chips which the new crop of 3D games would take advantage of. To compare, the original 66mhz Pentium was about equivalent to a 100mhz dx4 486 chip.

In this article I’m going to take a look at what would be a typical high end socket 4 build from about 1994, so pre-windows 95. Building a 94 period correct machine rather then a 93 one opens up many more possibilities since PCI really didn’t come into its own until 94. In 93 there weren’t a lot of PCI cards available and in all likelihood someone that splurged in 93 on a socket 4 board may of been stuck with a ISA video card for few months.

s41

s42

This would be a case very typical of the era. By this point the desktop form factor really seemed to be fading away as far as home computers go and a majority of new PC’s in homes were of the taller but usually less internally cramped tower design. Of course an IDE hard drive like the one I have installed was standard by now as well as the 1.44MB 3.5 inch floppy drive. A lot of machines from the era still had a legacy 5 1/4 inch 1.2mb floppy drive as well to support older software or games you were likely to still have from a previous 486 or 386. The CD-ROM drive was also starting to become standard fare now as more titles were being released in the format and popularity of the CD was bolstered from the hit game Myst that was released the year before in 1993 on CD-ROM.

The motherboard I’m using in this machine is a socket 4 Intel PM-900 with what I believe is the Mercury chipset. It still has many features that were more common with a 486 motherboard such as on board l2 cache and an AT style keyboard. It does feature three of the then cutting edge PCI expansion sockets and four older 16 bit ISA slots. To be honest I was initially surprised by the lack of features on this board. Even if it was a low end socket 4 board you would expect manufactures to want to go all out for something that at the time was an expensive state of the art board. a PS/2 mouse port or connector for a header would of been nice as well as on board IDE or floppy connection. Many of these things were even starting to show up on 486 boards of the time.

There are also some interesting peculiarities on this board such as the inclusion of a connector for a turbo led but no turbo switch. Instead of a jumper to select if your using the 60 or 66mhz CPU this board requires you to swap out the oscillator not unlike many 386 era boards. Also the board features jumpers for the PCI slots and these assigned IRQ’s. I have never noticed this on any board before.

s48

Taking a closer look

s43

1) CPU – The real star of the motherboard was the cutting edge Pentium processor. You had only two options with socket 4 and those were the two early P5 Pentiums that came in either 60mhz or 66mhz. Mine is the faster 66mhz. both these CPU’s ran at 5.0 volts when as all Pentiums after ran at 3.3 volts. You did have one option though for upgrade and those were the socket 4 Pentium overdrive chips. these chips would boost a P60 system to 120mhz and a 66mhz system up to 133mhz which is pretty significant. Unfortunately these overdrive chips are pretty uncommon and when found expensive. These upgrade chips also weren’t released until later in 95 or 96. The Pentium 66mhz is roughly comparable to a 100mhz dx 486 though with a superior FPU performance as I said earlier. These chips did noticeably outperform the gaming standard of the day which was the 486 66mhz DX2 but later 486’s like the 133mhz 5×86 from AMD with a Pentium rating of 75 easily beats the 66mhz Pentium in everything except Pentium optimized games or games that utilize FPU operations such as Quake. It has also been found that 83mhz Pentium overdrives used to upgrade 486 boards will also outperform a true Pentium 66mhz. to change the CPU from 60mhz to 66mhz or vise vera there is no jumper. you need to change the oscillator. The oscillator is obscured in the image above by the wires but its located above the CPU and to the right of the large chip under that bundle of wires.

s44

2) L2 cache – the on board L2-cache, all of the Pentiums up to the Pentium II lacked on chip L2 cache so as before L2 cache was accessed from the motherboard. The PM-900 supports up to 256k of L2 cache which is pretty standard for the time and the amount I have installed.

3) RAM – this board supports up to 192MB of 72 pin DRAM via six slots. As far as I can tell it does not support EDO RAM. Its a bit of an unusual number but 192MB would of been an outrageous amount of RAM for the time. I have a more conservative 32MB’s installed which would be more common for the time on very high end pimped out builds like this one. At the time though many machines still happily ran 8mb or 16MB’s so even this is overkill.

4) AT power connector

5) AT keyboard port

6) CMOS battery – this board uses the infamous Dallas real time clock. these clocks were basically lithium batteries in a hard plastic shell. Though they don’t have the same level of leaking risk as the old barrel batteries they are sometimes pretty annoying to replace. they can be hacked to allow for cheap and common lithium battery replacements.

Now I’m going to go over some expansion cards that would be pretty common for a machine of this type. I’m not going to talk about modems cards cause they bore the hell out of me but a PC of this era would usually have some sort of ISA or maybe PCI networking card or modem.

Multi I/O – since there is no IDE or floppy controller built into this particular board I needed a I/O controller. This is the one that came with my board. Its a Winbond chip based card and nothing special but it gets the job done for floppy and IDE support as well as giving me a serial and parallel port.

s46

Video – The choice of early PCI video cards seems to come down to two brands, ATI and S3. You also need to ask whats more important to your specific built. DOS performance or Windows (3.1) performance. Some cards are better in DOS and some Windows. The ATI mach64 supposedly was released in 94 but all the cards I found had a BIOS date of 1995. This left me with a PCI ATI Mach32 and an S3 Vision 864. after some benchmarks the 2MB Vision 864 did come out ahead in DOS but I never tested in Windows. The Vision 864 like the trio that would come later was a great card for the time offering excellent compatibility with games and other software. Other options are the venerable et4000 which should of had an early PCI version available.

s45

Sound – There are a multitude of option for sound such as the PAS16, Adlib gold or Gravis Ultrasound that were out in 94 but all of said cards are rare and expensive. The sound Blaster 16 line on the other hand was widely available and almost all games supported it. My board came with Acer Magic S30 which is just a SB16 that used a early version of the Vibra chip. This card has a real OPL FM chip, some various CD drive headers as well as a wavetable connector for a daughter board. Its not as fancy as the other cards but its a hell of a lot cheaper and just about everything supports it. This card does suffer from the “hanging midi” bug though. I should point out on this build I actually am using the on card controller of this sound card to run my CD-ROM drive.

s47

So, is a socket 4 machine worth it to collect now and was it worth it back then. To address the second question first, No. The Pentium 60 and 66mhz were insanely expensive when they were first introduced. Throw in the fact they ran hot and were fairly unreliable and they just weren’t smart buys, even with the power boost. Consumers were far better off waiting for a 100mhz DX4 or better yet a AMD 133mhz 5×86. Many early software wasn’t yet optimized for the Pentium or took advantage of its superior FPU abilities that only later 3D games like Quake would heavily use. Now are they worth having presently as part of a retro PC collection, maybe. The price of these CPU’s and motherboards keeps creeping up as they become more and more rare. For practical use though in an actual running retro game PC there more of a novelty and best avoided. A retro gamer is far far better off with building a socket 5 or 7 machine as those Pentiums are more powerful, cheaper, and far more reliable then the socket 4 types.

s49

benchmarks Pentium 66mhz, 256kb l2 cache write-through, 32mb fpm RAM, s3 Vision 868 2MB

3DBENCH – 56.4 FPS

PCPBENCH – 17.6 FPS

DOOM – 37.78 FPS

Quake – 14.1 FPS

same setup with a ATI Mach32 1MB

3DBENCH – 49.0 FPS

PCPBENCH – 16.7 FPS

DOOM – 36.03 FPS

Quake – 13.6 FPS

Pentium 66mhz, 256kb l2 cache write-back, 32mb fpm RAM, ET6000 4mb

3DBENCH – N/A

PCPBENCH – 18.3 FPS

DOOM – 40.6 FPS

Quake – 14.8 FPS

FDISKformat

A place for the pc collector

I ❤ Old Games!

Probabilmente il miglior blog bilingue al mondo*

Waltorious Writes About Games

Game-related ramblings.

NekoJonez's Gaming Blog

My Gaming Timeline

Evelynn Star

Lynn talks about video games, records and books ...

Retro Megabit

Sharing My Retro Video Game Collection.

133MHz's Junk Box

Random electronics and gaming crap

SNES A Day

Chronogaming project featuring reviews, screenshots, and videos of the entire Super Nintendo library in release order.

Retrocosm's Vintage Computing, Tech & Scale RC Blog

Random mutterings on retro computing, music, plus radio controlled scale modelling.

The PewPew Diaries.

Work(s) in Progress!

1001Up

1001 video games and beyond

retro computing and gaming plus a little more

sparcie

retro computers and stuff

jispylicious

Stay Jispy!