
Yoga pose of the Month
Downward facing dog - Adho Mukha Svanasana
It's the most common pose in the Yoga world, even people who don't do Yoga have probably heard of it! You will be hard pressed to find a Yoga Class that doesn't have at least one instance of this pose, and for good reasons! It seems quite straight forward, yet there are a few tricks to nailing this "resting" pose. Yes I do promise, with practice and consistency, this can actually be a resting pose!
Benefits
It stretches back of the legs, feet and ankles.
Strengthens the hands, arms, shoulders, and legs.
Gives you similar benefits to inversions, such as lengthening and decompressing your spine - without the scariness of being fully upside down!
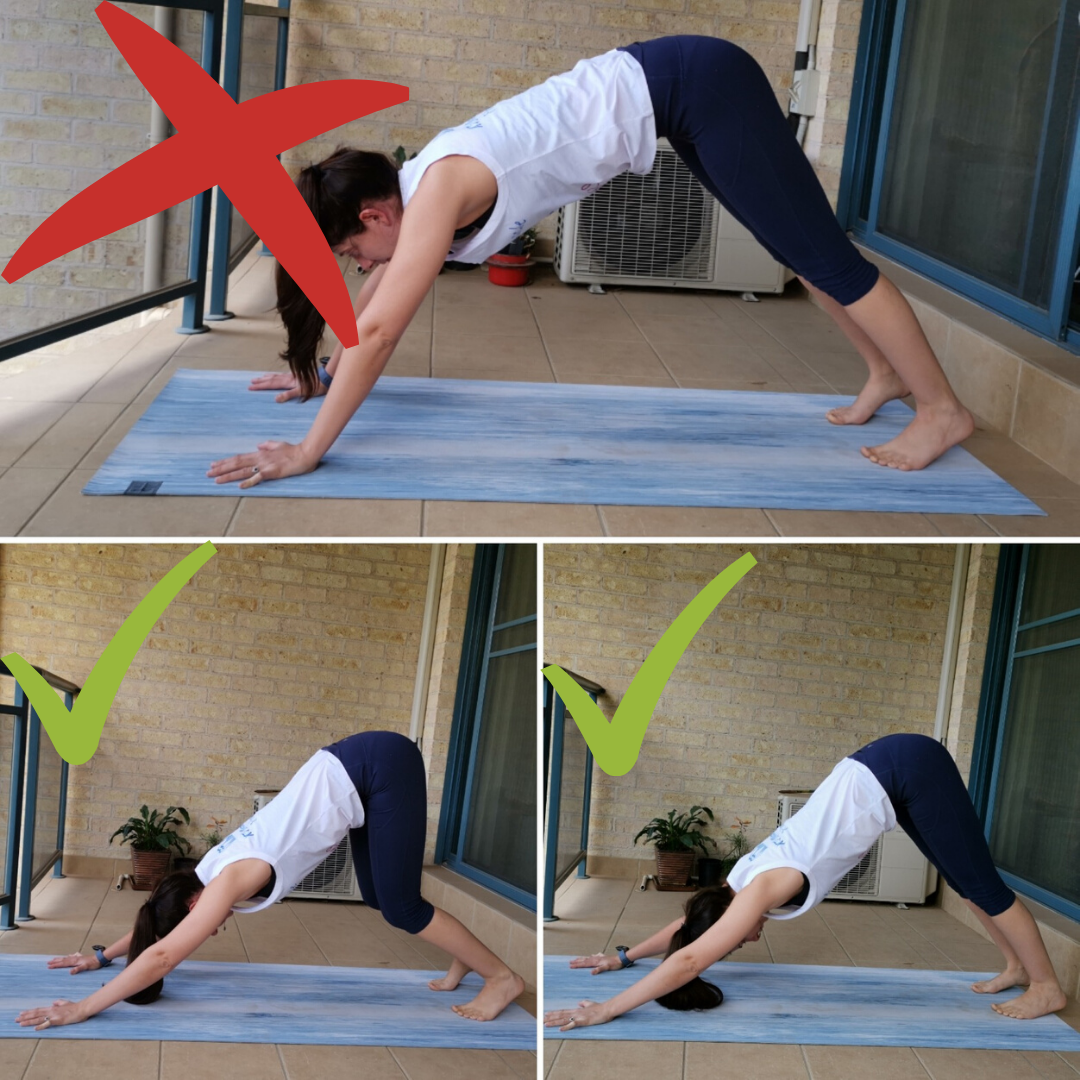
Downward Facing Dog
Am I doing it right? Stretch, strengthen, and lengthen - all in one common pose!
How to
Start in table top pose, on hands and knees, with hands positioned underneath shoulders, and knees stacked underneath hips.
Bring awareness and strength into your hands, arms, and shoulders - don’t let your weight collapse into your shoulders or wrists, activate from the base of your fingers up into your upper back between shoulder blades - pushing/lifting up.
Maintaining that strength and awareness, inhale and move both hands about one palm’s length forward, so your hands are in front of your shoulders, and tuck your toes so the balls of your feet are pushing into the ground.
Exhale and lift your hips up and back, start by keeping a gentle bend through your knees, and don’t worry if your heels don’t find the ground. Keep your spine lengthened, hands, arms, and shoulders activated, imagine forming a straight line from your hands all the way up and back to your hips.
It is more important to focus on your spinal alignment and creating a long, neutral spine, so bend your knees as much as necessary to find that position first, and then focus on lengthening through your legs. Be patient, and be kind to yourself, we all start somewhere.
Once you have found your spinal alignment, from here maybe your legs will straighten and your heels will sink down into the ground - maybe they wont. Maybe they will continue to have a soft bend in the knee, as long as you are maintaining the integrity of your spinal alignment, and can straighten your legs enough to feel a gentle stretch through the back of your legs you are nailing it!
Keep pushing up and back through your fingers, shoulders, and hips.
Breathe deeply, opening up through your chest and relaxing through your neck, your gaze can be focused roughly to the centre of your mat, ensuring your neck is long and lengthened along with your spine.
Hold for 5 breaths
As you exhale, bend your knees and release back into table top pose. Give your wrists a nice stretch!
Common mistakes
Sinking your weight into your wrists or letting your shoulders collapse down. Quick fix: stay strong through your hands, arms, shoulders and upper back.
Having too much weight forward over your hands/shoulders. Quick fix: send your hips further back and lift up, bend your knees to avoid rounding through your spine.
Rounding through your spine. Quick fix: bend your knees, lengthen and straighten out of your spine first, lift hips back and up, then focus on lengthening legs.
Pressure in lower back/arched back. Quick fix: if your shoulders are quite flexible, don’t let your chest sink down too low. Aim for a neutral spine, engage muscles through your core and shoulders/upper back, aiming for a long, lengthened spine.
Modifications
If you have sensitive wrists/forearms, this can be a great way to build up strength, but don’t over do it! Hold for a shorter time, and repeat a few times, shaking out your hands between downward dogs. Give them a good stretch afterwards!
You can modify by placing a wedge, blocks, or a thick towel underneath your hands/wrists to decrease the pressure and angle required on the wrists.
Another modification is Dolphin Pose, by dropping down onto your forearms instead of your wrists. Very similar pose with the same principle alignment goals. Dropdown onto forearms instead of wrists and follow same steps as above.
As always, stop immediately and gently come out of the pose if there is any pain or discomfort and seek advice from your healthcare professionals if any pain persists.
Do you have questions? I want to hear them!
I love talking/teaching/demonstrating all things Yoga, stretching and alignment - in fact I'm a bit obsessed! Feel free to always ask questions at the end of class (usually you are not the only one thinking the same thing!), leave a comment, or contact me anytime here.