

Introduction: From 3d Model to Papermodel


Hello guys. My name is Thomas Truong (also known a Hacaosuka_Designs on social media) and im a papermodelist. About a few months ago I was asked by someone to make a paper version of their car. Now seeing this car I was blown away about how great it looked and I couldnt refuse to make it. This client was all the way from America and during the build, I also had to find a way to send it without it being crushed or damaged.
Step 1: Find Images for Reference

Recreating the car was quite difficult since there weren't any blueprints on the internet avaliable. Luckilly I was able to talk to the owner and ask for him for some image of the car. Many images from Front, Side, Back and close up of smaller details that the owner wanted included on the papemodel.
Step 2: Setting Up for Build

The program I am using for making the 3d model is Google Sketchup. Since program was free and reliable, I knew this was the best way to go for me. Only using the side image of the car, I drew around the border of the car to make a cutout and to make it much easier to make the model. I was able to use the image also to try out the texture to see what it would have looked like coloured. The model is 3d model is made of lines. And when the lines have connected to form a shape these a called polygons. Basically the lesser the polygons, the easier the papermodel is going to be to build. Also only build half of the car first. You can duplicate it later on for it to be symmetrical and also to help you to build the 3d model much faster.
Step 3: Build the 3d Model

Using some of the images I got from the owner, I tried to recreate and add as much detail as I could. Also giving me an image of how wide the car would be. Even with the reference images from the owner, you would still have to go on google images to find some more images from different angles.I needed the images to help me make the hood (Part that covers the engine on top) and also the front mirrors.
Step 4: Texturing


I was able to get a copy of the actual file of the livery of the car and use that in my build. But a few stickers I had to recreate myself. Some other smaller details as the lights were from the images that were sent to me as reference and the badge which I was able to use as the texture. Sketchup has a very useful function which duplicates the texture and place it specifically to where it should be (Its hard to explain.LOL). It also has the paintbucket which paints a part whatever colour you want. Very useful. haha. But sometimes, sketchup doesnt have the right colour configuration. This is when you use photoshop or any photo editting program to create the colour and save it as the texture C:
Step 5: Finalizing Before Unfolding


Finally finish up the model adding the details you want and add the texture you have created. I had to change the colour a bit to owner specifications and I agree. It looks very nice in this shade of blue. Apart from that I created the wheels also and then add some support under and inside the model. Any then finally, Export the model into an OBJ or DAE file for unfolding.
Step 6: Unfolding in Pepakura

Ok. Heres the fun part (ish...) unfolding the model in a program called Pepakura Designer/Viewer.
Heres the link to download the program\/
http://www.tamasoft.co.jp/pepakura-en/download/get...
Really Without this program, Papermodel/craft would be very difficult and you wouldn't be seeing alot if not any at all. Well thank god and the person for creating this program for making all of this possible! Haha. Anyways, start by exporting the file to the program. And then press unfold. The parts would be spread apart into templates. (NOT DIRECTLY INTO THE TEMPLATES CLEARED UP LIKE IN THE IMAGES). The templates would look completely scrambled and you would have to fix up that mess by clearing the parts up. Many of the features you would have to do is connecting and disconnecting parts in order to make it much easier to build the model, Rotating to make it fit the paper and making the flaps(The part that makes the papers connect together.The triangle parts) where you want them and then finally scaling the model to make it the the scale and size you want your model.
Step 7: Adding Any Details/texure You Have Missed During 3d Building Process


Alright before printing out we need to finalize and check over the templates to make sure there are no flaws. Also this is now when I need to use photoshop to add any extra detail I need to visually and to make sure that you are not missing any flaps to make sure the papermodel would be easilly built.
Step 8: Print the Templates Out! C;

Ok. So my printer is not the best nor the newest. Its about 7 years old but its still pretty reliable.(I need a new one already. damn it.) Anyways I'm using 180 gsm cardstock paper for this project. About 25 pages has been printed and its ready to be built!. LETS GO!!!
Step 9: CUT, FOLD AND STICK TOGETHER

Alright were almost there. Now before we start cutting you may need these materials. Paper cutting knife, A pair of scissors, tweezers,a long metal ruler, a few toothpicks, some scrap paper, black marker, cutting mat, glue (recommend tacky craft glue) and finally some earphones and music C; You would want some music to relax you while building it. Other wise you will get tired (This is from experience. Haha) First you want to have the paper on the cutting board. Make sure the surface is flat. Then get your knife and cut around your desired part also around the flaps. Then fold the flaps to either backwards or forwards. If it is dotted lines, this part is where you fold backwards and if its straight cut up lines, this is when you fold forwards. Cut one piece at a time and try not have too many at once otherwise you will start loosing and forget where which part goes. Pour some glue (not too much) onto some scrap paper and use a toothpick to collect and apply to the folds. Apply pressure from the flap to the template to let it stick together and then repeat for the rest of the parts. For any parts you need curved you can also use a pen or a a marker. The ruler is used to cut straight lines and also to score the flaps. To score, You would need to get a a knife and go over the line of the fold trying not to apply too much pressure so that the flap doesnt get cut off. And finally, The marker is used to colour in any white edges If you want to give it a more detailed approach.
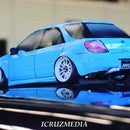
Step 10: Final Result


Ok. I could have done a better job but here it is the finished result! about 60 cm long and 20 cm high. Very big model haha. Apart from that I just added some clear spray to clear things up (no puns intended) and making it waterproof and much more durable. The car has been sent out and will arrive soon!! Anyways hope you guys enjoy reading the about the build and hopefully I have inspire you guys enough to try this hobby!!! Please if you enjoy my work follow me on Instagram @Hacaosuka_Designs and my Facebook page Hacaosuka Design. Also If you have enjoyed the whole process please vote for me as the prizes will help me with my future work! This is Thomas and PEACE OUT!!! C;

Participated in the
Papercraft Contest 2017


