Quantcast
| Almanac.com
Caption

Glowing noctilucent clouds

Photo Credit
NASA
Subhead

Summer brings noctilucent or night-shining clouds

Print Friendly and PDF

It’s noctilucent cloud season! These “night-shining” clouds glow electric-blue when most of the sky has grown dark. Learn how to view summer’s noctilucent clouds!

What are noctilucent clouds?

If you look up and see ripples in gleaming silver and blue across the night sky, these are Earth’s highest clouds. They look alien—resembling something from another world. And that’s not far off. Would you believe: they are literally frosted meteor smoke formed by meteor dust! Yes, they come from outer space!

In the Northern Hemisphere, noctilucent clouds (NLCs) will appear in summer. Usually, noctilucent clouds are restricted to the most northern skies, but some years, they reach all the way to Middle America.

When meteors burn up in the upper atmosphere, they leave dust, like smoke. When the hot moist air of summer meets the cold dust from outer space, roughly 50 miles high in the atmosphere, clouds form. When the light from the rising or setting sun hits these sheets of icy smoke, it glows an eerie blue and seems to ripple like waves across the skies.

noc_clouds_full_width.jpgNoctilucent Clouds seen from Alaska, 2006. Credit: NASA

More Facts About Noctilucent Clouds

  • Noctilucent clouds or NLCs are Earth’s highest clouds in the sky, literally glowing at the edge of space in the atmosphere’s mesosphere layer, a high cold layer that is, according to NASA, “one hundred million times dryer than air from the Sahara desert.” 
  • They are the newest of all the clouds that we observe. They were first seen in 1885, after the famous explosion of Krakatoa volcano. The volcanic dust filtered out incoming sunlight, forming gorgeous fire-red sunsets. Watching sunsets became an international fad. Then, scientists noticed that after the sunset, mysterious glowing blue clouds began to spread through the skies.
  • Strangely, even after Krakatoa’s volcanic debris settled, the clouds remained. Indeed they spread. Originally, they could only be seen in the most northern skies of Canada, Europe and Siberia. Now you can see them in the night skies of Colorado and Virginia. No one knows why they are spreading.

glowing-clouds.jpg
Image: The glowing clouds are formed when the light from the setting or rising sun strikes the icy clouds floating high in the atmosphere. Source: NASA and the Naval Research Laboratory, Washington, D.C.

More About How Noctilucent Clouds Form

Clouds are made of water and particles. In the lower atmosphere, water molecules attach to the dust in the air and form droplets. As these droplets float through the sky, too light to fall, they collect into clouds. Scientists were mystified. How could dust get fifty miles high into the air?

It was recent data from NASA’s AIM spacecraft that discovered this dust is from outer space. As meteors plunge into Earth’s atmosphere, they burn up. Only a few reach the surface of the Earth. The bits of “meteor smoke”, the microscopic dust, floats in the dry upper atmosphere, slowly collecting water molecules and forming ice crystals smaller than the particles in cigarette smoke.

They only form in summer, when hot moist air rises and a few, very few, water molecules rise high enough to cling to the drifting space dust. Then they form glittering sheets of ice, reflecting the lights of the setting sun with an eerie glittering blue light.

noctilucent-clouds-2_full_width.jpg

Noctilucent clouds as seen from space by astronauts aboard the International Space Station (ISS) in 2013.

The Krakatoa Volcano of 1885

The first time scientists ever record seeing noctilucent clouds was in 1885, after the famous explosion of Krakatoa volcano. The volcanic dust filtered out incoming sunlight, forming gorgeous fire-red sunsets. Watching sunsets became an international fad. Then, scientists noticed that after the sun set, mysterious glowing blue clouds began to spread through the skies.

Strangely, even after Krakatoa’s volcanic debris settled, the clouds remained. Indeed, they have spread south. Originally, they were seen only in the most northern skies of Canada, Europe and Siberia. Now you can see them in the night skies of Colorado and Virginia. No one knows why they are spreading.

How to View Noctilucent Clouds

Normally, you do need to live at a relatively high latitude on Earth to see them: between about 45° and 60° North or South latitude. In North America, this covers Canada plus the northern-tier Unites States including parts Washington, Oregon, Montana, Idaho, Minnesota, North Dakota, Michigan, Wisconsin, North Dakota, New York, Vermont, New Hampshire, and Maine. However, there have been years when these clouds will reach mid-America, particularly in days following the solstice.

From June through August, look towards the west 30 to 60 minutes after sunset. Noctilucent clouds are primarily visible when the sun is just below the horizon because the sunlight can still illuminate these high-altitude clouds, causing them to shine in the night sky. If you are lucky, you will see the rarest clouds on Earth. But even if you don’t live at these latitudes, it’s pretty cool to discover there are luminous blue-white clouds that come from outer space.

Learn more about basic types of clouds.

Subhead

Some beautiful flowers that come in orange!

Print Friendly and PDF

Add vibrance to your garden with orange flowers! I didn’t expect to be an orange fan, but these bright beauties lit up the dark or drab corners of the garden and made me smile. Plus, they’re hummingbird magnets! See my top orange flower picks.

I used to be a snob of sorts when it came to my garden palette, preferring cool blues and purples mixed with pinks, white, and pale yellow. I had very little red and no orange, thank you—except for the tawny daylilies.

orange_014_full_width.jpg
Orange daylilies.

There were just too many of them to even think about replacing them with another color. When seed shopping, I would avoid any description that could be interpreted as orange. You know how they like to trick us by calling a flower apricot, tangerine, salmon, or peach.

They rarely use the “o” word but when that flower blooms there is no other way to describe it—it is orange.

orange_005_full_width.jpg
Orange impatiens

A few years ago, we were left with all the orange impatiens out of a mixed color package we grew to sell. It seemed that no one else liked orange either so I was stuck with them. Not one to waste a perfectly good plant —or, in this case about 2 dozen good plants—I set about potting them up in containers to place in shady spots around my yard.

orange_016_full_width.jpg

I made the best of a bad situation by combining them with some splashy coleus, bright orange flowering begonias, and an odd orange flowering fuchsia to light up the dark corners. I figured that if I hated them at least they were sort of hidden. Instead, those colors drew the eye right to them, jazzing up my drab side porch and they were a magnet for hummingbirds. I fell in love with the look and I am proud to say that I am no longer shy about using orange in my garden.

orange_022_full_width.jpg
Pops of orange color jazz up the porch

On the hot side of the color wheel, red, red-orange, orange, yellow-orange, and yellow are next to each other. This is called analogous. Since they share some of their color with their neighbor, they connect well in the garden and can actually create a harmonious look. By planting flowers that bloom in those color ranges as accents, we can add warmth and excitement to an uneventful garden scene but you don’t want to have too much.

I have never seen a garden that was totally reds and oranges but I think it would be exhausting! Our eyes need a rest to be able to enjoy the brights. Foliage colors can help to calm the excitement. Silver leaves, gray-greens, purple, and dark green provide contrast and plants with white or blue flowers have a cooling effect. You can use flowers just like paints to create an interesting picture.

Oriental poppies are always exciting—the first spark of flaming orange to appear in our perennial bed.

orange_027_full_width.jpg
Butterfly weed is beloved by pollinators

Asclepias, the butterfly weed, draws not only butterflies from far and wide but also a variety of beneficial insects to its yellow and orange blossoms.

orange_007_full_width.jpg

Gazania, Asiatic lilies, daylilies, dahlias, crocosmia, glads, and cannas come in some of the brightest shades of orange.

orange_006_full_width.jpg

Marigolds, zinnias, calendula, nasturtiums, and snapdragons are annuals that can bring a touch of the tropics to a boring garden.

orange_017_full_width.jpg

It has been a cool rainy summer so far for us, so in an effort to heat things up, at least visually, this is the summer to add some sizzling color. Time to crank it up a notch!

Enjoy browsing flowers in the Almanac Flower Guide. Here are flowering plants that come in orange colors!

Photo Credit
Jean Faucett/shutterstock
Subhead

Tomato Woes!

Print Friendly and PDF

I say “tomayto” and you say “tomahto,” but however you say it, tomato time is here! Along with the luscious fruits that we gardeners await, we have the tomato disorders and diseases that the flesh is heir to—tomato flesh, that is.

Blossom-End Rot

In my area, we have had enough rainfall this summer so no problems with blossom-end rot this year. This usually begins as a sunken spot on the blossom end of the fruit which turns black and leathery as it grows larger. Often you don’t notice it until you go to pick the tomato and find that the bottom half has rotted away—not a nice surprise!

It is a physiological disorder rather than a disease caused when the plant has trouble extracting enough calcium from the soil because moisture levels are too high or too low. There can be plenty of calcium in the soil but the plants are incapable of utilizing it properly. Stressed plants divert the little calcium they have away from the fruit and send it to the shoots to keep them growing. Along with uneven moisture, excessive nitrogen and high soil acidity can contribute to blossom end rot.

To prevent blossom-end rot from happening, ensure your soil is rich in calcium. Many “tomato toners” fertilizers include extra calcium. Also, eggshells are full of calcium, making them very handy for your tomato plants.

  • First sterilize the eggshells by popping them into a warm oven for 20 minutes, or microwave on full power for two minutes. Crush them up then add them in and around your planting holes. Shells take a while to break down, but you can speed this along by grinding them up to increase the surface area, or even dissolving the grounds in water to water on at planting time. Aim for about two eggshells per plant. Often, though, the simple reason behind blossom end rot is irregular watering, which makes it harder for the plants to absorb all the nutrients they need.

Also, mulch your plants to keep the area around the roots consistently moist. See more about blossom-end rot solutions.

Early Blight

Early blight is the most common tomato disease.

tomatoes_002_full_width.jpg

It is a fungus that begins on the lower leaves as brown spots which enlarge into concentric rings like a bull’s eye. Eventually they get bigger and run together.

tomatoes_004_full_width.jpg

The lower leaves turn yellow and drop off, usually without affecting the fruit.

tomatoes_007_full_width.jpg

Sometimes dark patches will appear on the plant stems and on the stem end of the fruit. We have one ‘Early Goliath’ plant that shows signs of early blight but it soldiers on, has plenty of tomatoes forming (only one of those had stem end rot), and it keeps on blossoming. I keep plucking off the infected lower leaves and it continues to grow so for now it stays. I may regret that decision later.

Late Blight

Late blight is terminal.

tomato-608290_1920_full_width.jpg

One year we got it early in the season and watched helplessly as it turned all the plants and fruits to disgusting mush, practically overnight. You can track the spread of late blight across the country at the website usablight.org.

Avoid blight by giving your tomatoes good air flow and water at the base of plants to avoid wetting the leaves. Many gardeners even remove the lowest leaves specifically to improve airflow and minimize splashback when watering. Keep tomatoes off the ground. Laying a mulch of clean, dry organic matter such as straw can also reduce splashback. 

Also, choose blight-resistant tomatoes next year! Though most of the varieties we grow are heirlooms, we also grow some hybrid tomatoes for their disease resistance. We are trying ‘Mountain Magic’ this year which is bred to resist both early and late blight.

Anthracnose And Fungal Diseases

Anthracnose damages just the fruit with its 1/4 to 1/2 inch spots. Septoria is another fungus causing small brown spots with black centers to appear on the older leaves. Eventually they turn yellow and fall off. To prevent all fungal diseases be scrupulous when cleaning up plant debris in the fall. All old leaves and fruit, especially those that were affected by disease should be removed from the garden and disposed of in the trash rather going to the compost pile.

Wilts

Many tomato varieties are bred for disease resistance. Verticillium and fusarium are two wilt-causing diseases that have no cure. When shopping for tomato seed, look for the letters V and F after the variety name indicating resistance to those diseases.

Other letters are code for tolerance to other diseases: an A means the plant is resistant to alternaria, LB stands for late blight, EB early blight, N is for nematodes, T is tobacco mosaic virus, St is stemphylium leaf spot, Tswv is tomato spotted wilt virus, and Tylc is tomato yellow leaf curl virus.

Watering and Feeding Tomatoes

You may have noticed that many diseases come back to watering properly. With tomatoes, aim for consistent moisture as plants are establishing.

But once tomatoes begin to set fruit, let the soil just-about dry out between waterings. It’s okay for the foliage to show early signs of wilting before watering, but don’t push it too far. Inconsistent watering (seesawing between dust-dry then sodden soil) encourages water to rush into the fruits when it’s applied, causing them to split. The best time to water is in the morning, when plants are at their most receptive to moisture.

Of course, the tastiest tomatoes are gleaned from plants that have access to all the nutrients they need. Add slow-release organic fertilizer to the soil at planting time, or apply regular liquid feeds using a product specifically formulated for tomatoes. Feeding tomatoes should also avoid problems with blossom end rot,.

With all that can befall a tomato plant from the time of germination to the picking of the first ripe tomato, you might think that it’s a miracle that we get any fruit at all! However, growing tomatoes is all about avoiding some common pitfalls that can trip you up along the way. Knowing what to expect and what to do about it will greatly improve your chances of a truly terrific crop of tomatoes.


See our video on troubleshooting MORE tomato problems.
The Almanac’s Tomato Growing Guide has more information about pests and problems.

Photo Credit
Anne Richard/Shutterstock
Subhead

Natural fences made of stumps, logs, brush, stone, and plants

J. Almus Russell
Print Friendly and PDF

Most of the early American fences were made of natural material—brush, logs, stumps, plants, and stone. Many folks are rediscovering these vintage fence ideas. Take a look at 8 traditional fences and tell us what you think!

1. Brush Fence

Did you know that the first American fences of record were built of brush? A thicket of small to medium-size trees was required. These were felled and then stacked. As the trees overlapped one another, an impenetrable mass was formed, several feet wide and many feet tall.


Credit:Anela.k/Shutterstock

Brushwood fences were probably one of the earliest fence types constructed in Japan. Today, people are rediscovering this ancient, eco-friendly fencing style as a natural backdrop using undergrowth, twigs, tips and small branches. . 


Today’s brush fences tend to be somewhat more decorative and may have tree branches in vertical or horizontal positions

2. Stump Fence

Stump fences are often found near a woodlot because they are constructed from one. Once built, they are horse high, bull-strong, and pig-tight—as difficult to get through as living hedges. These fences are made from tree stumps: Roots are cut off the sides of each stump and saved for possible use. Then stumps are laid flat, or trunk cut side down, with roots in the air. They are placed close together, along the fence line. Any gap between the stumps is chinked with the remaining (cutoff) roots.

If the lumber can be spared, stump fences can be made of logs cut from tree trunks to the same length and set upright on the fence line.


Photo: “A New England stump fence,” ca. 1890-1901, by Detroit Publishing Co., via Library of Congress Prints and Photographs Division.

Today, there are many ways to use tree stumps to create natural fencing.

Credit: Ekaterina/Shutterstock

3. Snake Fence

A snake fence is also known as a split-rail zigzag fence or Virginia fence. They were built of split rails that were laid in a zig-zag fashion. Rails, split medium-size logs, or saplings are placed one on top of each other at an angle, intersecting at each end. A pair of long stakes driven into the ground at the end of each intersection holds the fences upright.

-warren_price_photography_shutterstock_va_fence_full_width.jpgSnake Fence. Photo credit: Warren Price Photography Shutterstock

4. Basket-Weave Fence

This style of fence is highly decorative. Measurements are especially important in erecting this fence. For DIYers, proper materials would include 4-inch-square hardwood posts; smaller support posts half the diameter and of the same length; plus 10-foot-long, 6-inch-wide, 1/2-inch-thick boards of matching length (these are woven between the uprights). The posts—especially the ends of them—should be treated to prevent rot after being set in the ground. Boards should be woven as close as possible for protection and privacy.

basket_weave_fence.jpg

5. Picket Fence

In Colonial times, picket fences became a symbol of America. They were originally rough pointed sticks to defend and also demarcate land. Anyone could gather the wood to create their own fences on new homesteads. Over time, picket fences represented the pride of home ownership and allowed families to keep children and pets safe, while also remaining neighborly. Colonial fences were made with a mixture of lime and water to protected the wood—and gave the fences that traditional white color.

Wooden picket fences are often of elaborate workmanship. Pieces are usually made to order from raw stock and prepped for paint—but not painted—before assembly. Because of the detail and time involved in creating them and the ensuing costs, original wood picket fences are seldom erected today.

maria_dryfhout_shutterstock_picket_fence_full_width.jpgPicket Fence. Photo credit: Maria Dryfhout Shutterstock

6. Tenter Fence

More drying rack than true barrier or enclosure, this form gave rise to the expression “to be on tenterhooks,” meaning to be anxious. It is constructed with 8-foot posts stuck 2 feet deep into the ground about 4 feet apart. Smoothed rails are nailed into the posts horizontally at the top, the middle, and a foot or two above the ground. At regular intervals, tenterhooks are screwed into the top and bottom railings.

Predressed woolen cloth is hooked to the upper railing, then stretched down and hung on the lower hooks. There it would dry into preshrunken goods. The procedure keeps the cloth from overshrinking. For a longer-term, decorative alternative, attach grommets to a piece of canvas (or similar suitable fabric) and hang it on the hooks.

7. Stone Fences

In regions abundant with natural stones and rocks, farmers would need to remove the stones from the field to clear it for plowing. This was especially true in New England’s glacier-formed topography which meant a wealth of fieldstone.

This gave rise to stone walls or fences which also separated their fields for livestock and crops. They were traditionally about 3-feet high and very durable. Every year, the farmers would walk the fields to replace loose stones. Later, some stone fences would use dry mortar to hold stones in place.

8. Live Plants/Hedges

In many areas, especially in the Southern states, both stone and timber were not readily found. However, fast-growing plants could make a live fence or hedge. These “live fences” had many benefits, not just privacy. Plants can also filter air, absorb noise pollution, and make for a very attractive green backdrop. Learn more about best shrubs for making hedges.

Willow Fencing

There’s also a type of natural fence that you can use in the garden! Quick-growing, flexible hazel and willow trees offer stems to weave into fences, screens, supports for climbing plants, and more.


Not only do they look stunning but they also help to filter wind instead of deflecting it, avoiding the damaging eddies found along solid walls.


Both willow and hazel have a long structure of use in all manners of garden structures. See how to make a willow structure here.

Primary Image
Photo Credit
CatherineLProd/Shutterstock

Take measure to put tomatoes in the strongest position now

Print Friendly and PDF
Body

Should you prune tomatoes? When do you feed them? Keep caring for your tomato plants with these tips for disease-free, trouble-free tomatoes. By taking the right steps now, you’ll put your tomatoes in position for a bountiful harvest. 

Offer Tomatoes Support

Almost all tomatoes need some form of support. Left to their own devices, vining, or indeterminate tomatoes, would sprawl along the ground, but we want to grow them vertically to make the most of space and minimize transmission of soil-borne diseases such as, for example, septoria leaf spot.

  • There are different types tomato supports that can be used throughout the garden: sturdy canes for outdoor plants and string supports for greenhouse tomatoes. (See video for a demonstration on both tying a stem into the cane and weaving a string support around a stem.) Weaving stems into position are best done in the afternoon/early evening, when stems are more supple as they have warmed up during the course of the day.
  • There are additional benefits of growing vertically, including better light levels and, through targeted pruning and removal of side shoots, better air circulation.
  • Bush, or determinate tomatoes don’t need nearly as much attention. They are much shorter and stockier than vining tomatoes, but even these types will benefit from some sort of support, particularly as the plants get laden with heavy fruits.
  • In all cases, the aim is to keep the plants up off the ground to reduce the risk of diseases spreading and fruit rotting where they touch the soil.

Pruning Tomatoes

Another way to manage disease risk is to cut off the lowest leaves of your tomato plants.

  • Ideally, we don’t want any leaves coming into contact with the soil, so prune out leaves to keep them well clear of the soil surface.
  • Once plants are more established you can remove all the leaves up to the first flower/fruit truss. Doing this also helps with airflow, a good thing as stagnant air is a prime breeding ground for air-borne disease such as blight.
  • Vining tomatoes will need any sideshoots removing. Also known as ‘suckers’, they will appear where the leaves join the main stem and it’s important to remove them in order to concentrate more of the plant’s energy on fruit production and to avoid issues with overcrowding and reduced airflow. 
  • Pruning and sideshooting is best done in the morning as plants are more swollen after the cool of the night. This way they should snap off neatly, giving a clean break.
  • In a cooler climate, you can prune once four trusses have formed on outdoor tomatoes, and once the main stem reaches the greenhouse roof for the tomatoes grown in there. 

Cover the Soil with Mulch

Work to achieve a healthy, nourished soil and the plants you grow in it will surely thrive! If you improved your soil before planting your tomatoes – such as an inch layer of compost – then you shouldn’t need to add any more compost over the course of the growing season. However, what you can add is a layer of mulch.

  • Apply a mulch as talking – of shredded bark or grass clippings.
  • Mulching has so many benefits: weed reduction, shaded soil for cooler roots in hot climates, moisture retention for more efficient use of water, and as a barrier between the soil and the foliage on your tomatoes, again reducing the disease risk. 
  • When you water there is less chance of splash back onto the plants. And, of course, you won’t have to water as often.
  • Mulches will also promote more even soil moisture, helping avoid issues such as fruit split – when plants are watered after a prolonged dry period, causing the fruits to suddenly swell and the skins to split open under the resulting pressure.
  • Steady soil moisture also prevents blossom end rot, when calcium fails to reach the fruits due to a lack of water flowing through the plant.
  • You can also grow tomatoes in straw bales, so they won’t need mulching. The bales also offer more consistent conditions at the roots.
  • If you are growing in containers or growbags, please be sure to never let the potting mix dry out. Potting mix is a pain to rewet after it’s dried out, so try to prevent this happening in the first place. An irrigation system may help, as will growing in larger containers, which are slower to dry out. And remember you can also mulch the surface of potting mix in the same way as the soil.

Water and Feed Well

So how often should you be watering? The answer is: it depends! 

  • In temperate climates, water tomatoes in containers at least once a day if it’s warm and dry, dropping to maybe twice a week in cooler, cloudier weather. Tomatoes grown in beds and borders will usually need watering less often. Of course, if you’re in a hot climate then you’re going to be watering more often than this.
  • Do the finger test. Stick a finger down where the roots are – perhaps an inch or so beneath the soil surface, beneath any mulch, and assess how damp it is down there. If it’s dry, water. If it’s damp, don’t. Over time you’ll get a kind of sense for how moist it’s likely to be.
  • Avoid wetting the leaves at all costs to reduce the chances for diseases to get a foothold. Try not to splash back soil or potting mix onto the leaves – this is where pruning and mulching help.
  • Tomatoes are quite hungry plants. Plants grown in soil improved with plenty of compost may not need additional feeding, but plants in containers, grow bags and straw bales certainly will.
  • Use a purpose-sold liquid tomato feed for this because it will have a good balance of nutrients specifically suited to tomatoes and other fruiting vegetables.

Reduce the Risk of Blight

Blight is the most widespread threat to our tomatoes. It’s notorious for cutting down plants in their prime, dashing hopes of summer-long harvests. This soil-borne disease is carried on the wind, so it’s just about everywhere. But there are precautions you can take to try and avoid it.

  • Make sure to water carefully – taking care not to wet the leaves – and water in the morning if you can, so the soil surface has a chance to dry off during the course of the day.
  • As mentioned earlier, cut off the lowest leaves so there is no foliage in contact with the soil and soil can’t splash up onto the leaves when you water.
  • Encourage that all-important airflow. Pruning off those lower leaves and side shoots will help, but make sure plants are properly spaced too. If you’re growing in a greenhouse or tunnel, open up the doors, vents and windows as wide as they go to encourage a good ventilation. Tomatoes grown under cover will be less susceptible to blight, but they are no means immune, so watch out!
  • Inspect plants regularly are remove infected material the very moment you spot it – act fast as blight spreads quickly.
  • Avoid growing tomatoes near potatoes, as blight can pass between them, affecting both crops. Remove all traces of tomato and potato crops, including tubers, at the end of the growing season.

At this point it’s also worth mentioning one of the more common pests of tomatoes is the tomato hornworm. Hornworms weaken plants by eating the foliage. Being green in color, they don’t exactly stand out against the leaves, but a little tip is to head out at night and shine a blacklight or UV light on your plants. Incredibly the hornworms glow in the light, making them easy to spot and pick off.

See our video on Top Tips for Trouble-free Tomatoes which demonstrates many of the points discussed above!

Taken together, these simple steps should power your tomatoes through the growing season, giving you truly trouble-free plants and a delicious harvest.

If you’d like to know more about growing tomatoes, see the Almanac’s Tomato Growing Guide

And if you do run into trouble, see these top 10 tomato problems and solutions!

Photo Credit
Francisco Romero Ferrero/Wikimedia Commons
Subhead

Preventing a Fruit Fly Infestation in Your Home

Print Friendly and PDF

Indoors, a fruit fly infestation can be a truly annoying experience. Here’s how to get rid of fruit flies, including how to make your own fruit fly trap!

Where Do Fruit Flies Come From?

Reach for a peach, and what happens? A squadron of fruit flies takes to the air above the fruit bowl! But where the heck did they come from? 

They probably didn’t come from your grocery store produce. They tend to wander into your home from the outside when they catch the scent of fruit that’s ripening, especially if it was starting to get a bit overripe. (In fact, fruit flies actually prefer wine and beer to fruit because they like food that has fermented.)

Peaches in bowl

What Are Fruit Flies?

The tiny, yellowish, red-eyed insects are part of a large family of small flies that has about 3,000 species. Unlike houseflies, which may spread disease, fruit flies are harmless. They can live and breed in drains and garbage cans, and on damp mops and rags. Spilled juice under the refrigerator or a rotten potato at the bottom of a bin can be a happy home for the fruit fly’s larvae.

Fruit flies lay their eggs near the surface of your ripe fruit—and they can lay up to 500 eggs at a time! About 30 hours later, tiny larvae emerge and feed on the fruit, eventually turning into pupae. A week later, they are ready to take to the air.

Luckily for us, the entire life span of a fruit fly is only about two weeks. However, researchers have discovered that drinking a fermented beverage will enable a fruit fly to live a day or two longer—and a day or two is quite a bit when your life is only two weeks total!

Fruit flies on a rotting mango. Image by John Tann/Wikimedia Commons
Photo by John Tann/Wikimedia Commons

How to Get Rid of Fruit Flies

Eliminate Fruit Fly Breeding Grounds

The key to preventing fruit flies is to not attract them in the first place, so keeping your kitchen and dining area clean and free of potential fruit fly breeding grounds will go a long way in stopping an infestation before it begins. Here are some tips:

  • Refrigerate or throw away ripened or damaged fruit instead of leaving it out where the fruit flies can access it. Check it regularly for blemishes or rot, too.
  • Make sure you take out the garbage regularly, and consider putting a secure-fitting lid on your trash can.
  • Completely clean up any spilled fruit juice, beer, or wine, and don’t leave half-empty drinks out.
  • Be sure to clean your drains regularly, as flies can live there if grime builds up. Use these tips for clearing drains.

Build Fruit Fly Traps

You can buy fruit fly traps or make your own, and either way, they should be effective. One of the most common traps is the cider vinegar trap:

  1. Fill several glasses or jars with apple cider vinegar (or old beer) to about 1/2 full. The flies will be attracted to the smell of the fermented liquids.
  2. Add a drop of liquid dish soap to each glass and mix gently with a spoon. This breaks the surface tension of the liquid, making it so the flies can’t just float on the surface.
  3. Put plastic wrap on top of each glass so that it is tight, and hold the plastic wrap in place with a rubber band.
  4. Punch about ten holes in the plastic wrap with a toothpick, and put the glasses in an area frequented by fruit flies. Make sure the holes are wide enough for the flies to crawl through. They’ll be enticed by the smell, crawl in, and drown in the mixture.
    • Tip: No plastic wrap or aluminum foil on hand? Take several pieces of paper and roll them into funnels (taping the sides of each funnel so they don’t unravel), then place a funnel into each glass. Flies will be able to get in, but not out.
how to get rid of fruit flies

Learn More

See more tips on managing other insects and pests.

Have you ever gotten fruit flies? Share your solutions in the comments below!

There’s nothing worse than the sinking feeling you get when you go out to your precious garden only to discover that creepy crawlies have eaten your dinner before you even had a chance to harvest it. We hear your cry for help! Here are tips for natural pest control.

Subhead

You can help yourself with panic, fear, hopelessness, and resentment.

Print Friendly and PDF

We all have times when we experience strong negative emotions—anger, panic, fear, anxiety, frustration, sadness, hopelessness, and resentment. Here are eight simple calming strategies to help.

I’ve found that I can’t do much to prevent the rise of negative emotions, but I have found ways that help to halt a downward plunge. I call it “calling down the calm.”

Negative emotions are often justifiable, especially in emotionally or physically toxic environments, and on those days when one calamity after another seems to strike. But ruminating on what caused the feelings or acting impulsively when I’m in the grip of a negative state does nothing to fix the situation and sends you down a path you may not want to follow.

3 Steps to Calm Yourself

Each of my calming strategies begins with:

  1. Noticing the rising feeling,
  2. Naming it, then
  3. Intervening quickly to restore emotional balance.

In my experience, “calling down the calm” is empowering because each technique involves self-awareness and choice. Each of these strategies is available immediately, costs nothing, and takes no training.

Benefits to Calming down

There are good reasons for many of our feelings—positive and negative and in between. Strong negative feelings evoke a cascade of physiological responses that enable us to respond quickly to genuine threat. But allowed to fester, the same responses endanger our health.

Plus harboring negative emotions makes us feel lousy. It’s no accident our words anger, anxiety, and angst share a common ancient root, which means to narrow, squeeze, or choke. Held onto, negative feelings narrow my perspective, shrink my options, and choke any possible joy from the moment.

calm-woman-peopleimages-gettyimages_full_width.jpgImage Credit: PeopleImages/Getty

8 Calming Tips

  1. Take a breath (or 10). Breath is one of our greatest psychological and physiological tools. It’s always available, and, practiced mindfully, it exerts immediate positive effects on both body and mind. Try it right now: Inhale slowly, breathing through your nose and expanding your lungs. Keep your shoulders relaxed and relax your jaw. Exhale slowly through your mouth, making a  soft “whooshing” sound as you exhale.
    Repeat this breathing exercise. Do it for several minutes until you start to feel better.
  2. Count. Mom’s old advice to “Count to 10” really holds up in moments of great emotional stress. Not only does it refocus attention, but also its ordering function tends to keep me moving forward with the task at hand or with a calm and appropriate response to the situation.
  3. Just stay with the discomfort. Somebody once gave me this valuable advice: “Nobody ever died from a strong feeling. Sometimes just sitting with your discomfort and doing nothing is the most powerful act of all.” This is different from suppression, because I’ve acknowledged the rising feeling and named it. I find naming a powerful psychological tool because it gives me some distance from the focus of my discomfort, so I don’t fully identify with it. I feel angry, but I’m not the anger.
  4. Stop! Sometimes just interrupting the negative feeling with a stern injunction to quit it works wonders. Because all I have to do to avoid any damage from hanging on to a feeling, really, is just to stop it cold.
  5. Move. Intentional physical movement—a quick turn around the parking lot or the driveway, a few jumping jacks—brings the attention to the working muscles instead of the mental chaos.
  6. Laugh. Laughing, even when you don’t feel like it, measurably reduces stress hormones and positively affects the immune function and cardiovascular systems. Researchers say that laughter is contagious and works its magic best in company with others. But laughing alone works, too. Fake laughter works. Even anticipating a humorous experience confers health benefits. 
  7. Groan, shout, or shriek. People instinctively groan in the grip of strong emotion. But I’m talking about groaning intentionally, just to break the grip of a negative emotion. It works wonders for me. I do most of my groaning and shrieking in my car (alone), where I don’t feel self-conscious. Groaning and shrieking encourages deeper, more complete breathing (see previous), and sometimes morphs into hilarious laughter (see previous).
  8. Be joyful. Finally, when I can remember to, I take the advice of the opening lines from Carl Sandburg’s wonderful poem, “Joy”:

Let a joy keep you.
Reach out your hands
And take it as it runs by… .
Keep away from the little deaths.

After all, nothing describes the corrosive effects of long-held negative feelings than “the little deaths.” I’m for grabbing the next little joy that runs by!

Subhead

Lightning facts and fiction!

Print Friendly and PDF

Lightning may be awesome to watch, but it can also be dangerous—even deadly. Did you know that lightning strikes more than 40 to 50 times a second during June, July and August? So, summer is a good time to learn more about nature’s light shows and familiarize yourself with 10 basic lightning safety rules. Know your “flash” facts from fiction. 

What is Lightning?

What you are watching are spectacular electric sparks! Just as you build up static charges when you shuffle your feet along a carpet, so do the collision of ice and slush churning in a thundercloud build up charges.

The slush near the bottom of the cloud builds up a negative charge while the tiny ice crystals carried to the top become positive. Finally, the charges equal out, just like that irritating spark that stings you when you touch something. The giant discharge flows somewhere and about 25% of the time—BANG!—it hits the ground. 

How Far Away is Lightning?

When you see a flash of lightning, start counting the seconds until you hear the following thunder.  Then divide that number by five. The resulting number will tell you how many miles away you are from where lightning just struck.

For example, if that resulting number was 5 seconds, then the lightning struck 1 mile away. If the resulting number was 10 seconds, the lightning was 2 miles away.

How do you calculate the distance of a thunderstorm?

Don’t be fooled by blue skies. Lightning often strikes from 3 to 6 miles away, though it can be as far as 10 miles. According to safety experts, the time to take cover is 6 miles, at minimum.

Follow the 30-30 rule:

If the time between the lightning flash and the crack of thunder is 30 seconds or less, the lightning is about 6 miles away or closer.

  • After you see lightning, start counting to 30. (Use the stop watch or count “One-Mississippi, Two-Mississippi, Three-Mississippi,” etc.)
  • If you hear thunder before you reach 30, seek shelter indoors immediately.
  • Stay inside for at least 30 minutes after hearing the last clap of thunder.

When the storm passes and the skies turn blue again, don’t be fooled. Lightning threats continue much longer period than most people realize. This is why we have 30-minute safety rules.

Predicting Lightning

First, know that every thunderstorm produces lightning. 

Warm, humid summer days are the times when thunderstorms are most likely to develop, especially in the afternoons, as the sun heats the air and heat rises into the atmosphere. Watch as those puffing cumulus clouds start to form. As they build, they’ll start to “tower” vertically upward, and likely to develop into a thunderstorm. 

Flash Fact: If your hair stands up in a storm, it could be a bad sign that positive charges are rising through you. Get yourself indoors immediately.

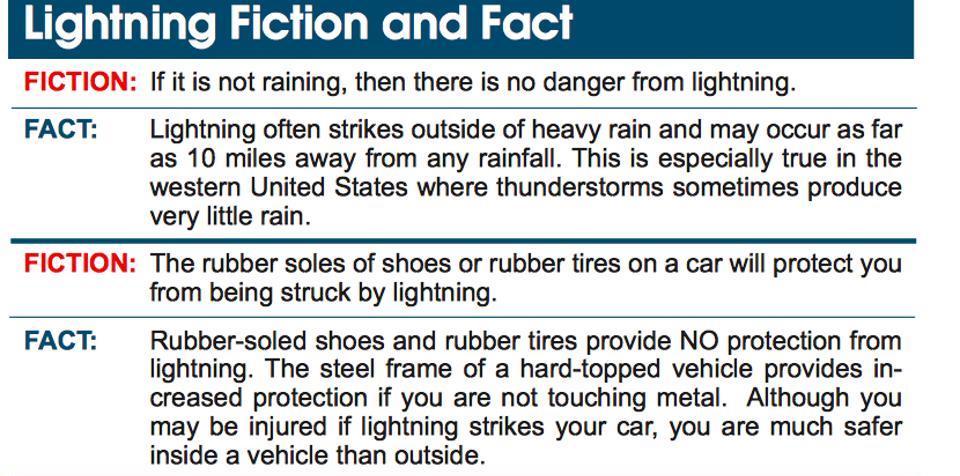
Summertime is lightning season. Source: NOAA

Can Lightning Kill You?

Surprisingly, lightning is one of the leading weather-related causes of death and injury in the United States. 3,696 deaths were recorded in the U.S. between 1959 and 2003) or cause cardiac arrest.

What Are the Odds of Being Struck by Lightning?

The odds of being killed by lightning is 1 in 700,000. But the odds of being struck in your lifetime is 1 in 3,000.

About 70% of those struck by lightning suffer serious long-term effects such as severe burns, permanent brain damage, memory loss, and personality change.

But some places are more dangerous than others.

  • Kifuka in the African Democratic Republic of the Congo averages 410 lightning strikes per square mile every year.
  • In North America, the champion is the Tampa-Orlando area with 91 flashes per square mile.

Even then, statistics show that not all people face the same risks. Little old ladies are safe, but guys between the ages of 20 and 30 seem to be lightning rods.

If you are a young man in Florida, lightning is not your friend! Source: NOAA

10 Lightning Facts and Fiction

The rules for safety in lightning storms are mostly common sense but you may find a few surprises here. Separate the facts from the fiction.

  1. Do not hide under a tall tree. Being under a tree is just about the worst thing you can do and the second leading cause of lightning casualities. If lightning does hit the tree, there’s the chance that a “ground charge” will spread out from the tree in all directions. Also, don’t touch anything metal outside—such as a fence or bike—as metal can conduct the electricity.
  2. If no shelter is available, crouch low, with as little of your body touching the ground as possible. Lightning causes electric currents along the top of the ground that can be deadly over 100 feet away. Do not lie flat on the ground. While lightning hits the ground, it sends deadly electrical currents in all directions. By lying down, you may even be more likely to be electrocuted because you’re providing more surface area.
  3. Cars are relatively safe shelters and will likely protect you. Make sure the windows are shut. Myth: The car isn’t safe because of rubber tires but because the metal roof and sides divert lightning around you. Convertibles and motorcycles offer no lightning protection.
  4. Stay out of water! Swimming is very dangerous. Wet bodies are a channel for electrical discharge and also water is a good conductor of electricity.
  5. Find shelter quickly. “When The Thunder Roars, Go Indoors” is a common warning. A house or large structure is the safest place you can be during a storm. Note small structures (such as an athletic hut or metal sheds) are only meant to protect from rain and sun and not designed to be lightning-safe with mechanisms for grounding from the roof to ground.

    While being in your home or a large shelter is safest, you may be surprised to discover that one-third of lightning strike injuries still happen indoors! There are a few tips to remember when you are waiting out a storm inside:
  6. Stay away from windows and doors in your home, especially metal doors and frames. As tempting as it is, you may not want to stand next to a big window watching a huge lightning storm.
  7. Avoid concrete walls or flooring which often have metal rods or framing for support. Lightning can travel through any metal wires or bars in concrete walls or flooring.
  8. Stay away from plumbing and water indoors during a storm. Metal piping conducts electricity. Never take a bath or shower during a thunderstorm. 
  9. Don’t get near electrical equipment like televisions, stereos, wires, TV cables, and “smart” electronics during a big storm. Don’t use a corded phone (cellular or cordless phones are fine). Talking on the telephone is the leading cause of lightning injuries inside the home! 
  10. Surge protectors do not protect against direct lightning strikes. Unplug equipment such as computers and televisions or anything connected to an electrical outlet. Lightning can travel through electrical systems, radio and television reception systems, and any metal wires or bars. (These items must be installed in conjunction with a lightning protection system to provide whole house protection.)

Flash Fact: Did you know that rubber shoes do nothing to protect you from lightning? 

Credit: NASA

Enjoy the light shows, but stay safe! 

Subhead

Midsummer Maintenance for Nuisance Plants

Print Friendly and PDF

“Garden thugs” are plants (not weeds) that quickly get out of control in the garden. They can really run amok and hog all the room if they’re not judiciously pruned, dug out, cut back, or thinned in midsummer. Here’s how to keep these bullies from taking over!

Last week I was making iced tea and wanted to add some spearmint to the brew. It grows in a flowerbed near the kitchen. I couldn’t find it! Though I pass by this flowerbed many times each day, obviously, I haven’t paid much attention to this bed. It had been choked out by other plants.

Ironically, mint is a common garden thug, notorious for its habit of overrunning a garden, but that was not the case here. A turf war was raging under my nose and the violets and goutweed were winning.

I intentionally planted the most rugged and hardy plants in this bed since it’s near an area that has poor soil and gets piled by snow. These plants, including mint, would become invasive thugs if they were being grown in better soil, more sun, and had a little extra water thrown their way in the summer. None of that is the case, so this is truly a Darwin garden where only the strong survive. I finally had to step in though and do some editing—a nice term for long overdue maintenance.

garden_2018_003_full_width.jpg
Is it any wonder that only one iris bloomed this spring? They are being totally choked out by rampant growers like violets and goutweed!

10 Plants That Need to Be Chopped, Thinned & Dug Out

Here are some of my own plants that just aren’t behaving in the garden.

  1. First, the violets had to go. Never fear, next spring there will still be plenty of them to give a nice show of blossoms, as they are virtually impossible to totally eradicate. Their shiny heart-shaped leaves are a nice groundcover or understory plant in the right place, but I have way too many of them. Shade or sun—they don’t care.
  2. Next, it was time to deal with the goutweed (Aegopodium agraria)—pretty, but dangerous. Don’t trust it! It attacks from above and below, spreading by underground runners and seeds. I was surprised to see it for sale at a reputable nursery this spring and had to restrain myself from saying what I was thinking. “Are you crazy selling this stuff! Don’t you know how invasive it is?” A former owner of my house must have thought it was pretty and planted it here. Probably the same person who thought planting burning bush (Euonymous alata) was a good idea. I have been fighting with both for years!
  3. Then, the New England asters got chopped in half to cut them down to size. Even so, they still will eventually tower over the rest of the plants in the bed. I don’t know where all the phlox have come from. They have extensive root systems, but birds also spread the seeds so some of these plants must have traveled from the other side of the yard. I ripped out most of them to prevent a hostile takeover and chopped the rest in half to give the plants around them a fighting chance.
  4. Goldenrod is great for late summer color and a pollinator favorite, but enough is enough! It rudely rides roughshod over its neighbors and most of it had to go.
  5. Rambunctious Jacob’s ladder (Polemonium caeruleum) is holding its ground against the domineering astilbe, so I let them continue to duke it out on their own.
  6. Lily-of-the-valley could easily overtake any garden if given the chance, but they struggle to gain a foothold in this battleground.
  7. The obedient plant (Physostegia virginiana) usually does not live up to its name, but in this garden of plants behaving badly, it has been kept in check by its more aggressive neighbors.
  8. Talking about space invaders, the great blue lobelia (Lobelia siphilitica) is another plant that appeared out of nowhere and has elbowed its way into this bed and several others. I do love the blue flowers later in the season, but they need to quit hogging all the room.
  9. The tawny day lily is another plant that does not play well with others. I have tried to mix day lilies in other colors with them only to find that the tawnys have taken over. Now they have their own bed and are kept in check by mowing around the edges.
  10. Years ago I found some vinca growing near an abandoned cellar hole in the woods and brought a piece home to plant on the shady north side of the house. Any plant that can grow for 100 years with no attention is my kind of plant. I should have known better! Given an inch, it has taken a mile. Now I see why it is on the invasive species lists in many states.

garden_2018_056_full_width.jpg

That said, be wary of pass-along plants that you might be gifted with. Will they be friend or foe? Many are fine but some may be rampant growers that you will eventually regret planting. When buying plants look out for watchwords like “vigorous grower”, “fast spreading”, “exuberant”, “thrives in sun or shade”, “self-sows freely”, or the dreaded “good for erosion control”. All of them could spell trouble down the road. If you have a question about whether or not something is considered invasive in your area consult your state’s invasive species list or check out invasive.org or invasivespeciesinfo.gov for more information.

garden_2018_054_full_width.jpg

The upside to spending a few hours removing some of the thugs from my garden is that now I have room to plug in some annuals for season-long color and can plant some new perennials!

P.S. Some other common garden thugs include: blackberries, horseradish, Japanese anemones, the herbs fennel and dill, amaranth, and butterfly bush. Add yours as well in the comments below!

→ Read four good reasons to deadhead your flowers!