
This is a step-by-step guide to implement a Skype for Business Cloud Connector Edition Server which directly connects to an Internet SIP Trunk Provider without the need of an on-premise PSTN Gateway device.
Skype for Business Cloud Connector Edition Topology and port requirements
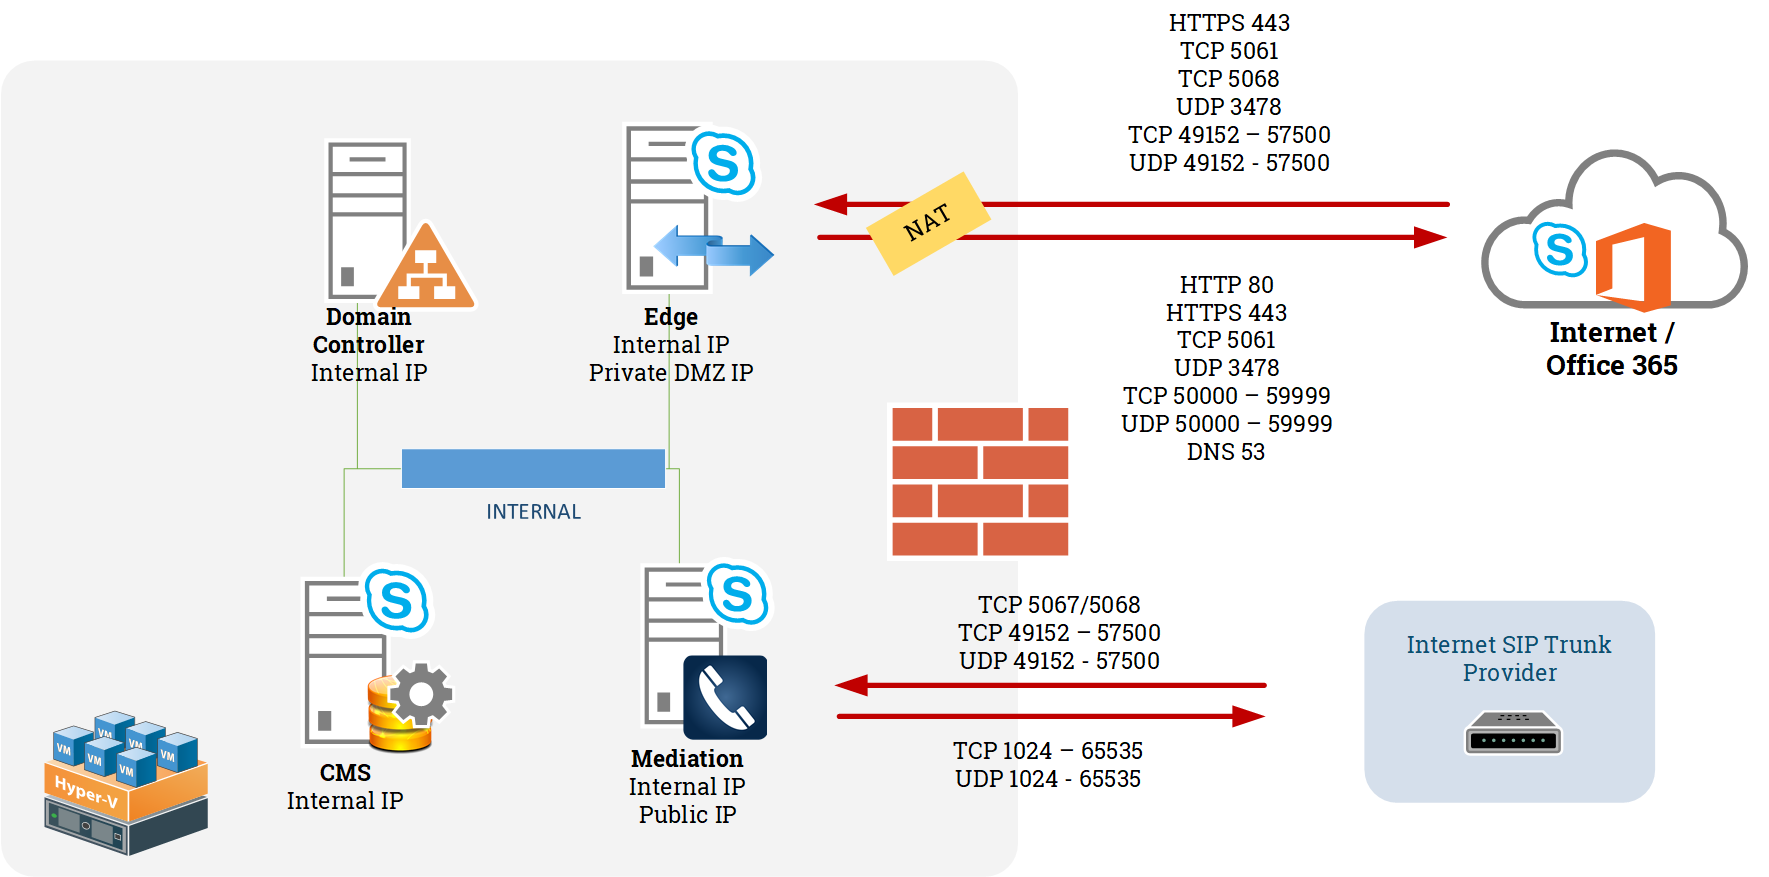
Note: The ports between the Internet SIP Trunk Provider and your Mediation Server may vary depending on the Provider you use. The ports mentioned in the picture are valid for Netstream AG (Switzerland).
Hardware requirements
https://technet.microsoft.com/en-us/library/mt605227.aspx#BKMK_Requirements
Certificate requirements
The certificate must contain the Edge Server Public FQDN as common Name. For each SIP Domain there must be an entry sip.domain.ch.
Example
CN=accessedge.ptschumi.ch
DNS Name = accessedge.ptschumi.ch DNS Name = sip.ptschumi.ch DNS Name = sip.philippetschumi.ch
DNS requirements
Cloud Connector
| DNS Record | Public IP |
| accessedge.domain.com | Edge Server Public IP |
| media.domain.com | Edge Server Public IP |
Skype for Business Online
For each SIP Domain:
| Type | Host | Destination | TTL |
| SRV | sip.domain.com | sipdir.online.lync.com | 1h |
| SRV | lyncdiscover.domain.com | webdir.online.lync.com | 1h |
| Type | Service | Protocol | Port | Weight | Priority | TTL | Host | Destination |
| SRV | _sip | _tls | 443 | 1 | 100 | 1h | domain.com | sipdir.online.lync.com |
| SRV | _sipfederationtls | _tcp | 5061 | 1 | 100 | 1h | domain.com | sipfed.online.lync.com |
Installation
Enable Hyper-V
According the prerequisites you need to install the Skype for Business Cloud Connector VMs on a dedicated hardware with Windows Server 2012 R2 Datacenter Edition (English).
You then need to enable the Hyper-V role.
Enable-WindowsOptionalFeature -Online -FeatureName Microsoft-Hyper-V -All
Note: The installation on a Windows Server 2016 – even it’s not supported yet – works fine too.
Network Adapters on Hyper-V
Create the following Virtual Switches in Hyper-V Manager:
| Physical NIC | Virtual Switch | Network |
| NIC1 | SfbCCEManagement | Internal Network |
| NIC2 | SfbCCEInternal | External Network (Coorporate Network) |
| NIC3 | SfbCCEPublic | External Network (DMZ Private) |
| NIC4 | SfbCCESIPTrunk | External Network (DMZ Public / Public IP) |
Pre-installation
- Verify that .NET Framework 4.6.1 or later is installed
- Download Source: https://aka.ms/CloudConnectorInstaller and install
- Open PowerShel
- Import Skype for Business Cloud Connector Module
Import-Module CloudConnector
- Adjust Cloud Connector Directories to your needs
Set-CcSiteDirectory "D:\CloudConnector\SiteRoot\"
Set-CcApplianceDirectory "D:\CloudConnector\ApplianceRoot\"
- Set the path for the external Edge certificate
Set-CcExternalCertificateFilePath -Path "D:\Sources\edge.pfx" -Target EdgeServer
- Set the path for the SIP Trunk certificate (optional, necessary when using encryption)
Set-CcExternalCertificateFilePath -Path "D:\Sources\mediation.pfx" -Target MediationServer
- Create CloudConnector.ini sample file
Export-CcConfigurationSampleFile
Define parameters in CloudConnector.ini
In the CloudConnector.ini file you need to set the necessary parameters. For an explanation of CloudConnector.ini parameters and example file visit this blog post. You can copy the previously created sample file and rename it to CloudConnector.ini.
Main Installation
- Change the excecution policy if restricted
Set-ExecutionPolicy RemoteSigned
- Download the binaries
Start-CcDownload
- Create Base VM Image
Convert-CcIsoToVhdx -IsoFilePath "D:\Sources\Windows2012R2.iso"
- Register the appliance with Office 365
Register-CcAppliance
- Start the installation
Install-CcAppliance
Additional configuration for internet SIP Trunk
If you configure an Internet SIP Trunk the only supported scenario is to have two network adapters where one has assigned a public IP for the connection to the SIP Trunk Provider.
To get this done, follow these steps:
- Connect one Hyper-V network interface to public DMZ/IP Zone.
- Create another Virtual Switch in Hyper-V Manager. In my case I called it SfbCCESIPTrunk.
- Modify the Settings of your Mediation Server VM and add a new Virtual Network Adapter
- Connect it to the previously created Virtual Switch (SfbCCESIPTrunk)
- Sign-in to the Mediation Server VM
- Configure the newly added network Adapter with your public IP (fill in only IP and subnet mask)
- Configure a static route for your SIP trunk:
route -p ADD 'SIP Provider IP' MASK 255.255.255.255 'Default Gateway IP'
In some cases you need to configure some more parameters on the SIP Trunk as requested by the SIP provider:
- Add the Domain Administrator to the CsAdministrator Group in Active Directory.
- Edit the Parameters of the trunk if necessary with
Set-CsTrunkConfiguration
Office 365 configuration
- Download and install Skype for Business Online PowerShell Module: https://www.microsoft.com/en-us/download/details.aspx?id=39366
- Connect to Skype for Business Online:
Set-ExecutionPolicy RemoteSigned
Import-Module SkypeOnlineConnector
$credential = Get-Credential
$sfboSession = New-CsOnlineSession -Credential $credential
Import-PSSession $sfboSession
- Set up Hybrid connectivity:
Set-CsTenantHybridConfiguration -PeerDestination 'External Access Edge FQDN' -UseOnPremDialPlan $false
Set-CsTenantFederationConfiguration -SharedSipAddressSpace $True
Enable users
To assign a phone number to a user, you must first assign a Skype for Business and a Phone System license to the user.
Set-CsUser -Identity "username" -EnterpriseVoiceEnabled $true -HostedVoiceMail $true -OnPremLineURI "tel:+phonenumber"
Start your call
You’re done now with your initial Skype for Business Cloud Connector setup. Now you can sign-in with a user and call in/out through PSTN with using your internet SIP Trunk Provider.