Flowers – the Art Elements theme challenge for July

I left for Wales as the month began… on a trip with family that was part heritage tour and part vacation. ( In depth Wales posts are coming shortly.) I kept flowers in my mind as I was touring castles, exploring old seaside villages, hiking in the national parks…. It was an amazing transformative trip, and I will be feeling and seeing the creative effects of it for a long time coming.

But after returning home, and catching up on sleep, laundry, household chores… there was very little of July left for me. I offer you some works in progress for this month – inspired by the theme.

The first showcases these vintage glass pieces. I do not know anything about their original purpose – but when I saw them – I saw frames. ( Sadly there was a blue one too. The set of 4 made me think – 4 elements. I was only able to procure these three.) They have no holes or fasteners/bails of any kind. What do you think they were?

After sorting through many folders of vintage and antique papers ( did you see my post on my paper class with Keith LoBue?) I found some images in the right scale. Two were antique cigarette cards, the other an image from children’s illustrated encyclopedia. ( Yes – mine form my early childhood) I added gesso to the images outside the window area to cloud the colors – I didn’t want them showing through the glass.

Above you can see the copper piece engineered to fit the glass. I had not picked up the jewelry saw in months? a year? and it was so wonderful to be back at the bench pin! Below you can see the piece assembled – well, how it will be.

Currently – the images are drying – a coat of Diamond glaze to protect them. And the copper is in the tumbler – left bright, no patina. I plan to add 3 jump rings from the top arch/bail to add the connection point, and a little movement.

These pieces – when done – will be available for purchase at Bead Fest!

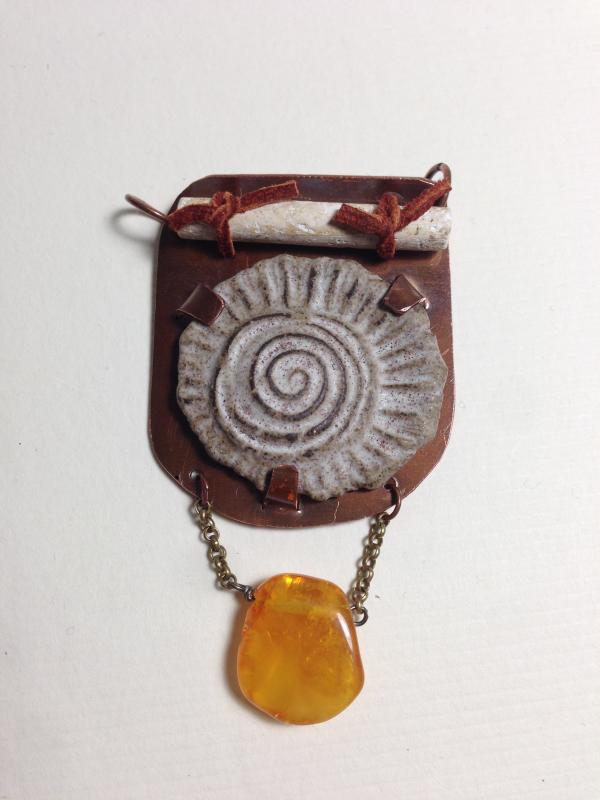
I have missed seed beading in all my travels this month – so I prepared a bead piece, wanting to sit and chill and bead. Well, you can see how far I got:

Labradorite and Lisa Peters cab. Waiting patiently on the bead table.

I hope you have had a wonderful July – whether you traveled or not…

For now – please enjoy a bit of armchair travel as you visit the blogs of my team mates and our guests. Thank you Marsha for a fertile theme, where I am sure many ideas have taken root !

Here is a list of our Visiting Artists:
Alysen
Cat
Divya
Evie and Beth
Jill
Hope
Kathy
Linda
Louise
Martha
Melissa
Michelle
Rozantia
Sarah
Sarajo
Tammy

And our Art Elements Blog Contributors:
Caroline
Cathy
Claire
Jenny ( you are here)
Laney
Lesley
Marsha
Susan

Nests: the Art Elements themed challenge reveal

Happy Spring!

Welcome to the first in our monthly themed challenges! (We have had these seasonally occurring in the past, but have recently switched to all themes, every month. ) Cathy stars us off with the theme: Nests. Her original post was filled with inspiration for jewelry, fibers, all sorts of mediums.

I knew exactly what I wanted to do… ever since this tutorial was released at Sarafina Fiber Arts, I have been thinking of nests. The timing was perfect for Spring and this challenge – and I do so love the colors and textures of the curly dyed sheep’s locks! ( Not to mention I work there part time, and find all the products, colors, textures very inspiring!

IMG_7902

The first one – a little wild and unruly. 

IMG_7904

Natural colors, mostly… and a scrap of suede.

Sara of Sarafina Fiber Arts shares her tutorials on You tube – you can find the nest tutorial here. When I first saw the nest samples I wanted to fill them with earthy polymer goddesses. So I did:

IMG_7906

This is what I originally imagined. 

IMG_7908

Under the sea

My stash of curly locks *may* lean heavily to greens, teals, and earthy forest colors – but that works well for an underwater themed nest too.

IMG_7911

The river rock balances out the coral as it was a bit heavy. 

And any color works – I made a candy fluff Easter nest for my Mom – including 3 polymer  eggs! This was great fun to do – and I have other nest ideas for my art journal that I just didn’t get completed in time.

IMG_7914

One of these things is not like the others….

Please join us on the blog hop today and see what my talented team mates and out guests have created. 

Happy Spring! 

Guest Participants-

Alysen

Anita

Divya

Kathy

Kym

Mona

Rosantia

Sarajo

Tammy

AE team members-

Caroline

Cathy

Claire

Jenny (you are here)

Laney

Leslie

Lindsay

Marsha

Niky

Love is… the February Component of the Month reveal!

feb17-com

This month I had the pleasure of creating pieces for the Component of the Month at Art Elements blog. While February does bring hearts to mind – mine were “real”. They were damaged and repaired, they bore their scars – yet maintained their beauty. Or at least that was my inspiration.

I am thrilled to see what my team mates and out guests have created! ( Links at end of post) But let me show you what I did:

img_3038

Follow your heart.

I HAD to put a heart and a compass together. This was a bonus cab, simple crackle without the tear and stapled repair that the larger hearts had… I wanted a follow your heart meaning. The heart cab is bead embroidered on Stiff stuff with a loose representation of flames, and a toy compass.  Then it has been stitched onto a new messenger bag I am altering. I want something that can get dirty at the studio. I plan to embellish it with patches, paint and stitches. A chance to wear my heart on my sleeve shoulder.


img_3041

Starting to make my statements…. The butterfly is a shaped beaded pin. Shaped pieces are on my “to-do” list. The hand is from the AVAM.

So then I was thinking… I guess I should work with a heart like the components I mailed.  So I took a small stapled/crackle heart and created polymer wings. The wings are cut to fit exactly with the small cobalt heart. The piece is rather large for me – and brings to mind Egyptian scarabs… which I was ASLO working on for themed challenge at Art Elements. Phew. I’m not sure how I will finish this – silk? chain? gems? What do you think?

img_3043

Take flight heart

So  – thanks for stopping by and thanks to all who participated this month! I think I will keep making hearts and share the love even though February is fading away…

And now without further ado: 


Beaded bags and amulet bags – a blog hop!

 I remember thinking the blog hop schedule would give me plenty of time… 

I met Christine of One Kiss Creations when we were partnered on an ornament swap. I still hang my driftwood with beaded snowflakes every year, and enjoy it all winter. So when the magic of the internet told me she was co hosting ( with Therese Frank) an amulet bag hop… I decided to go for it… Beaded amulet bags. So many options! 

Well – I have attempted this, and I apologize that nothing is finished… I have more ideas, and when I have even more time… but let me show you what I have worked on: 

beaded bag WIP

This piece was pure bead embroidery – and I LOVED doing it. The basic idea and directions came from Beaded Embellishment by Robin Atkins. I loved my palette – so very me. And I loved watching the design grow. The problems (see below) began when I started assembling the bag. I have very limited sewing/construction experience. The piece IS complete – although it is lacking a snap closure. The beadwork did not quite line up at the front where the flap folds – so I have a few more beads to add to camoflauge that area. AND a strap. I became rather frustrated with assembly and will confess, this piece was put aside for a long while… 

beaded bag as is

The second piece I am much happier with – and learned quite a bit. I actually bagan this peyote stitch bag ten years ago?! The delicas and the bottom section, stitched int he round – was squirreled away in a bag… SO I tackled this. I decided to vary the beads and made a bead soup with the original beads, adding more new colors as hte original colors were depleted. I love the variation this has given me. A teammate over at Art Jewelry Elements said it reminded her of Roman glass – so there is the button closure! Spot on!  I adore peyote stitch and could do this all day! My thought for next time? Use rounds not delicas! The bag is SO firm. I plam to stitch silk to the sides as shown on my sketch. The ends will terminate in a knot, and a few charm or crystal dangles. 

peyote amulet bag

On a completely different note – I had done this as well, and thought it would apply. The leather belt pouch was made by my friend Betty at Emperor’s Needle. She has a booth at the PA Renaissance Faire. I beaded the embroidered element onto stiff stuff, then stitched it to the leather with the final round of beads. 

beaded leather pouch

As these are my first attempts I would love to hear what you think…

Thank you Christine and Therese for hosting and challenging me! Please take a look at the other participants fabulous creations! 

Therese ( hostess)
Christine (hostess)
Jenny ( that’s me!)
Bobbie
Ana
Amy
Cynthia
Karin S
Maryanne
Liz
Lori
Paula
Jasvanti
Dagi
Kepi
Samantha
Alicia
Motidana
Becky

Beading Back in Time – Blog Hop Reveal

 (If you are looking for the Art Jewelry Elements April COM follow this link. Thanks! )


Beading Back in Time! Time to find the Tardis key, walk through a certain circle of stones, or fuel up the DeLorean… 

This quarter we are inspired by ancient history, “Early Human” which for the intents and purposes here will be prior to 3500 BCE. Now this time period resonates with me… I hve been drawn to the carved stone goddess figures since childhood.  If you want to get really careful with dating and art history this period is even before the famous cave paintings of Lascaux! So I thought for sure it would be goddesses that inspired this challenge! 

ancient goddesses

1. Venus of Willendorf 2. Venus of Brassempouy 3. Venus of Laussel 

Goddess work collage

My goddess tiles, and small sculptures. 

Goddess amulet planning

So I set aside a small simple stoneware goddess. She is bare clay, fired to ^10 reduction with a wash of iron oxide to give her a patina. Iron oxide is a naturally occurring pigment, just rust actuallly, and it was used to color stone and cave paintings of this era. I tried her with honey tones, with rugged chunks of labradorite, with craggy rough turquoise. And I havent made a decision yet. I have an existing piece ( shown bottom left above) where I paired a stoneware goddess with Roman glass, geode slices, bronze ammonites… and I wanted to do something different. We’ll see what I finally decide on. I’d love to hear your thoughts! 

 Here is what I did end up with as my “Early Human” offering: 

Tab set in copper, this Marsha Neal cabochon is a dark clay body with a white “crusty” glaze. This already felt right, but its a spiral – an ancient motif that can embody change, journey, progression, life, cycles, it was perfect. I was drawn to use other ancient materials – a hollow shell that is reminiscent of bone, and a chunk of amber. Both bone and amber were used as adornments since… forever. 

Early Human amulet

I wasn’t sure I would have time to complete the necklace parts, but the Muse ( and the clock! ) cooperated: 

Seed pods and chunky howlite connect the copper chain to the sari silk. Although rawhide would have been more historically accurate, the silk was the right fit  aesthetically. 

Final version!

 I love the pieces together, the spiral and the amber really sing to me. Please join us in this time travel inspiration, to our early human roots! 

All the participants links can be found at Sherri’s blog OR Lindsay’s blog. 

Thanks for joining us! 


The AJE COM reveal: “Use your stash”!!!

January. It comes in with champagne and noise makers… and goes out with howling winds. At least here in Delaware! 

This year, the AJE team wanted to start the year fresh. While we are still doing out Component of the Month give aways on the blog – we are mixing it up. January was “Use your stash” month, for lack of a prettier term. We are collectors of each others work, known to barter, buy and trade. So this month we decided to put the treasures to good use! 

I wanted to make as many pieces as I could – and I’ll share with you how far I got, and what I still have planned.

First up Karen of Starry Road Studio

Two sides of Karen

I love to make earrings. I had these pieces tucked away for a year and a half? The pair on the left, apple green boat shapes are paired with garnet and black spiniel. Lots of movement, a little bling. The pair on the right? Umm. That’s a bracelet bar that I broke… and it was too pretty to lose. Its a matte teal glaze, very me, very earthy. I paired it with seed pods for their organic-ness and complementary warm color. (and turquoise in there too)

Next up is a partnership – Melissa (Melismatic Art Jewelry) and Sue (Sue Beads):  

Metallic dazzle

This lampwork glass cab from Sue is heavenly, metallic with silver across the surface like stars. Although it has warm honey colors in it – I wanted to go metallic from the start. I used seed beads in bronzes, crystal, and silver. The picot edge is bright silver beads, although its tough to photograph. The dangle is one of Melissa’s metal clay pieces. I scooped up ALL the “little tiny shinies” that she had to trade at Beadfest. I adore them. I think it plays up the silver on the cab nicely. 

 Then – the Kristen (Beadwork by KAS) and Diana (Suburban Girl Studio) partnership: 

Blue floral

I usually don’t design things in a complimentary color palette. I prefer harmonious rather than “pop”. But this necklace designed itself. The PC/MM focal is one of mine- with a vintage illustration under resin. It’s many shades of blue with rust highlights. As I sat, treasure box of artist beads on my lap… there it all was. Kristen’s beaded beads and Diana’s stoneware beads were the same scale, making it easy to pair them in a balanced composition. Additional flowers to pull in the illustration itself…done. Really pleased with this one! 

 And now for something completely different – with Rebekah of Tree Wing Studio

Sleepy fox den

Start with a mini mint tin. Burn off the paint, sand it down. Then fill it with treasures! The sleepy fox bead of Rebekah’s is nestled in hand dyed silk from my friends at Reyen Studios. The collage opposite incorporated vintage dictionary text, origami paper and Czech flower beads. The outside was done first – and it was going to be a winter fox asleep in the snow and ice. (Hence the crystal and blue…) So this is a prototype, guess I will have to keep it! I have a menagerie of creatures napping on my work table now… more of these forthcoming! 

And then there were no more days left in January… but I am not done. Here is what I am going to showcase next: 

a lampwork bead from Jen (Glass Addictions)

a Celtic bronze hound/hare from Lesley (Thea Jewelry)

a lunar hare from Caroline (Blueberri Beads)

a copper donut ( destined to be a shrine) from Kristi  (Kristi Bowman Designs)

treasures on deck

Please take a look at the wonderful, creative bounty from the team, the guests, and the winners! So much to see! 

AJE team: 
Kristen Stephens 
Susan Kennedy 
Jenny Davies-Reazor ( yup. thats me)
Lesley Watt    
Melissa  Meman
 Lindsay Starr 
Jennifer Cameron 
Caroline Dewison
Linda Landig

 Guest Participants ( aka winners)

Lee – Strega Jewellry
Shai – Shai’s Ramblings
Samantha- Wescott Jewelry
Kathy – Bay Moon Designs
Nikki – Silver Nik nats
Melissa Trudinger
Becky Pancake
Yvette – Blue Kiln Beads
Karin – Ginko et Coquelicot
Bonus participants! 
Sarajo Wentling
Leah Curtis
Susan Delaney 
 

Tangled webs: the waxed linen blog hop reveal

Waxed linen. 

When I think of it I imagine the colorful options, know it is versatile, and then draw a blank. Its not in my wheel house. Friends like Linda Landig and Erin Seigel, to name a few, use it with great results. But for me… its a challenge. So thats exactly why I decided to join when Diana of Suburban Girl Studio announced this blog hop. 

I sat down with my journal – and a coffee – to try to sketch… I like to think visually on paper in doodles. The characteristics of waxed linen that I was drawn to: multi strands, an assortment of treasures, versatility for beads of varying size holes, and I wrote down one word more, that really started the ball rolling. WOVEN. 

Athena and Arachne. 

In Greek myth, Athena ( Goddess of wisdom, war, and patroness of the arts) enters a contest with Arachne. Arachne, a human girl of consumate skill at the loom, commits a fatal mistake by bragging of her talent and offending the Goddess. They weave tapestries in competition, and although Athena wins, Arachne’s skill is great. Arachne hangs herself in the tatters of her weaving. Athena, in a moment of mercy, transforms the girl into a spider so she is allowed to/cursed to spin all her days.

Polymer hollow focal

I created a hollow polymer focal with aluminum tubing inside to act as a channel for multiple threads. The owl, representing Athena, is cast from a reproduction drachma. The web for Arachne is a linoleum stamp that I carved to use in clay. I toyed with various spider options, but they ended up distracting from the focal… 

thread and beads choices!

I have an amazing assortment of waxed linen from Mary at White Clover kiln. I also delved into my Czech glass treasure, from back in the days at the Shepherdess in San Diego. Just making the color decisions was the hard part! 

knotting the strands

My original plan involved all three of these strands. Two are double strands, knotted at intervals with beads spaced an inch or so apart . The third was denser, knots, 8’s and drop beads, continuously knotted. I liked the contrast of the more open strand with the denser strand. But all three – was too busy. Here is what I decided on in the end: 

 Tangled web - Athena and Arachne

The front: greys, blues and golds. A linen tassle dangling from the embedded loop. ( Note the top. The channel inset in the pendant was too narrow. Wrapped loops solved that problem!)

Tangled web - Athena and Arachne (back)

The back: Arachne’s web

So I was left with a knotted strand – just waiting for a pendant. Here is the bonus necklace I created with one of my ceramic fairy pendants. ( Fired to ^10 reduction for you clay people out there)

Bonus piece

 So – if I can muse philosophical for a sec, I am glad I did this. I don’t see waxed linen being my go-to material. I respect it, and designers/artists who work with it. I can see using it as an accent in mixed media pieces. I am happy with my pieces, and would love to hear your thoughts!


Thanks to Diana for organizing the challenge. Please visit her page for the links to all of us participating! There are sure to be diverse offerings, and many beautiful things! 

Thanks to Mary Hubbard for the sample bag of the waxed linen from her shop! I purchased it from her at Beadfest a year or two ago, and the plethora of pretty colors really inspired me to try my hand at linen and knotting! 

To my fellow participants – I am currently photographing flowering cacti in Austin, TX – and visiting family. I apologize for the delay, but I look forward to “hopping” as soon as I can! 

Holiday Ornaments! Swap and Hop!

Oh the weather outside is frightful, but inside its so delightful… 

my view...


Ornamental dogs

coffee, fire, sleepy dogs, a warm shawl… and a twinkly tree to delight the eyes. And on that tree proudly displayed are my lovely gifts from Kim of KimmyKats. This hop is a great way to meet people-  I had known Kim from her work, and her participation on other hops. It was nice to chat via email and  – I confess  – stalk her blog to get ideas to personalize her ornament. 

How thrilled was I to open this:

Kims ornaments

I had already admired Kim’s repurposing of flatware, and now to own 2! The stamped handle is gorgeous, the crystals and the detaisl on the bead caps accentuating the pattern of the flatware. And then the Santa! What detail! so adorable! 

in situ...

cheating

( Yes, I am cheating. I am still working on the big tree as I write this. Its been really busy with teaching final classes at the studio and doing holiday shows. This gives you the idea of how great they will look… )

gnomes at home

( Tiny tree pictured in my cheater pix. Watch those gnomes with the wine… ) 

Thanks to Sally Russick of The Studio Sublime for another fabulous festive friendly hop! And thanks to my fab partner Kim! Please sip your eggnog or your cocoa and enjoy the other offering from these partners! Happy Holidays to all! 

Sally Russick and Beth and Evie McCord

Erin Prais-Hintz and Melissa Trudinger

Karen Williams and Shirley Moore

Lori Finney and Alicia Marinache

D Lynne Bowland and Paula Kramer

Kim Bender Hora and Jenny Davies Reazor

Becky Pancake and Lori Anderson

Veralynne Malone and Therese Frank

Tanya Goodwin and Sandi Volpe

Jeanette Ryan and Rochelle Brisson

Patti Vanderbloemen and Susan Kennedy

Creating with Cabochons

 Welcome! Here it is – reveal day for the “Creating with Cabochons” hop hosted by Sally Russick. 

The challenge was to create using cabochons – no holes! I admit – I use cabochons, and make ceramic cabochons frequently. I wanted to challenge myself to set cabs four ways: 1. tabs 2. a soldered bezel 3. polymer  4. seed beads. 

I know that sounds crazy – and it was! I havent soldered a bezel since my metal smithing days in college. I want desperately to reclaim those skills, and I will – but it did not happen in time for this hop. I have set cabs in polymer before — with a textured clay bezel. My favorite is using tabs. I like the challenge of designing tabs that are decorative and functional. And I love sawing. But let me show you what I DID accomplish… 

porcelain flower

Cab #2 – just beginning. Porcelain cab/my work – irregular shape. 


tab set cabs

My tab set cabs. ( All my work – polymer Ganesh, stoneware butterflies and Green Man foliate head). I was using brass for a change, and left it shiny! Not my usual preference, but I was trying to challenge myself… 

first owl cab

Athena’s owl ( earthenware cab, repro of antique drachma coin) The first attempt. Its a little wonky – a few beads sticking out of line here and there. I learned peyote stitch 10+ years ago when I worked at The Shepherdess in San Diego. Never did bezels until now… I adore the painterly aspect of choosing bead colors to accentuate the ceramic glaze!

peyote backing

Full disclosure! I had an assist from Cooky Schock – she was in town for Beadfest and we had a few days of “Art Camp” before she headed home to SD. (She was my original peyote stitch teacher, BTW!) She gave me valuable insight into finishing the backs on my pieces.

From top right: 1. bezel complete – stitched onto pollon in lieu of Stiff Stuff. 2/3. The back plain and then with pellon stitched down. 4. Ultrasuede stitched down! 5. first owl cab with messy stitched sueded cloth. compared to the final of the three cabs with the clean presentable backing! 


final three

The final three peyote stitched cabochons. I am pleased with how they came out! It was new to me – even though I had tried peyote stitch in the past… and its very exciting to have a chance to use my own work in such a different context. While I dont know if I will ever switch to seed beads completely – I am glad to have them in my repertoire. I often sit and bead while watching tv… I am so glad Sally threw down this challenge! 

Looking forward to seeing all the diverse cabs put to use on this Hop! Here are the participants! Before you go – I would love to hear your thoughts! And thanks for stopping by… 


Your Host:  Sally Russick

D Lynne  Bowland

Alicia Marinache           

Lynn  Jobber           

Jenny Davies-Reazor  ( you are here)         

Jo-Ann  Woolverton           

Marde Lowe           

Dawn Doucette           

Mary K McGraw           

Gloria Allen           

Cheri  Reed           

Sonya Stille           

Elizabeth Owens Dwy           

Veralynne   Malone           

Tania Hagen           

Lynsey  Brooks           

Christina Miles           

Holly  Westfall           

Kathy  Lindemer           

Patti Vanderbloemen           

 Therese Frank           

Adrienne Berry           

Liz   E  

Tanty  Sri Hartanti           

Ginger Bishop

Renetha Stanziano           

Marlene  Cupo           

Sandi Volpe           

Sharyl McMillian-Nelson           

Niky  Sayers

 Mischelle Fanucchi           

Tracy  Stillman           

Skylar Bre’z           

Ann Schroeder           

Paula Kramer

Jess Green           

Susan Kennedy           

Stacie  Florer           

Cathie  Carroll           

Susan F.   

Michelle Caballero       

Sabine Dittrich           

Kristina Johansson           

Kimberly Sturrup-Roberts           

Melissa  Meman           

Cheryl McCloud         

Michelle  Timms           

Cindy  Pack                 

Lynda  Carson

Cynthia  Machata           

Julia  Harris           

Karin  Slaton

Ingrid  Anderson           

Karin Grosset Grange

Jasvanti  Patel  

Inge  von Roos

Molly Alexander


Challenge of Music – The Gypsy Nomads

 Challenge of Music

Welcome to the 2nd Challenge of Music hosted by the creative goddess Erin Prais-Hintz of Tesori Trovati. This year – the challenge: instrumental music.  In my opinion, this is much harder, trying to embody a piece of music in a piece of jewelry without the usual cues and visual symbolism we read via the lyrics. But it was also easy, as my favorite instrumental music is composed and performed by Frenchy and the Punk – formerly The Gypsy Nomads.

Their music has been described as “An energetic hybrid of European Folk roots, Punk attitude, World Beat eclecticism and traveling player theatricality.”Phil Brucato  They are guitar and percussion – hearing them you will find it hard to believe there are only 2 of them. Their energy is infectious. Their music is magical, and addictive, and captivating. The first CD I purchased from them – I honestly described the song as ” the one that goes  _______” since it was on a loop in my head!  They release their own CDs and tour the country from coast to coast  probably 11 months of the year, a grueling pace. If you EVER get a chance…. run, dont walk. 

Gypsy Nomads Thread & Stone

The song I selected is Track 1 on this CD “Travelin’ band of Gypsy Nomads” and you can hear a clip here.   (I am happy to know Scott and Samantha personally. I asked Sam about this song. It may have been the birth of the Gypsy Nomads – Scott, who wrote the instrumental, was performing and Sam decided to jump up on stage, adding dance and  percussion.With this collaboration, a new concept, and a duo was formed! ) I know I am influenced by the song title – but also by their lifestyle. Traveling the county and to Europe, instruments in hand, exploring and being inspired… The song conjures up a campfire, flames leaping, as a fiddle is tuned, a guitar strummed. Music freely played, dancers skirts twitching, tamborines jingling… and I see vardos aka Gypsy wagons. 

 Vardos

( I know this is a Romanticized version, even a stereotype of Gypsy life. I mean no disrespect to Romani culture. I have started doing research – if you are interested in the Romani people, the British Romanichals or the Irish Travelers there are many articles on the Web. )

The vardo shape was what I kept seeing, and the door. So I set off to make a hinged door pendant. Yes, you read that correctly. The good news: I have 2 that work. The bad news: After making 4 pendants I have no finished necklace for the hop… So here’s what took all of my time… Vardo pendant

The copper door, Door #1. A friend gave me scraps of 1/4 plexi and I wanted to use that inside to cover the image and add depth. You can see the diagrams I drew, planning hinges. The hinges are parts of the sheet rolled with pliers. The hinge is small tubing with a balled wire inside. The piece is joined with microbolts at the bottom and a tube rivet at top – that will be the bail. Three holes are located below for dangles. The image is an antique postcard, and the door has a curtain of sorts – resined paper circa 1880’s. I am currently working on  a silver chain and copper pin that will latch the door closed. 

 I am happy with the piece, a protoype of sorts – and see that hinges will be easier in the future now that I purchased bail making pliers! Its app. 1.75″ tall so its not too massive to wear. I am imagining a triple strand – 1 of sari ribbon, 2 of beads ( one seed bead strand, one gems). 

While all that was happening so was this: 

Keyhole vardo pendants

Teal keyhole shrine – Polymer pieces, built in bail, hand painted. Image under mica. The image is “The Fool” from an Italian Tarot deck of the 1800’s. The Fool card means free of burdens, worries; living in the now, setting off to journey, spontaneity… among other things. It seemed to capture some elements of the Gypsy symbolism I was working with …

Red keyhole shrine: Constructed as the blue shrine, the image will have resin or glaze over. I am thrilled with these results even though there were hours of fiddling to shape and then after curing, carve the door and hinge. I think the shape is also the most clearly derived from the vardos’ original inspirarion. The image (seen below) is Mucha’s Moon/cresent goddess. 

round pendant window

Round porthole window: Thinking on the painted pattern and designs on a Gypsy caravan… you see here (from L to R) the front window shutter, the center image and the back. The cover will have a tube rivet, and the piece will be simply hung on a large jump ring. The image is a Gypsy woman, also from Alfonse Mucha. These are the images I was considering: 

Image references - gypsy

(All images by Alfonse Mucha except the Tarot card images. )


So you can see I was inspired! But I still have quite a bit of work to do! I would love to hear your thoughts and preferences from the four… I will do a follow up post when they are completed. I look forward to traveling the blogs to see what my colleagues have created; the list is shown below.Thanks for stopping by! 

The Challenge of Music participants