Feeds:
Posts
Comments

Posts Tagged ‘herbs’

With autumn in our midst, many gardeners are focused on their fall gardens of leafy greens and roots. However, now is a wonderful time to create a winter garden of indoor herbs or tomatoes. Adding a little living green to a home during the chilliest of months can be simple.

One of the best ways to get indoor herbs started is to root a cutting—this way you don’t have to play the waiting game for a seed to sprout and develop into a mature plant. Cuttings may be rooted in water, moist soil, or even a damp paper towel wrapped in plastic. Rooting hormone will help speed the process along. Basil, sage, thyme, rosemary, mints and tomatoes have all been known to root and not let go!

Choose a Cutting

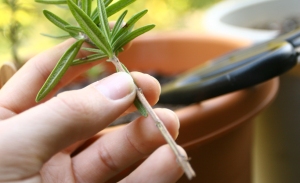
When choosing a stem to cut,  it is important to avoid new, immature growth. I prefer to use a woody or developed softwood side shoot. Take cuttings early morning before a warm sun has sapped their stored energy.

It is also a good idea to take several cuttings per chance one doesn’t develop roots.

Remove Leaves

Remove any leaves and side shoots 2”-4” from the bottom to prevent rot.

Dip cutting end into rooting hormone.

Rooting mediums:

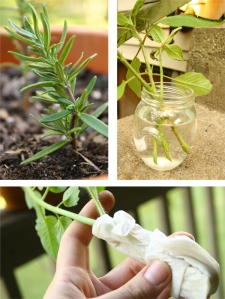
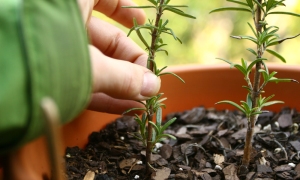
  • Soil – make sure the soil mixture is light and retains moisture.
  • Water – root cuttings in a jar of water. Don’t forget to change the water every couple days.
  • Paper towel – dampen a paper towel and wrap around the base of the cutting, then wrap plastic around the paper towel.

Developing Roots

Until they begin to develop roots, cuttings need to remain moist and must not be allowed to dry out. Use a plastic bottle or plastic bag (like a miniature greenhouse) to help retain moisture. Stick the cuttings in a sunny location such as an east or south facing window. Do not fertilize until roots have developed.

Tug Tug Tug

Check weekly for root development. If using soil, gently tug on the cutting—any resistance means it has begun to develop roots. Generally it will take anywhere from 2-6 weeks for roots to develop. If rooting in a glass of water or a damp paper towel, wait until roots are at least 2” before replanting in soil.

Read Full Post »

Highly aromatic, lemongrass grows in thick, cascading clumps that make an attractive indoor or outdoor plant. This plant isn’t just a beauty; it also has medicinal properties and can be made into a delicate tea. In addition to being healthy, this herb will also impart a citrus flavor into any cuisine. If you’ve been interested in experimenting with it, growing lemongrass couldn’t be easier.

Getting Started

Purchase lemongrass stalks that are fresh and still green; avoid stalks that are turning brown and drying out. The ones I purchased were beginning to yellow, but still rooted. Each stalk will multiply to create several new stalks by the end of the season. Fresh lemongrass may be difficult to find in some regions, so I suggest looking in specialty shops—I found mine in an international food market.

Watching Grass Take Root

I prefer to make a fresh slice on the end of the lemongrass to help it take in water until the new roots form. Now simply plop them into a jar of water, making sure the bottom bulb section is covered. After 2-4 weeks, roots and new growth should begin to appear.

Watching Grass Grow

Once 1-2” of roots develop, the lemongrass may be planted into soil. If unable to plant right away, don’t worry–lemongrass is patient. It was still chilly outside when the roots developed on mine, so I left mine in water until the roots were approximately 5-6” in length and the weather had warmed.

Choose a well-draining container to plant the stalks in. When planting, ensure that soil covers the root base. To prevent a risk of rot, do not bury into the soil any deeper than where the highest root nodule is. Water thoroughly. The stalks may feel loose at first, but will soon grow new roots to anchor them securely into the soil.

Lemongrass is not frost-hardy and must be brought inside if temperatures dip below 45°F/7°C.

Health benefits

According to The Herb Bible: A Complete Guide to Growing and Using Herbs (Harding, 2006), lemongrass has many medicinal benefits such as:

  • Lower fever, especially malarial
  • Treating stress-related symptoms
  • Aromatherapy
  • Aids digestion
  • Essential oil relieves muscle aches and pains, injuries, and poor circulation
  • Insect repellent

Making tea

Lemongrass tea is a delicate, citrus flavored tea. It can be made by either steeping the top leaves or the stalk of the plant. The top leaves make for a lighter citrus flavored tea. Simply cut up the leaves and steep as normal—approximately 5 minutes.

When using the stalk, peel off the outer leaves—these are bitter. It is necessary to bruise the stalk by either bending it several times or crushing it under the blade of a chef’s knife. Cut the stalk into pieces. Add to boiling water and steep until preferred strength is reached—approximately 5-10 minutes.

Cookery

Lemongrass is one of those mystery herbs you typically see sold as dried, brown stalks in a little glass bottle at the grocery store. Well-known in Thai cuisine and common in Southeast Asian dishes, lemongrass can be added to soups and curries or made into a tea. It pairs well with coconut milk and will provide a delicate and acidic lemon flavor to balance and compliment a dish.

Lime and Lemongrass Cooler

Servings: 4

  • 2 limes, peeled and each cut into 8 pieces
  • 1 small lemongrass stem, coarsely chopped
  • 3 Tbps. Sweetened condensed milk
  • 4 crushed ice cubes
  • ½ cup water
  • 4 slices of lime
  • Soda water, to top off

Place lime pieces, lemongrass, and crushed ice cubes in a food processor.

Add the water and sweetened condensed milk, process for a few seconds, but not until completely smooth. Strain the mixture into glasses. Add a slice of lime to each glass and top off to taste with soda water. Serve at once.

Enjoy!

After removing, the outer leaves of lemongrass make great cat toys!

Read Full Post »

Starting your garden from seed may sound like a great, thrifty way to save some cash. However, there are several herbs that will give a variety of disastrous results when grown from seed. I strongly recommend propagating the following by cuttings or plant division.

Tarragon

When looking to grow Tarragon, never buy seeds. It is very important to be aware of what you’re buying because incorrect labeling does occur. Many times, when you see seed or plants for sale, they will either be Russian Tarragon (Artemisia dracunculus L.) or Mexican Tarragon (Tageteslucida). Look for French Tarragon (Artemisia dracunculus var. sativa). Taste a leaf before purchase to ensure the plant is labeled correctly—look for a numbing effect on the tongue when purchasing French Tarragon.

The Differences

French Tarragon (Artemisia dracunculus var. sativa)

  • Superior flavor
  • Preferred in culinary
  • Numbing effect on tongue
  • Rarely flowers, seeds are typically sterile
  • Can be finicky to grow

Russian Tarragon (Artemisia dracunculus L.)

  • Belongs to same family as French Tarragon
  • Lacks flavor, may be bitter
  • Readily flowers and sets seed
  • Hardier and more tolerant than French Tarragon

Mexican Tarragon (Tageteslucida)

  • Actually a variety of Marigold
  • Closest in flavor to French Tarragon, so may be used as a substitute

Rosemary

I recommend everybody interested in growing rosemary to buy an already established plant or start with a cutting from an established plant. The seed germination rate is incredibly low—I had only one germinate last year. If you’re lucky enough to get the seeds to germinate, the seedlings can be fussy and difficult to keep alive. The seedlings seem to prefer a moist, well-draining soil and will quickly die if the soil remains dry too long. Rosemary is also slow growing and will take at least a year to establish.

Mint

Mint plants should be incredibly easy to find and are even easier to propagate from cuttings or division. Due to hybridization, mint should not be started from seeds. This causes the mint to have a rank odor and taste. If possible, I strongly recommend finding a good wild or heirloom variety to start with. I have purchased mint varieties from stores that turn rank after a couple years of growth. Since mint tends to readily take over where it’s grown, I encourage everybody interested in growing mint to check with friends and family for a clipping or plant division.

Lavender

If absolutely insistent upon starting from seed, Lavender would be the safest from this list. The biggest problem with Lavender seed is that it can take up to three months to sprout. From there, it may take one year for the plant to become established and bloom. There are also many varieties of Lavender to choose from, just make sure to choose an edible variety.

These plants may sound discouraging to grow, but with a little attention a garden can be saved from imposters. Starting plants from seeds may sound like a cost-efficient method to acquiring a garden, but it may have the hidden cost of replacing poor quality varieties with the proper plant. If looking to save money, cutting and plant division are the keys to success with these four plants.

Looking to start from seeds? Try reading “Seed Sowing: Timely, Thrifty, Universal Methods”

Read Full Post »

Fundamental maintenance is necessary for keeping any container garden alive and thriving. My container garden hosts quite the arsenal of plants this year which requires a strategic plan of action.  While it is easy to feel overwhelmed by the responsibility of gardening, creating a routine will help to simplify the maintenance.

Water

Adopting a watering schedule is very important. Plants growing outdoors in containers will need more care and attention than plants growing indoors. Outdoor plants will require more frequent watering. Many factors attribute to the watering needs of a potted plant. These needs will depend on the size of the plant, pot, temperature and location.

Soil Quality/Condition

A good quality potting soil is preferable. Cheap soils may have a lot of filler that will cause the dirt to dry out quickly. I prefer to mix my own soil when I have the space and time—this year I’ve used a mix of cow manure compost, soil conditioner, sand, and a high quality potting mix. I mix in accordance to the need of the plant; the size of the plant in ratio to pot size should be taken into account when mixing soil. When planting a small plant in a large pot, a lighter soil mixture may make all the difference on whether the plant lives or dies.

Some plants that prefer well-draining soil:

  • Lavender
  • Tarragon
  • Citrus
  • Rosemary
  • Succulents
  • Cacti
  • Many tropicals

Repot if necessary

Nearly all newly purchased plants will need to be repotted into a bigger pot with fresh soil. To check if your plant needs repotting, simply turn over the pot and look at the drainage holes to check for visible roots. You may also gently remove the plant from the pot, if it comes out as a large, root entangled clump then it is time to repot. When repotting, it is important to loosen the roots—some dirt should be left around the roots.

Fertilize

Does your potting soil bag say it will feed your plant for six months? While this may be true for some plants, I have found that any vegetables, herbs, or plants that are heavy producers or fast growers will require fertilizer before the six month period. Using a good fertilizer on a regular schedule will help keep your garden green and thriving. Heavy feeders will require fertilizer weekly; while light feeders may require it monthly or less. Every plant will show signs of stress when in need of fertilizer; this may include yellowing or paling of leaf colors to wilting of leaves and lack of new growth.

Prune

Many plants will fail to thrive if not pruned. Pruning not only shapes a plant, but encourages bushy, new growth and proper airflow to prevent diseases. This is especially useful with herbs and necessary with fruit trees. Herbs will bush out, producing more leaves to be collected for your next meal. Pinching back new growth will also help delay flowering to prolong the usability of the plant.

According to Alli Cobra of our own “Greenhorn Wisdom” fame, for fruit trees, it is necessary to remove center branches to help air flow and prevent disease.

She also feels it is important to remove:

  • Center branches
  • Overlapping and crossing branches
  • Branches with weak crotches — for example, branching has a very high angle that is less than 45 degrees
  • Any other crowded areas to improve overall airflow

Deadhead

Flowering plants do best when deadheaded. This is the removal of dead or dying flowers. By removing the dead flowers, the plant will put more energy into producing new flowers instead of producing seed. Many plants can be kept flowering throughout the season if deadheaded when necessary.

Protection from the Elements

When growing in containers, plants will need protection from the weather. This is particularly true if in a place with a harsh winter and long periods of frost. According to Alli, surrounding the pot with mulch or leaves, placing in a shed or garage after reaching dormancy or placing them in a trench may make all the difference on whether the plant will survive the winter to thrive when spring arrives.

Growing on a balcony will also leave plants more prone to being blown over or knocked over by a pesky squirrel. To help discourage this, place a layer of small rocks in the bottom of pots.

Whether protecting one plant or many from a troublesome squirrel, every garden thrives with a little routine. Armed with the basic knowledge of container garden maintenance, any garden under your watch will not only remain green and lively, but will flourish and impress.

Looking to get into container gardening? Try reading our article about getting started here: “Gardening in Small Spaces

Read Full Post »