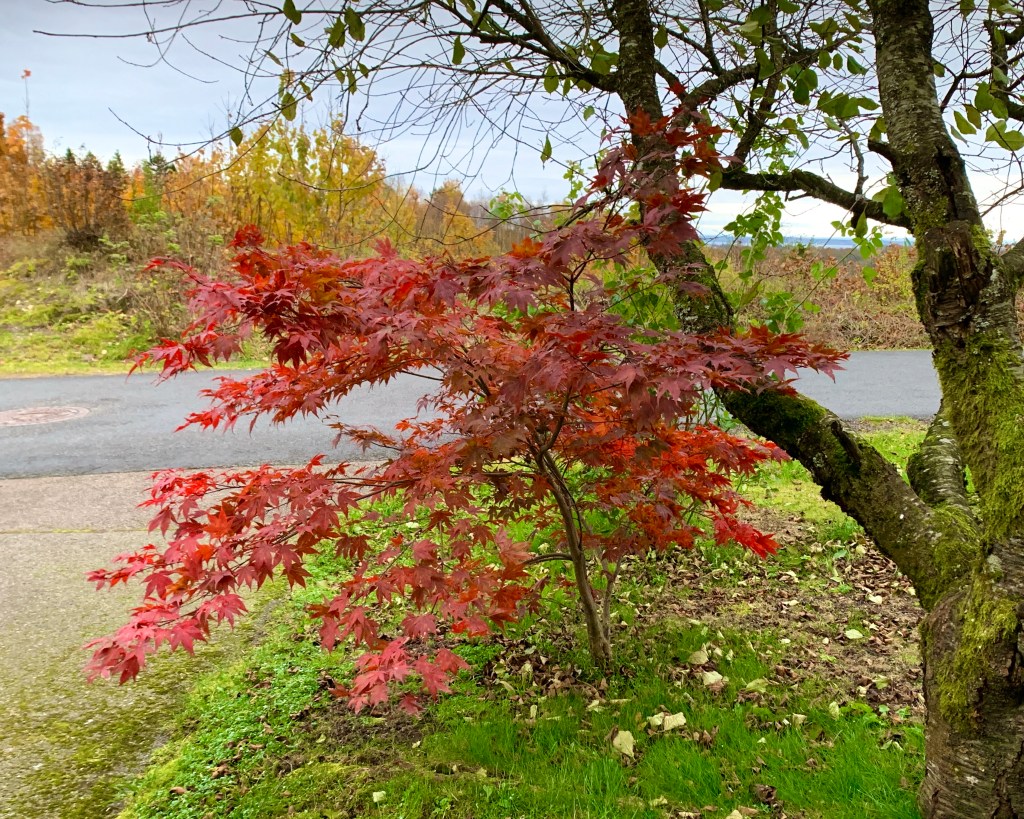
I have done ‘leaf-peeping’ in the Adirondack’s a couple of times – and it is fantastic. But this year, I only have to go outside my front door to see some absolutely amazing colours and scenery.
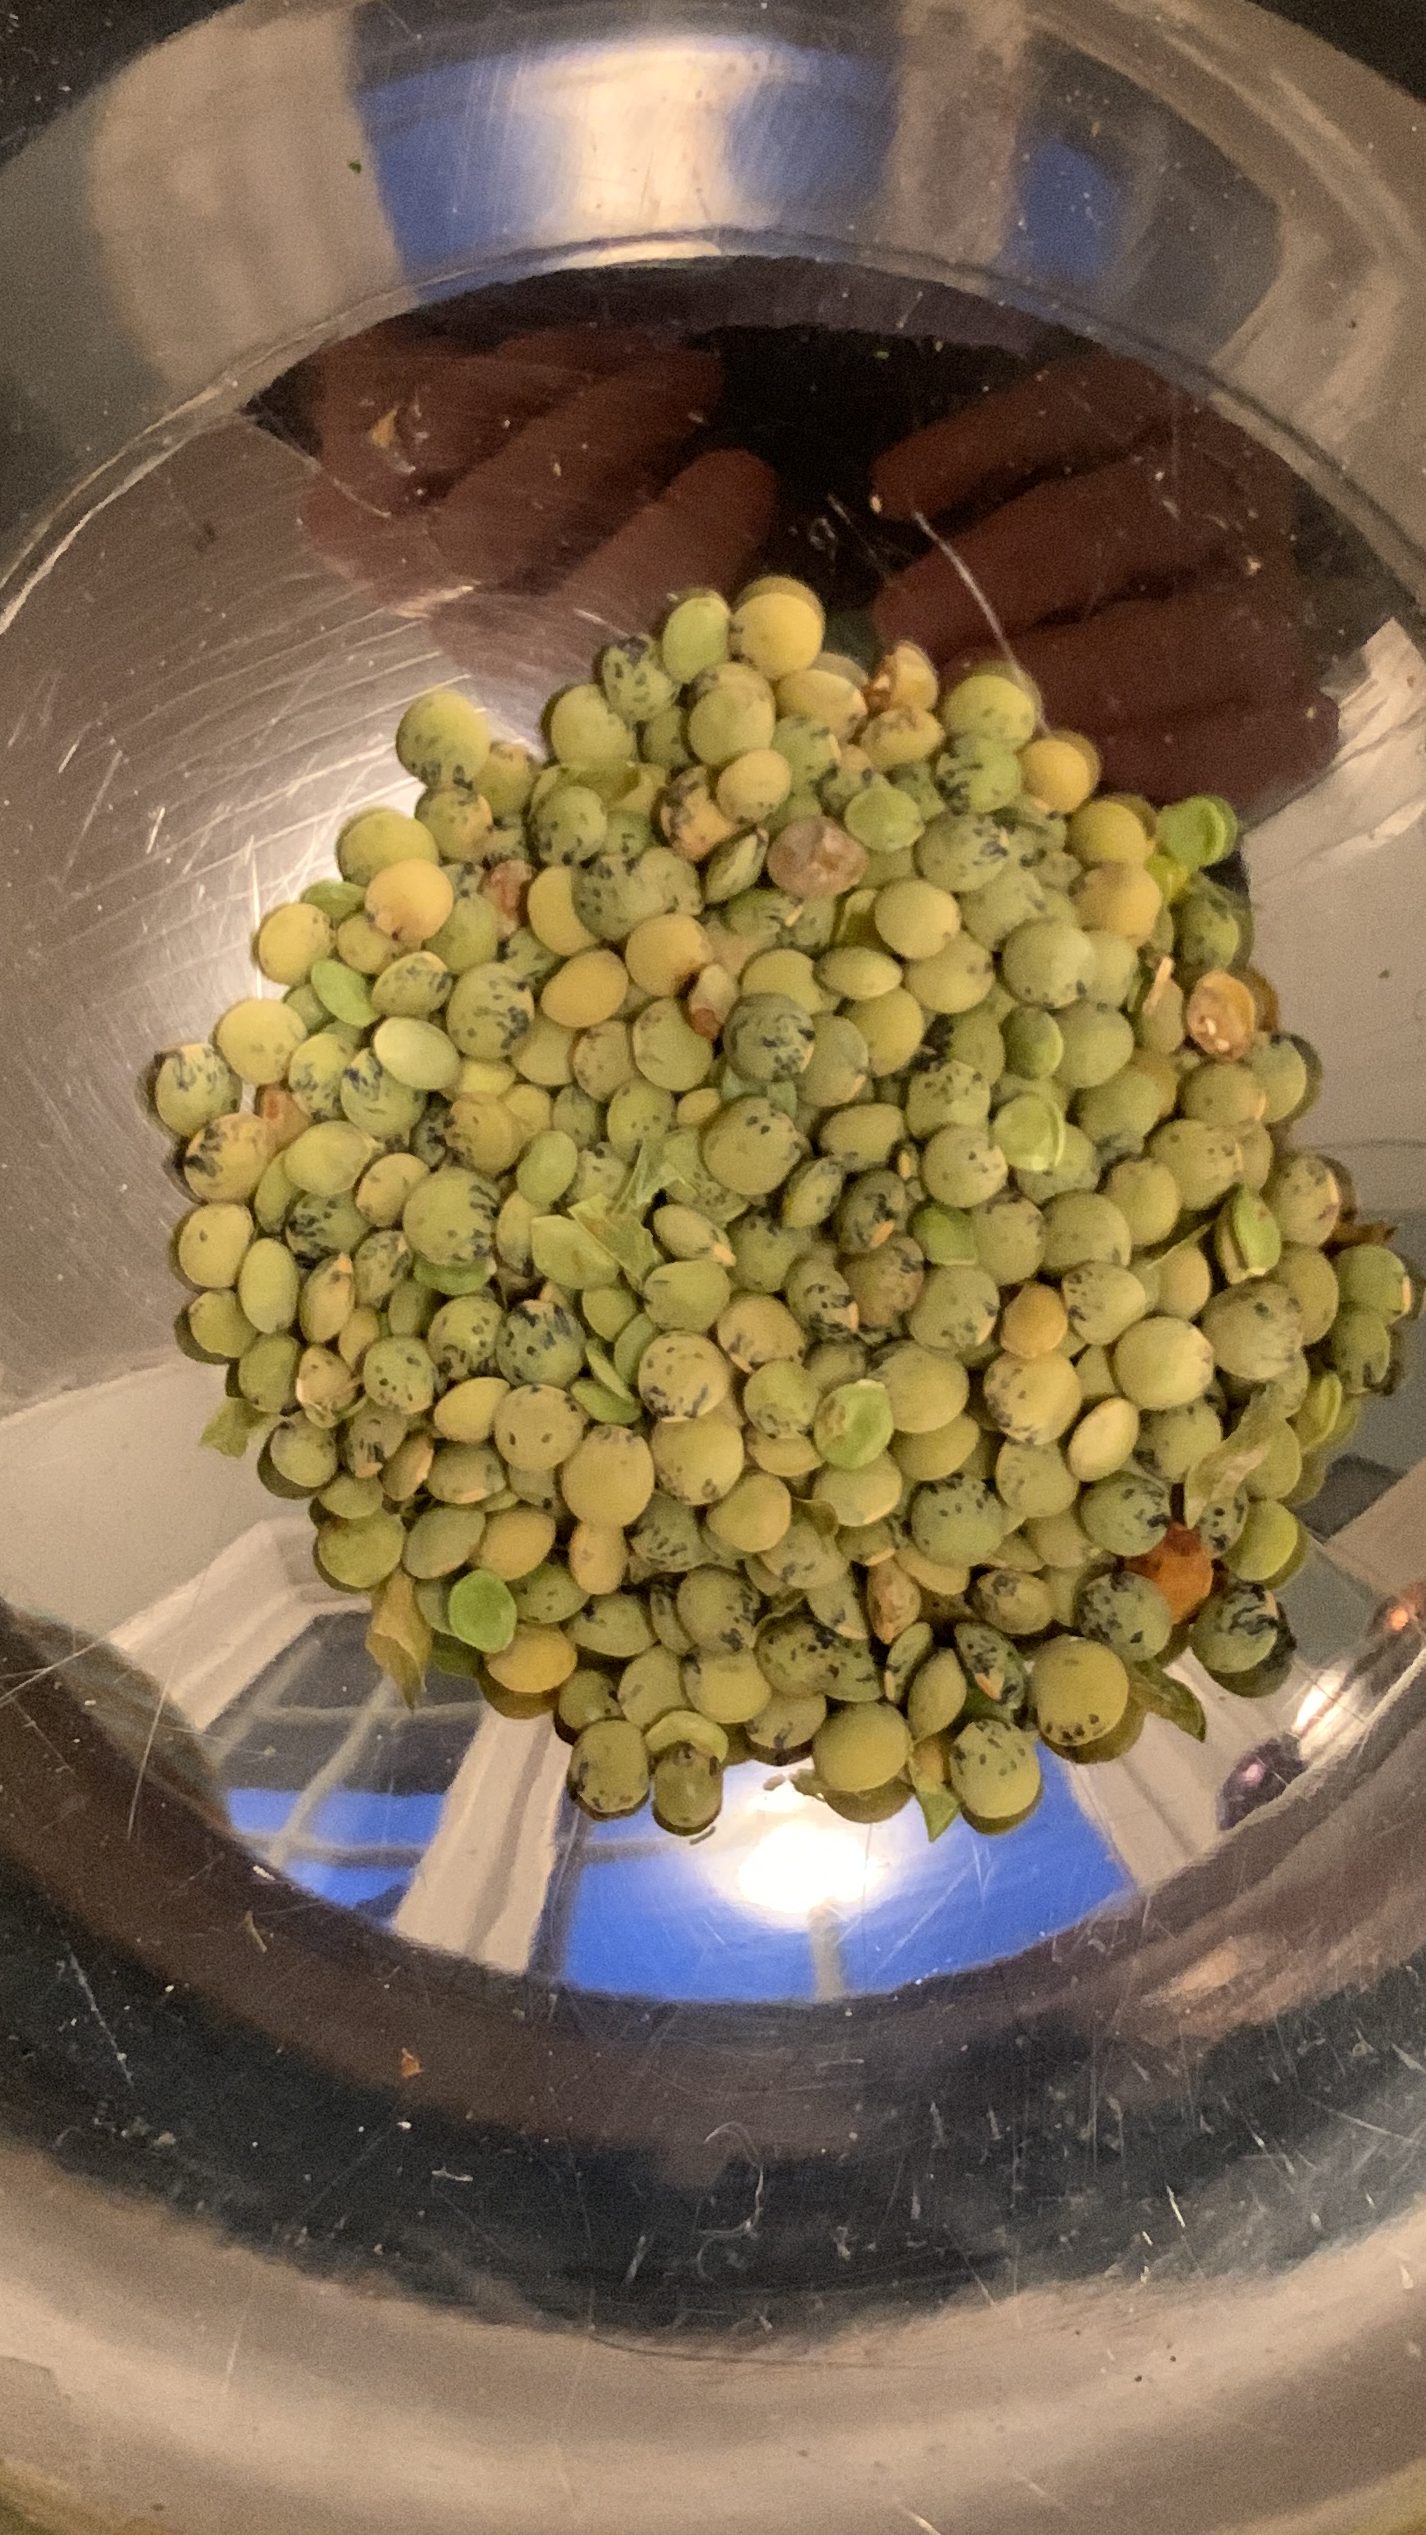
Puy lentils
I understand that it is a combination of rain, sun and temperature that helps to make the collars glowing. The rest of Europe has seen terribly high temperatures, fire and drought, but here in Norway the summer has been as I remember them from long ago – comfortable temperatures with just the right amount of rain (at night) and of course sun. This I believe gives us the colours we are seeing now.
I don’t think the beautiful coloured leaves will last too long though. I have done all I need to do to prepare for winter in the garden, protected some of the plants from foraging deer, weeded there it is beneficial to do so and filled the freezer with berries to last the long winter months. I even grew some puy lentils and shelled them ready to go into our Christmas meal. There aren’t too many, but it was fun to do.
Today we had snow flurries, not the first as there was also some earlier in the week; tomorrow’s forecast is for quite a bit of snow but I think the ground is just a little too warm for it to remain. The tyres are changed on the car ready to welcome the cold and ice. Inside we are warm and cosy with our heat pump and log fires in the evening.
November/ Christmas cactus – Schlumbergera Eva
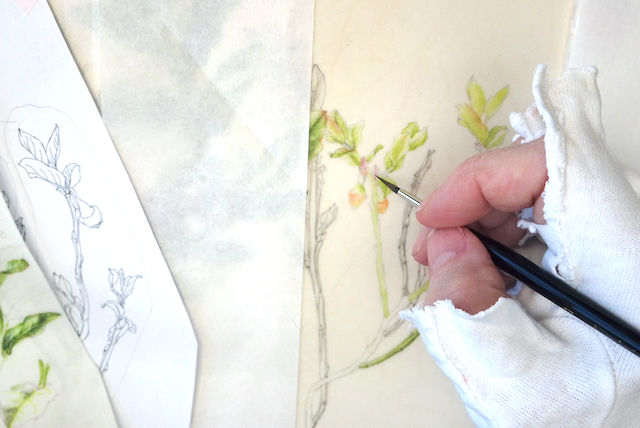
As far as painting is concerned I have been trying out different papers to use with colour pencil. Normally I use my old stock of Fabriano 5 or Fabriano artistico, but I fancied trying it on colour paper. Unfortunately there does not seem to be the same choices here as I am used to, so I will make do with the few I have for the moment. I will just see if it is worth pursuing.
The last time I exhibited in Norway was 1990 in Stavanger when I exhibited on my own. At that time I was just painting birds and borrowed ‘skins’ from the Stavanger museum collection. It wasn’t until after I moved to the UK in 1996 that I started painting plants – and then not until about 2004. The garden was obviously the trigger.
Botanical art is not a big draw in Norway – I don’t know why! There are so many fantastic plants, even up at the North Cape in between the slate. Some of these plants may be very tiny, but they survive and are colourful – if you have eyes to see.
The series of plants I painted for my last RHS exhibit were all found in the Norwegian mountains and Norwegians love these species. Perhaps with time people might be interested in what I do and want to draw or paint themselves. Hopefully I will be able to help in that process.
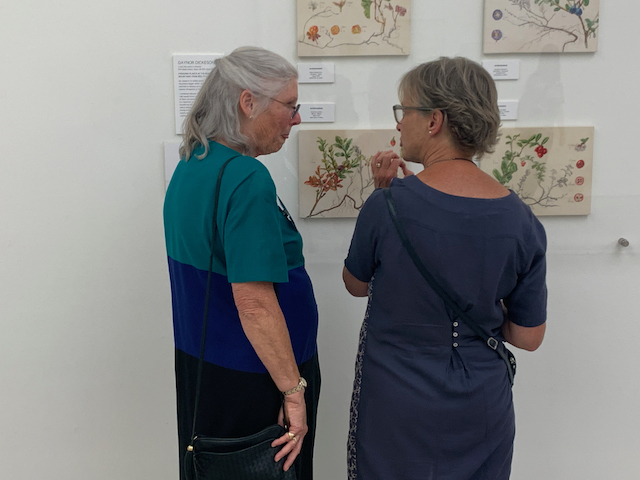
The exhibition I have been asked to participate in is at the local Horten Art Society. Apparently several local artists will be taking part, therefore I am glad that I was asked to be one of them. I have no idea which pictures I will be exhibiting, so watch this space. I don’t know whether to just have plant portraits, or whether to include work typical of me with details and dissections. I think I will just have to feel my way around this.
By the way, for anyone living in the vicinity of Horten, Norway, the exhibition is at the Kihlegalleriet, Falkensteinsveien. 29, 3189 Horten. It starts Saturday 11 November, running until 3 December. but only open at the weekends.
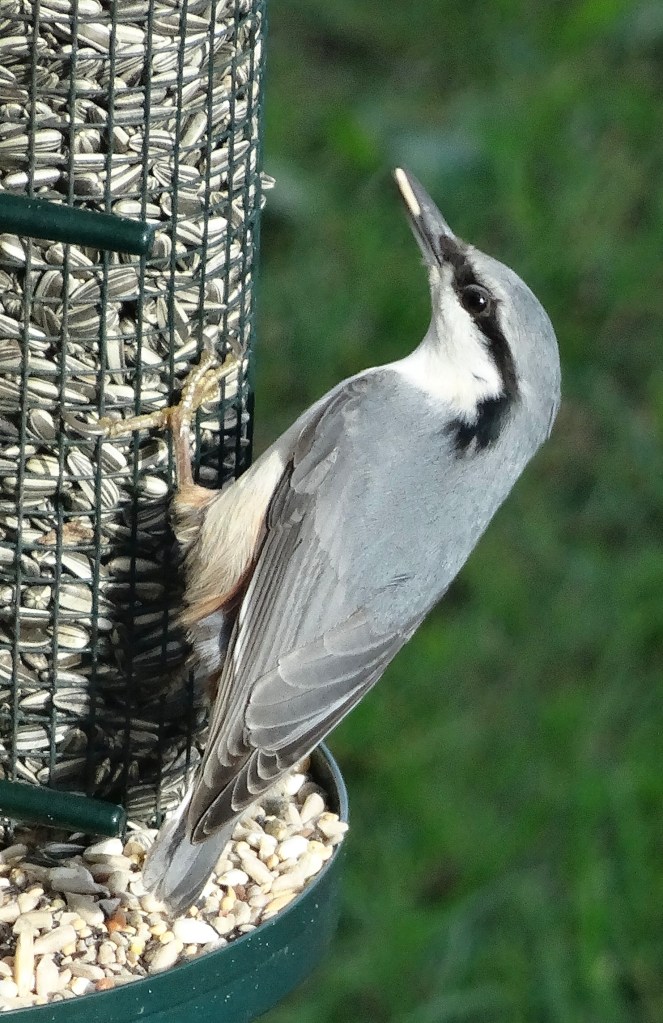
In the meantime we have a huge number of birds using our feeders, including Hawfinches, Woodpeckers and Bramblings. They are a wonderful and varied sight.
When the above picture was taken I had absorbed the judges feedback from a few hours earlier.
I had travelled from Norway the night before the exhibition and as soon as the plane landed I was able to access my emails. One of them was from the RHS telling me the results of the judging – a Silver Gilt award.
Before being invited to exhibit with the RHS one has to have ones work assessed by a panel of judges. The work, several pictures, needs to be of a consistent silver medal level.
If one is awarded a medal at the exhibition (this is not guaranteed), it is one of four in this order of merit:
Gold
Silver Gilt
Silver
Bronze
I, like everyone before me, hoped that my work was worthy of a Gold medal. It was not to be this time.
But having not got a Gold I can happily comment that this prestigious exhibition is international and the best artists from around the globe take part hoping to win this coveted award.
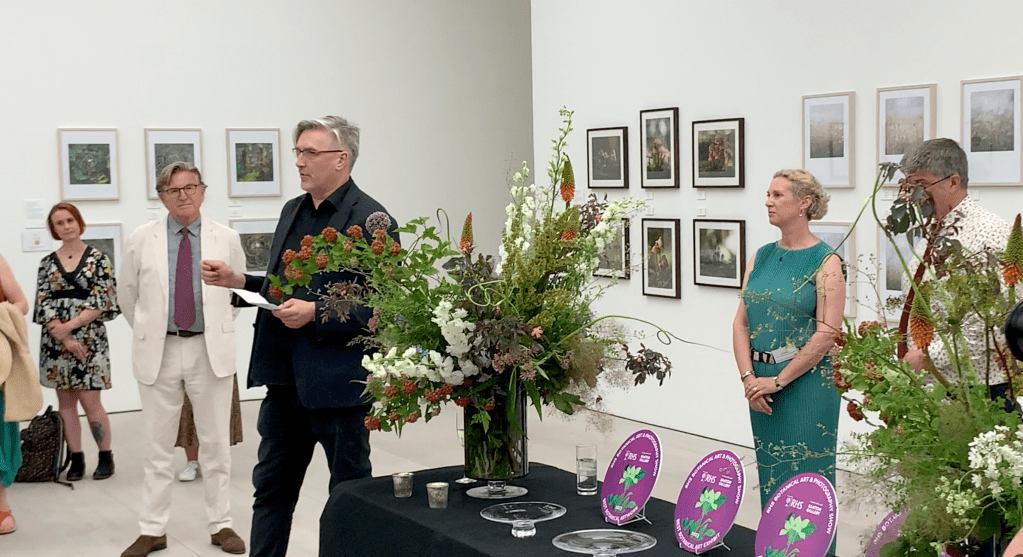
Arriving at the Saatchi Gallery on the morning of the preview.
I don’t have photos from the morning or afternoon sessions at the Saatchi gallery, but I was kindly and quickly nabbed as I arrived before lunch by someone who had taken the time to study my exhibit and wanted to understand my award. I was glad of this as it helped prepare me for my feedback due in the afternoon as the assumptions were correct.
Well what about the feedback?
Luckily I was well prepared.
I was extremely lucky as I was afraid that the judge(s) might not know my subjects. This was not the case as the judge given the task of my feedback had studied one of the species and had ‘gorged’ on most of the others! Apparently, my paintings were so convincing as to want to pick and eat them!
Therefore, it wasn’t the technical skills or quality of painting that was an issue.
Botanically, I was told that there were no holes in this area and they liked my use of graphite.
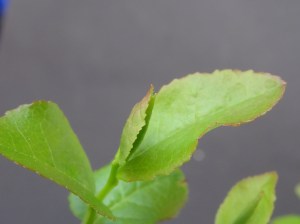
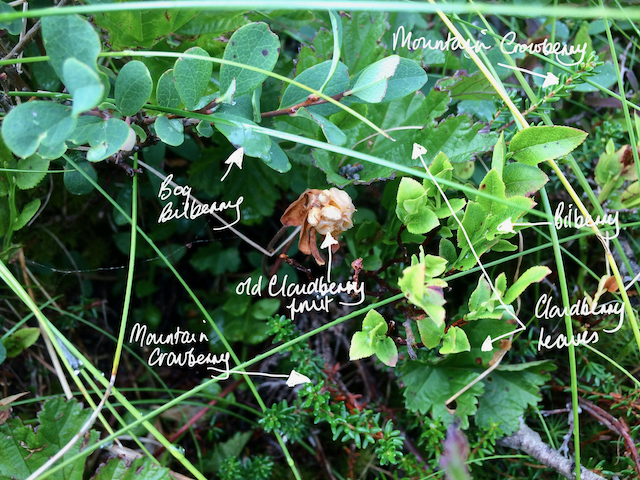
Young bilberry leaf
One of the judges had queried the nature of my Bilberry leaves as they thought them a little ‘wavy’. I commented that particularly young leaves are quite thin and often the edges were of a rather wavy nature.
Another query had been why I had chosen to paint on vellum rather than paper. I was readily able to say that the colours of the tiny fruit in the mountains are so intense that the way colours are reflected off vellum truly justifies that choice of support.
However, it seems that the issues the judges had with my pictures were my scale bars – again. It was my scale bars that were the issue in my last exhibit in 2014. But this time it was slightly different. Apparently, it was felt I had too many of them and that they had a tendency to dominate the picture making them intrusive.
I was told that the ‘judges decision was not unanimous and that there was gold in there’.
The judge who gave me the feedback felt that with the present exhibit format I was rather ‘hamstrung’. To explain that a little better, this was only in the way I had planned by exhibit without knowledge of the labelling restrictions now in place. I don’t know if I had missed some information sent out previously from the RHS, but as my exhibit took six years to prepare, plan and paint, things have changed as one would expect.
The way an exhibit is hung including the information given about each picture is the ultimate responsibility of the artist. This includes scientific names and common names used and their spelling. Previously, labelling included information about the species referring to parts on the picture. i.e. dissections were described in the legend and there might be additional information of interest. As such I wouldn’t have needed so many scale bars on each picture.
But now there was one overall description of the exhibit with the limitation of 100 words, plus an individual label giving the plant name.
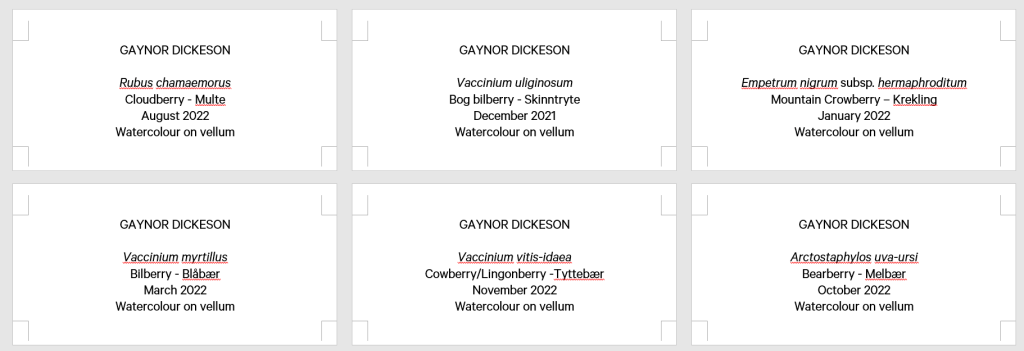
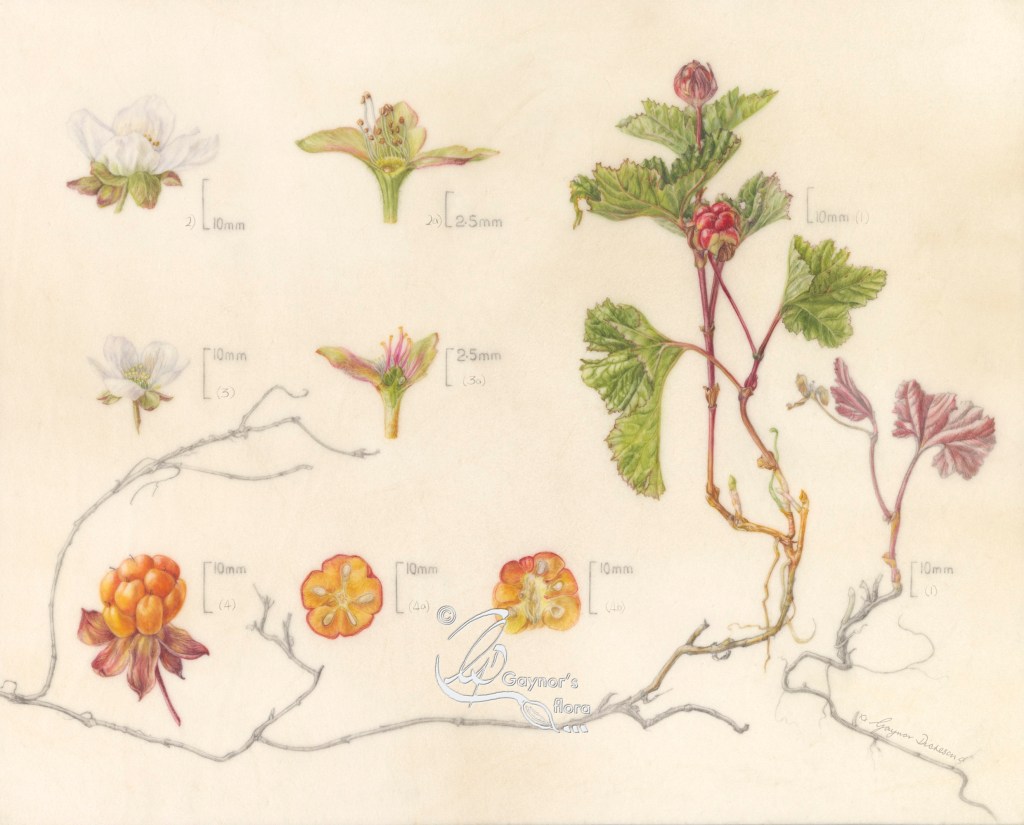
Rubus chamaemorus – Cloudberry
If one is looking at scale bars as a negative, this picture was probably the worst one!! I had three different sizes on the picture; the actual size of the plant to the right, the berry, dissection of the berry and whole flowers were the same enlargement and the dissections of the male and female flowers were enlarged further. Unless this distinction is made, no-one would actually understand that they were different sizes.
As it was, there was nowhere to inform that this fantastic species had separate male and female plants, therefore it also had separate male and female flowers! Furthermore, I was unable to show that the plant grew well in boggy areas.
The name of my exhibit included the phrase ‘ from bog to sand’. There was no indication in the exhibit that the six species grew in either sand or boggy areas and there was no room made to do so either.
Although my scale bars got in the way of the judging process, I was told that each of the pictures were valuable pieces of documentation.
How do I feel about this experience?
I have to say that overall it was fantastic. It wasn’t the same as previously where there was a special relationship between the exhibiting artists who put up their own exhibits – keeping their fingers and toes crossed that nothing would fall down. But it was different. We still developed good relationships as we were all in the same boat and just as unsure about ourselves and our work as we would ever be.
Thinking only of the exhibition and the run up to it, it seemed so well planned and disciplined. There was proper project management and information from the artists was needed in a timely fashion. We weren’t left in the dark about anything. What the RHS and the Saatchi Gallery wanted from us was clearly explained and they did their best to give us what we needed within the boundaries they had set. As an example, except for my pictures, all were on watercolour paper and needed to be framed with a mount. Right from the beginning I had asked for mine to be mounted behind perspex so that the whole vellum mounted block was visible. They did an absolutely beautiful job of this and for me this aspect of the exhibit was perfect.
The feedback from the judges was carried out in a sympathetic way. We were seated in front of our exhibit during this process and as far as I am aware no-one else was in the same gallery at the same time.
The preview was also done very well with speeches and the delivery of special awards.
Will I do this again?
Absolutely! But although I love tiny plants and dissections to discover the hidden life of the plant, I might actually keep it a little simpler next time!
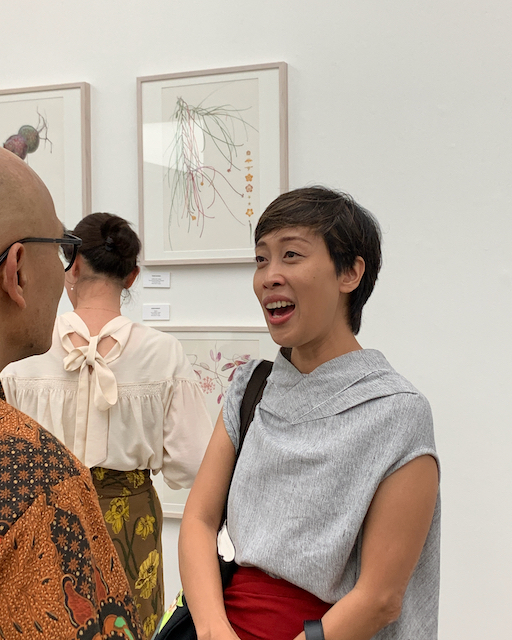
Chatting with Diane Sutherland – my son absorbed in my paintingsAsuka Hishiki – JapanThe award ceremony – Paul Foster (Saatchi Gallery), Keith Weed (RHS), Charlotte Brooks (Lindley Library)Eunice Nugroho – IndonesiaGreat discussionsChatting with Julia TrickeyKeahyung Lee – KoreaSo good to see old friends again!Youngran Choi – KoreaYungin Park – UKEnd of a long and fruitful day
If you have seen the exhibition, do let me know what you think of it. And, If you have any queries about my previous blogs on the series of paintings or about my experience, also get in touch. I look forward to hearing from you.
The title of my exhibit at the “RHS Botanical Art & Photography Show” is as above:
Foraging Plants in the Norwegian Mountains – From Bog to Sand.
Six of my watercolour and graphite paintings are exhibited by order of habitat starting with those growing in the wettest environment to those in the dryest. Seven paintings were completed not just the six, therefore it was a difficult choice to remove one of them. The second one shown below, the small cranberry, is not in the exhibition.
1. Rubus chamaemorus – Cloudberry – Multe Watercolour & graphite on vellum. August 2022
1) Habit 2) Male flower – 2a) LS Male flower 3) Female flower – 3a) LS Female flower 4) Fruit 4a) TS fruit 4b) LS fruit
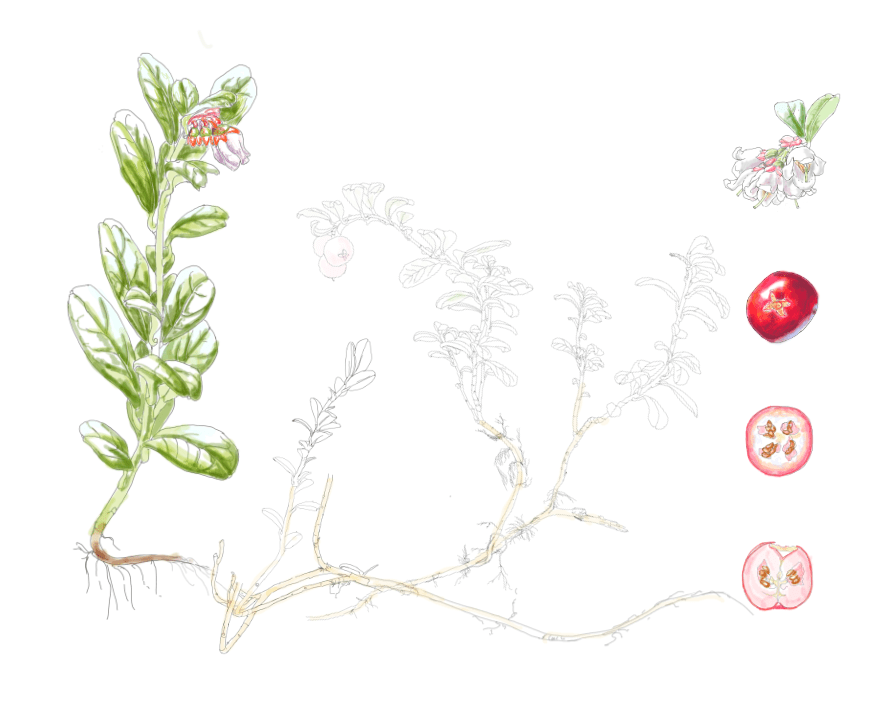
2. Vaccinium oxycoccus subsp. microcarpum – Small cranberry – Små tranebær Watercolour & graphite on vellum. January 2022
1). Habit 2). Flower 3). TS fruit 3a) LS Fruit 3b) Fruit
3. Vaccinium uliginosum – Bog bilberry – Skinntryte Watercolour & graphite on vellum. December 2021
1) Habit 2) Flower pair 3) Fruit 3a) TS fruit 3b) LS fruit
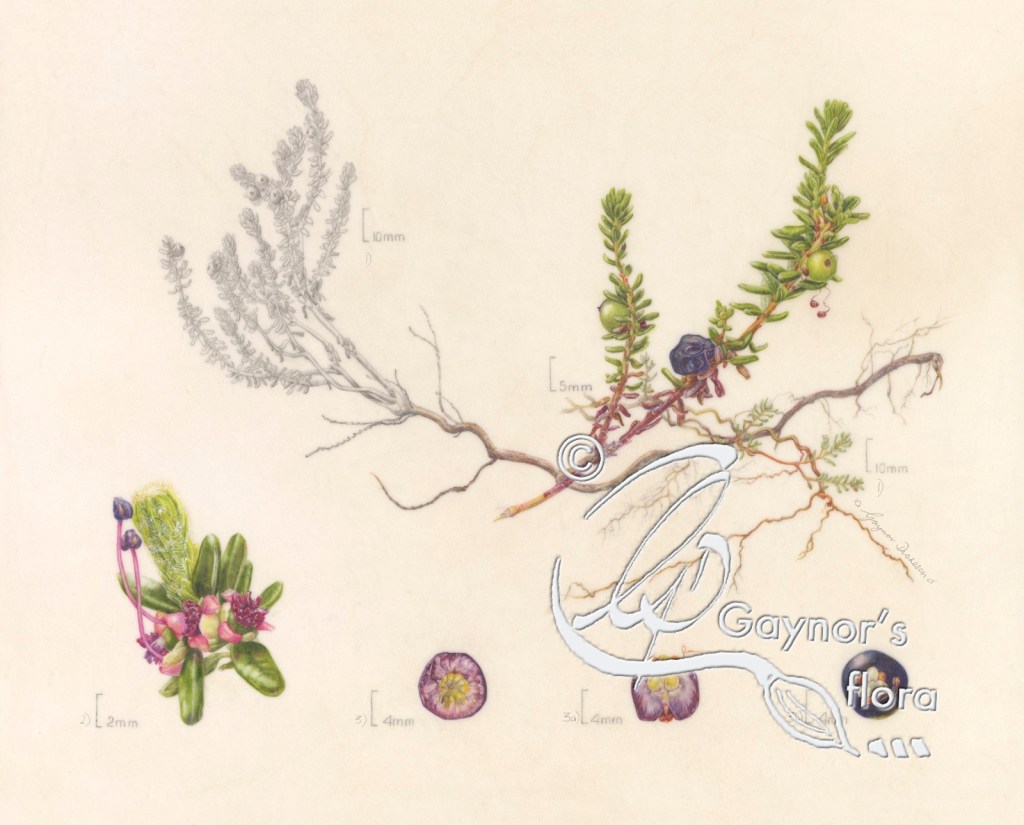
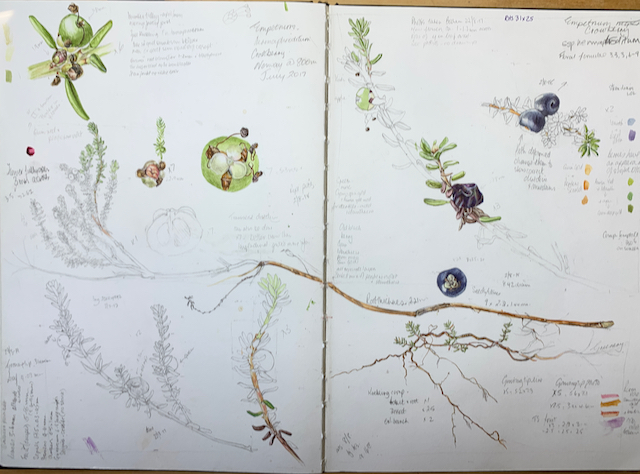
4. Empetrum nigrum subsp. hermaphroditum Mountain Crowberry – Krekling Watercolour & graphite on vellum. January 2022
1). Habit 2). Flower 3). TS fruit 3a) LS Fruit 3b) Fruit
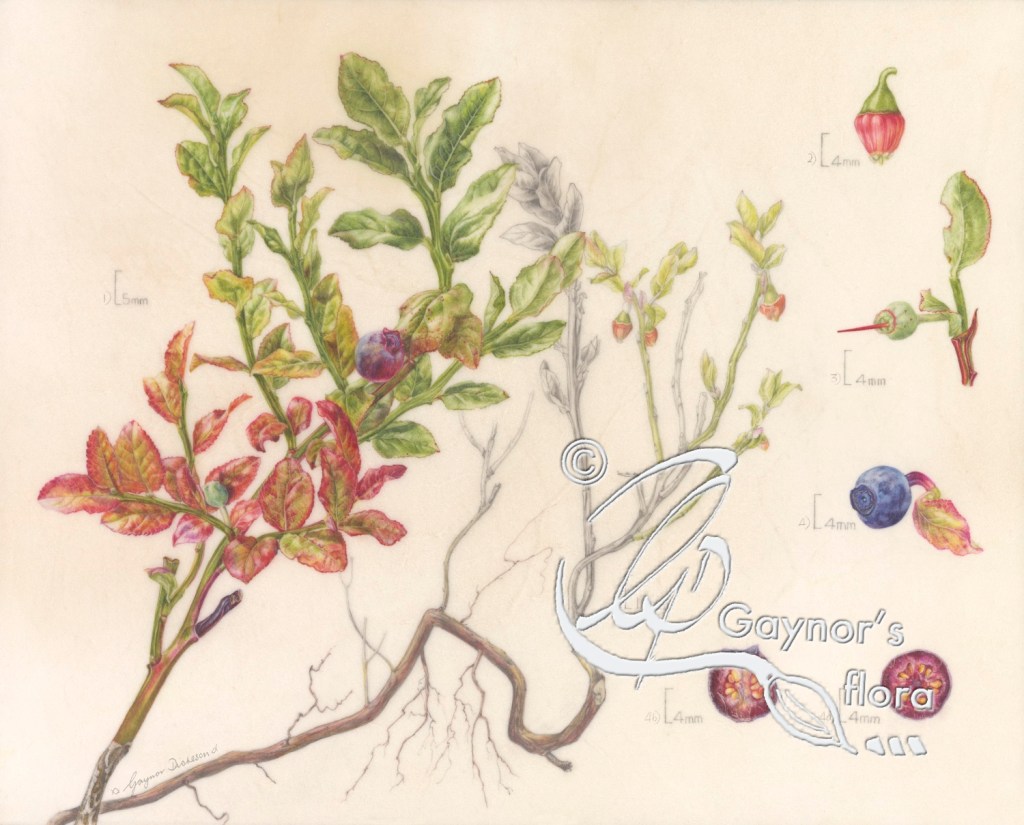
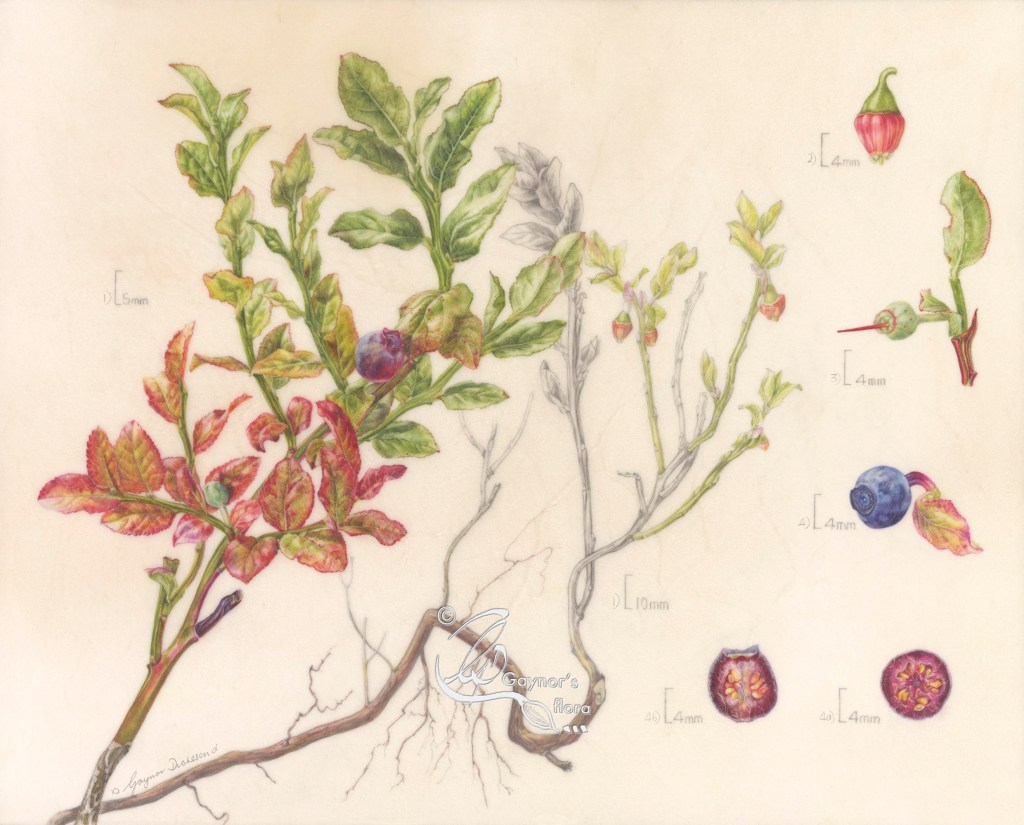
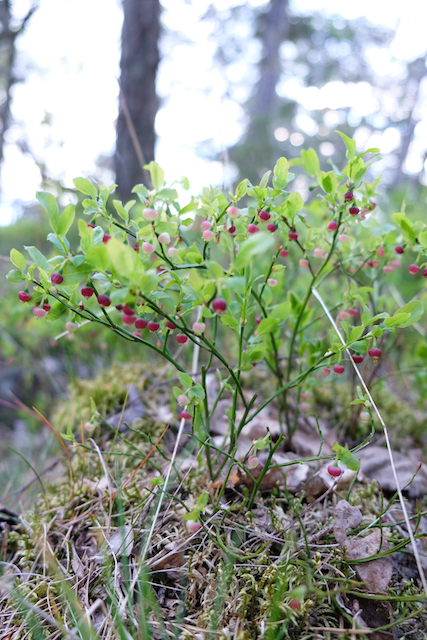
5. Vaccinium myrtillus – Bilberry – Blåbær Watercolour & graphite on vellum. March 2022
1) Habit 2) Flower 3) Immature fruit 4) Fruit 4a) TS fruit 4b) LS fruit
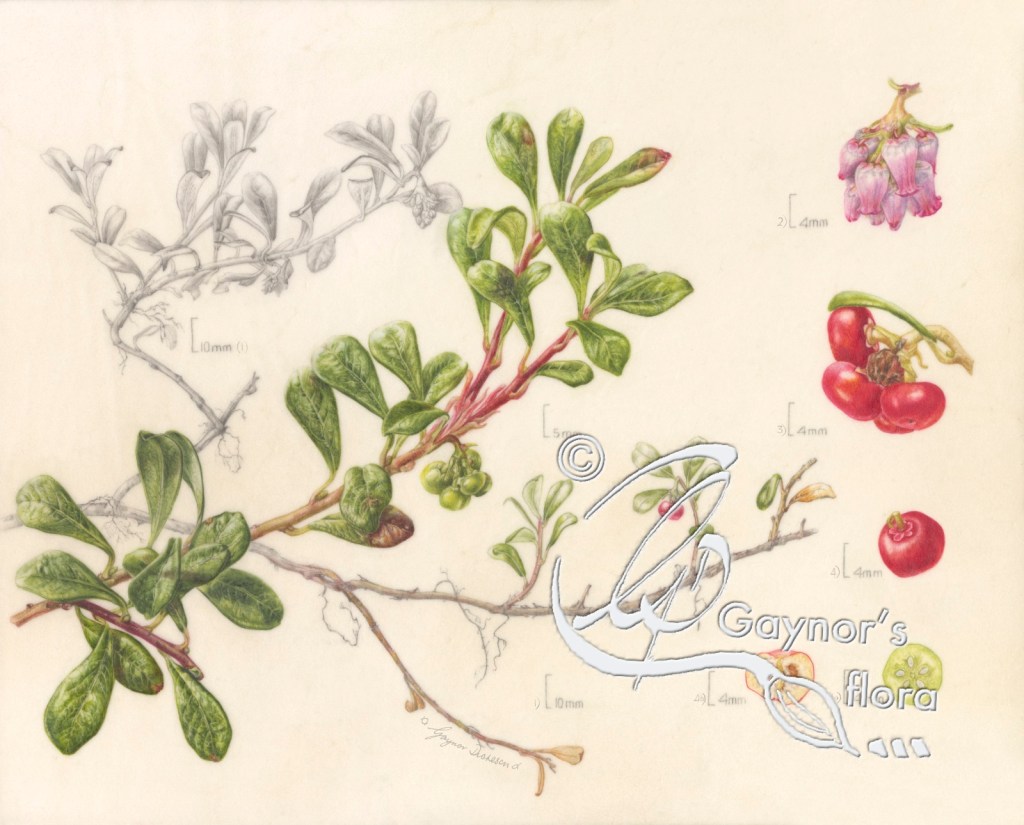
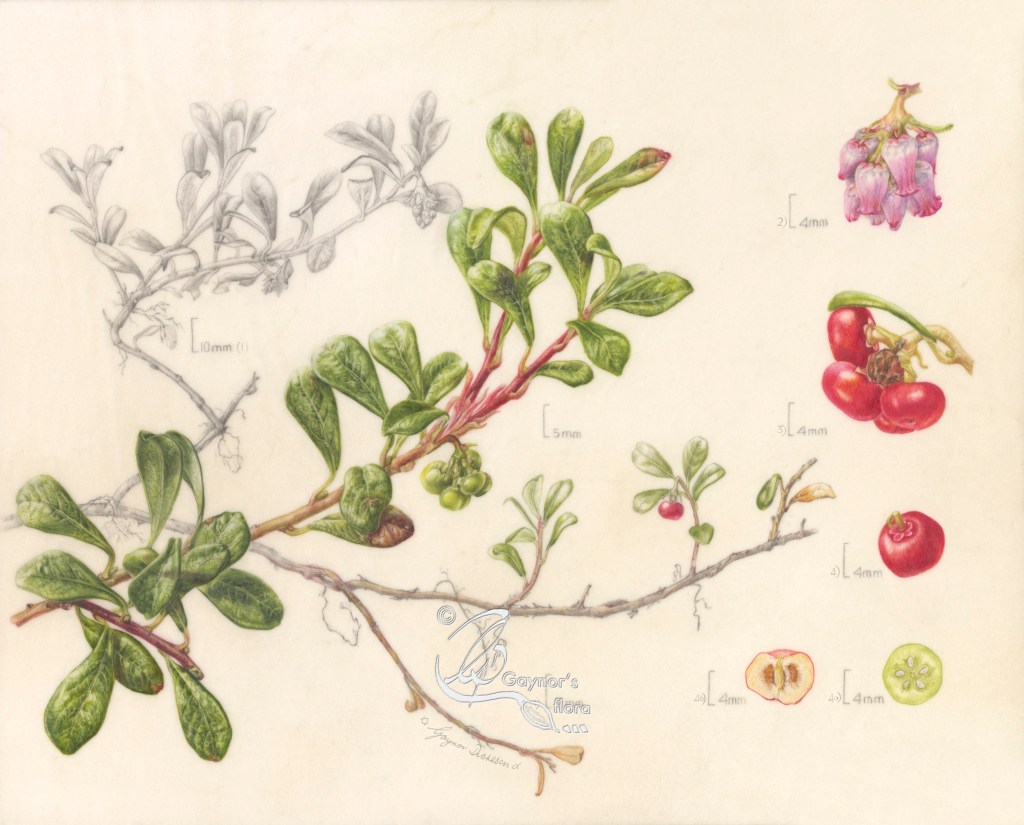
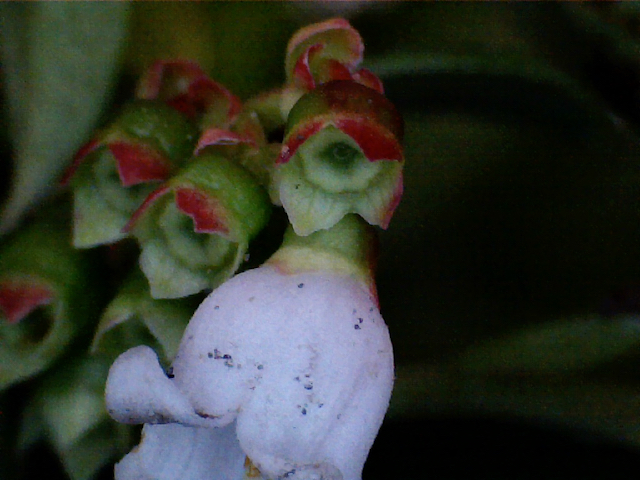
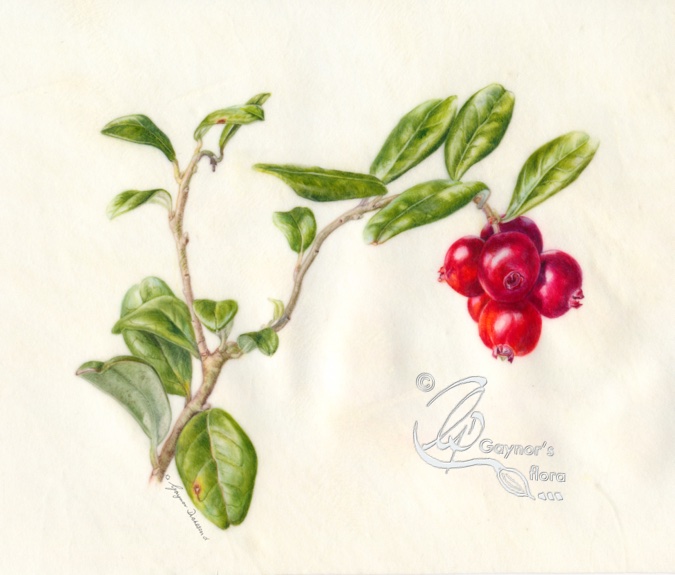
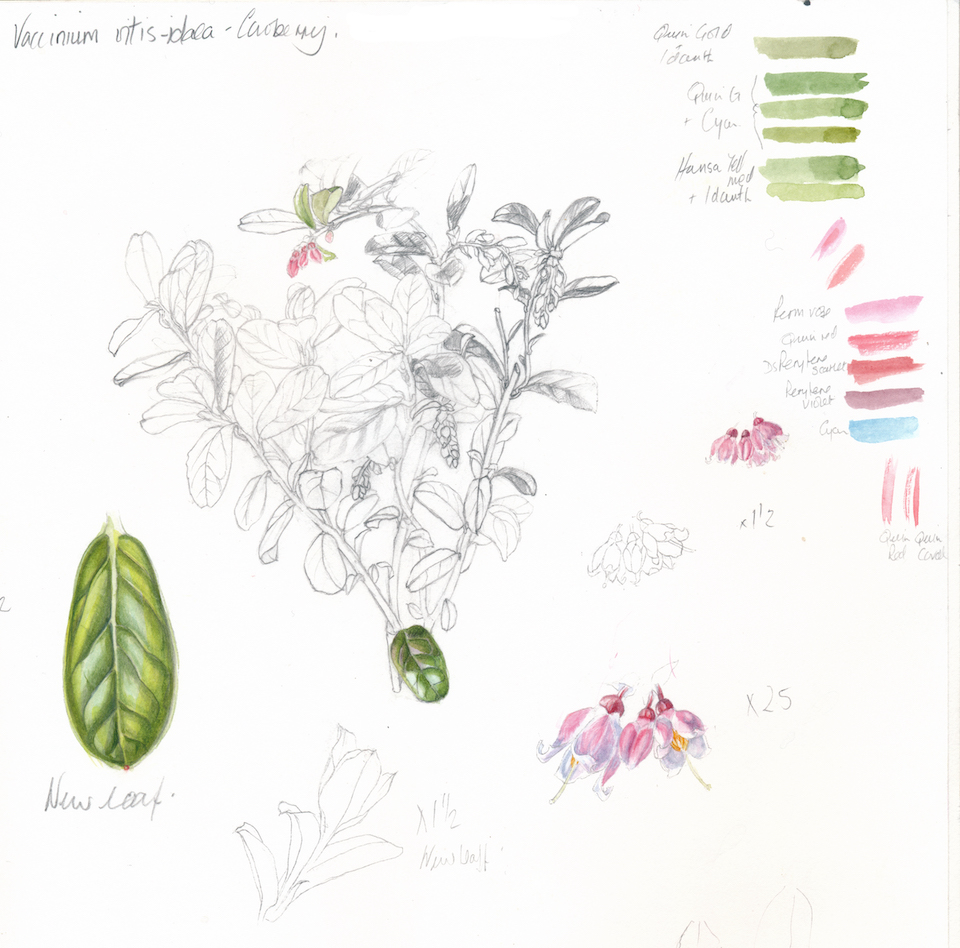
6. Vaccinium vitis-idaea – Cowberry/Lingonberry -Tyttebær Watercolour & graphite on vellum. November 2022
1) Habit 2) Flower cluster 3) Fruit 3a) TS fruit 3b) LS fruit
7. Arctostaphylos uva-ursi – Bearberry – Melbær Watercolour & graphite on vellum. October 2022
1) Habit 2) Flower cluster 3) Fruit cluster 4) Single fruit 4a) TS immature fruit 4b) LS ripe fruit
If you have read the blog series you will understand that the Cloudberry and Small cranberry enjoy the wettest environment – bogs and marshes, whilst the Bearberry is often found on a sandy forest floor. The other species are found in various types of environment from damp woods to harsh mountain tops. Some, like the Bog bilberry will grow very well just about anywhere as long as it has water and plenty of sun.
All of the plants in this series live in the Subarctic part of the world and have always provided a lot of nourishment for those living in the far north, the rest of us a little further south and of course animals that roam the area.
Some of the plants typically don’t grow in certain areas as witnessed by the difficulty I had finding the Bearberry. In very hot and dry years some plants produce next to nothing; Cloudberry and Small Cranberry are good examples. Can you imagine the risk that Global warming brings to these plants as well as to us. The warmer the planet gets, the more further north these plants are likely to move making it even harder for us and the animals they support, to find them. As it is, plants that can normally be found further south in Europe, are now beginning to appear in Norway; their pollinators moving with them and having a negative effect on the species that belong.
When choosing to study and paint these plants I didn’t realise how much I would learn about them. I loved the plants (and their fruit) before this, but now have so much respect for them and the environment in which they grow. I hope that I have been able to pass on at least a smidgen of this.
Thank you for following this series.
Latest news: I am really pleased to say that following the judging process yesterday, 14 June 2023, the judges decided to honour me with a Silver Gilt medal. The award ceremony will be held this evening at the Saatchi Gallery during the preview to the exhibition opening tomorrow.
I look forward to getting detailed feedback about my exhibit from the judges this afternoon.
Arctostaphylos uva-ursi or the common English name of bearberry and norwegian name of melbær.
The Norwegian name, when translated, literally and aptly describes the melbær, flour-berry. The berries are edible, dry, tasteless, and floury. But they are considered an important ‘survival food’ and eaten in sauces by some northern indigenous people with fish, venison, elk and bear.
When describing another plant in this series, Vaccinium vitis-idaea (cowberry/lingonberry), I mentioned that these two plants were the main reason that I wanted to do research and illustrate this series of plants. I wanted to show how they can be distinguished so that both can be used and enjoyed. Getting things wrong – mistaking one fruit for the other – is not dangerous, but it can spoil the effect of a recipe intended for Lingonberries.
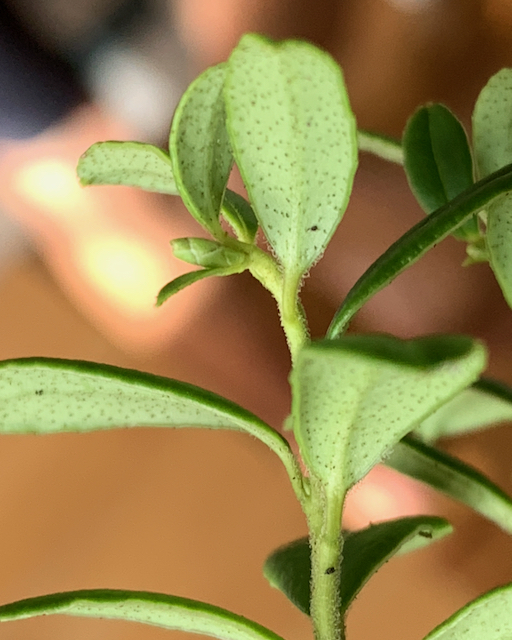
Both plants have leathery leaves as well as similar fruit and flowers and although they can grow in the same habitat, the bearberry does better in drier surroundings. In the last blog I showed the back of the Lingonberry leaf which is more oval-shaped, but now I will show you the back of the bearberry leaf which is paddle-shaped.
The photo of the Bearberry leaf was taken in September when the tiny flower buds start to appear – establishing themselves before the snow appears so they can make an early start as soon as it is gone.
To the left is the ‘veiny’ Bearberry leaf and to the right the ‘dotty’ Lingonberry leaf
As you see, the Vaccinium vitis-ideae – lingonberry leaf has small dots on the underside, whereas the bearberry Arctostaphylos uva-ursi leaf has a fine network of veins.
The bearberry is not a member of the Vaccinium Genus, but is part of the Arctostaphylos Genus. However they are both part of the Ericaceae (heather) family. This means that in both species the flowers are typically heather-like, although the bearberry flowers are more urn-shaped and the lingonberry flower is bell-like .
Bearberry urn-shaped flowers to the left and Lingonberry bell-shaped flowers to the right
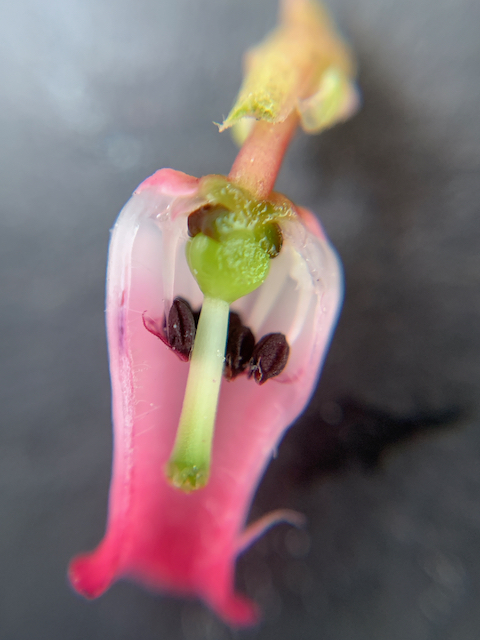
Longitudinal section of Bearberry flower
The rhizomes of the bearberry lie prostrate down rock walls or across the sandy forest floor, whereas those of the lingonberry sit deeper in the humus.
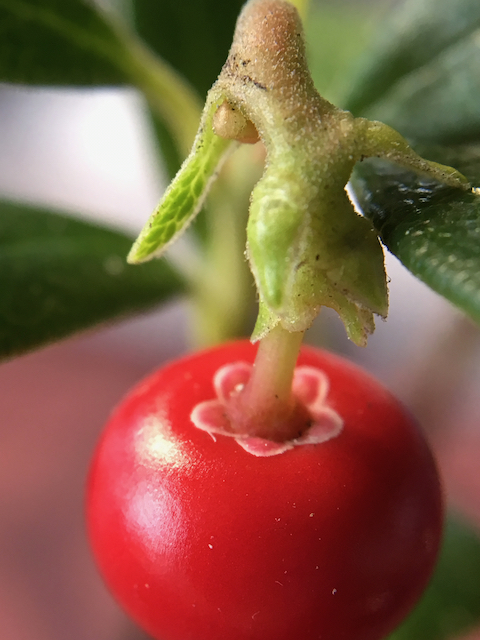
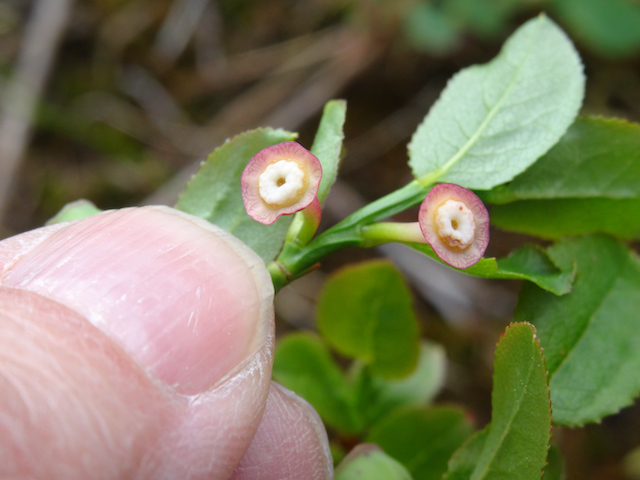
Both plants have clusters of red fruit, but the Bearberry fruit has a slightly flatter spherical form than that of the Lingonberry. Most importantly the Bearberry has a superior ovary (the gynoecium – [female reproductive part] is above the attachment point of the floral whorls [petals etc]), meaning that the remaining sepals are at the top of the hanging fruit, nearest the pedicel (stalk). The opposite is true of the Lingonberry where the remains of the sepals are at the bottom of the hanging fruit, distal to the pedicel.
This is a photo of the longitudinal section (LS) of one flower. It clearly shows that it has a superior ovary.
To the left, Bearberry fruit with sepal remnants near pedicel. To the right, Lingonberry fruit with Sepal remnants distal to pedicel.
The second blog about the Bearberry species is scheduled for 11 June 2023. That will be the last blog about the series, although I will show the completed pictures on 15th June.
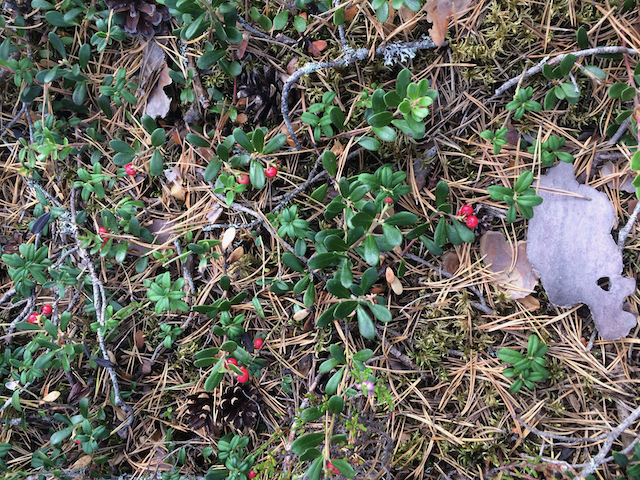
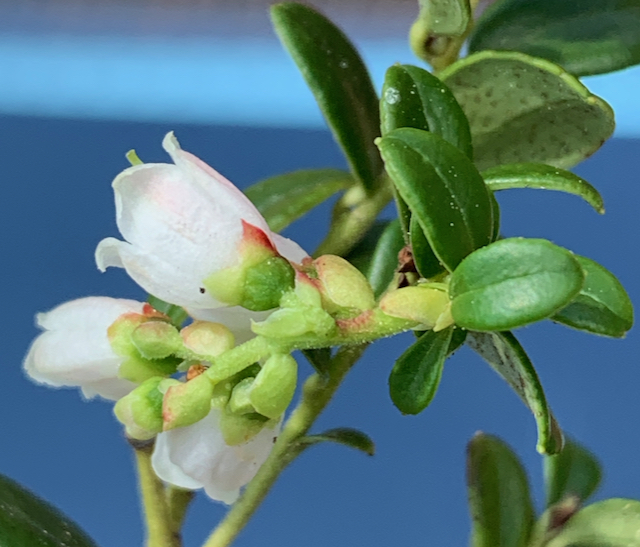
Vaccinium vitis idea – Lingonberry plantsin dry moss.
The reason for even thinking of doing a series of plants like this was because of this plant – Vaccinium vitis idaea (Lingonberry/Cowberry) and the next plant in this blog series Arctostaphylos uva-ursi (Bearberry). They are fairly similar and their habitats cross over into each other’s. So unless you know what you are looking for you can easily make a mistake.
Lingonberry leaf back.
It isn’t a ‘dangerous’ mistake to make, but it can spoil a recipe!
Above is a photo of the Lingonberry in its typical habitat. Both species have leathery leaves as well as similar flowers and fruit. But the Bearberry prefers even drier surroundings than the Lingonberry.
The Lingonberry leaves are oval as you see above, whereas the Bearberry leaves are paddle-shaped; The Lingonberry leaves have small dots on the underside, whereas the Bearberry leaves are finely veined; Both sets of flowers are typically Heather-like, but the Lingonberry flower is bell-shaped and the Bearberry flowers are more urn-shaped. The rhizomes of the Lingonberry sit deeper in the humus than the Bearberry, which are prostrate and limply creep across a surface.
The fruit for both plants are in clusters, but the Bearberry fruit has a slightly flatter spherical shape than that of the Lingonberry. Most importantly the Lingonberry has an inferior ovary (the flower parts arise above the ovary), meaning that the remains of the sepals are at the bottom of the hanging fruit, distal to the pedicel (stalk). The opposite is true of the Bearberry where the calyx (sepals) remain on the fruit around the pedicel.
Fruit developing. Petals fallen off to reveal shape of distal end of fruit formed with sepals.
If you look at the painted berry at the beginning of the last blog when I started discussing the species, you can see the remnants of the sepals. Compare it with these three pictures showing the development of the flower and swelling of the ovary in its inferior position.
At the end of the previous blog I showed you some of the sketches I did from various Lingonberry plants. Here you see additional ones and you may notice that they were part of the basis for my final artwork.
Below you see my first compositional plan for the Lingonberry picture, but I didn’t really like it. I suppose in this plan I wanted to avoid painting so many small, but detailed leaves. As you now know they have several diagnostic elements to them, but at the same time are quite shiny. The composition just didn’t give me the right ‘feeling’ of the plant.
One weekend I had been out picking fruit with my daughter and we were discussing the way the plants grew and the impression they gave. We again looked at my planned composition and she suggested I replace the flower on the stem with a fruit cluster.
That was the answer – the series emphasis was about the fruit. I decided to do a trial on vellum of the new piece of stem with the berries and this became the basis for the final composition.
My first sketches of this plant were done in March 2017, but I didn’t start painting the final picture until October 2022 (after harvesting), finishing December 2022. Because this plant is not deciduous, it allowed me to work on the leaves right up until the first fall of snow.
The native range of this species is Subarctic & Temp. Northern Hemisphere including the UK and Norway. It is a subshrub and grows primarily in the temperate biome.
Source: Kew – Plants if the World Online
The species in my next blog scheduled for 8 June 2023 is the Bearberry, favoured by bears when they wake up from their hibernation – or so I am told.
Eva’s Raw LingonberryJam
300g Lignonberries
100gm sugar
Blend together the berries and the sugar until berries well macerated. If possible let it stand for few hours in the fridge before being used.
Eva Biringvad gave me this recipe and sent me on a ‘no-return’ journey. Her father made the most delicious bread, so we ate chunks of his bread with sour cream and the raw lingonberry on top. Delicious!
This is also used with meals instead of Cranberry sauce – and it is much nicer.
Ripe Lingonberry ready for picking with Bilberry plants already done and dusted.
Distal view of ripe fruit – inferior ovary
Vaccinium vitis-idaea, or cowberry, the common english name and tyttebær the Norwegian name is more commonly known as lingonberry if you visit Ikea. It forms the sharpish berry sauce you get with your meatballs!
In fact, there are several ways you can eat the fruit and one of the recipes I will be sharing with you is one where the raw fruit is whipped with sugar – it is absolutely delicious – especially on lovely bread with sour cream!! A friend introduced me to this bad/delicious habit, but I have learnt to restrict myself!
I am glad that we picked quite a bit of fruit this last year and it is safely kept cleaned and ready for use in the freezer. Like the Bilberry, I use it in all sorts of recipes, sometimes even together.
Many will think that the Lingonberry is similar to the small cranberry and in many respects it is. They are both Vacciniums, similar in size; 5- 8mm, but the lingonberry is almost completely spherical whilst the cranberry has a very slightly elongated spherical shape.
CranberryLingonberry
Because the Lingonberry and Cranberry prefer completely different habitats, there is little risk of picking from the two species at the same time. But, both can be used in the same way and for similar recipes.
The Lingonberry is generally found on heathland and shrubby areas, but as discussed in my blog released 7 May, the Small cranberry grows in very boggy areas covered with sphagnum moss.
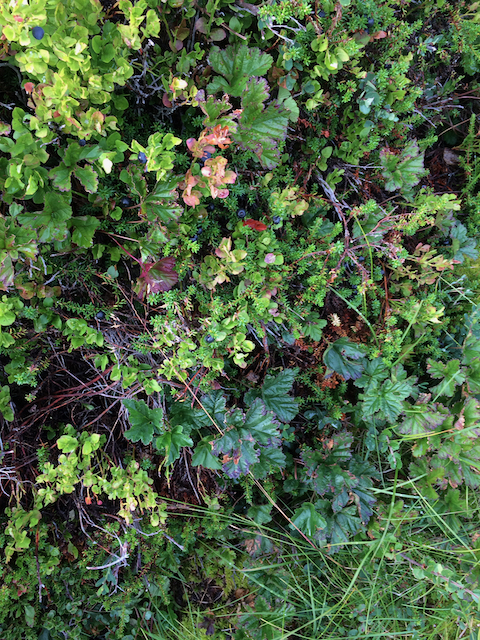
The next two picture were taken late September at 1100 metres over sea level. The red berries are
Veggli, Numedal, at 1100metres over the seaMix of several species in this series at 1100 m.
the Lingonberry and you can see that as they hang in bunches they are easy enough to pick. Unlike the bilberry (the red/yellow leaves), the fruit is pretty solid and bullet-like making them even easier to pick that that species. In the same picture is the Mountain Crowberry with their black berries, heather and some very short birch.
We are lucky enough to have some Lingonberry also growing in our garden, but in the two years we have been here I haven’t seen any fruit. Possibly this is because the plants are in shade and it has been very dry since we have been here, and our house is on rock. Therefore, with climate change even the native plants suffer. There is more fruit as one walks from our house into the protection of the woods. Often it grows on the top of extinct anthills, indicating how the seeds were transported.
The Vaccinium vitis-idaea (Cowberry) and the Arctostaphylos uva-ursi ( Bearberry) are, in fact, the main reason that I thought to do this series of plants. I have already written about the similarity between the Vaccinium myrtillus (Bilberry ) and the Vaccinium uliginosum (Bog bilberry), and in that case mixing the one with the other won’t spoil a recipe. But because the Cowberry and Bearberry are so similar, mistakes can be made and although both edible, Bearberry is dry and tasteless and has large stones rather than small seeds.
I will talk about the Bearberry as the last plant in this series. But the second section about the Lingonberry is scheduled for 6 June 2023.
My sketchbooks can be messy in comparison to many!
This is the main double page for my sketches done on the Bilberry plant. I try to keep as much information as possible together so that when I do my final work I don’t have to search too much in the sketchbook. I try to find a hole on the relevant page to add things, either more sketches or research I might have done. I often find that when I am researching on the internet, the gaps are usually left along the bottom edge of the page, so I frequently use this area to write any notes.
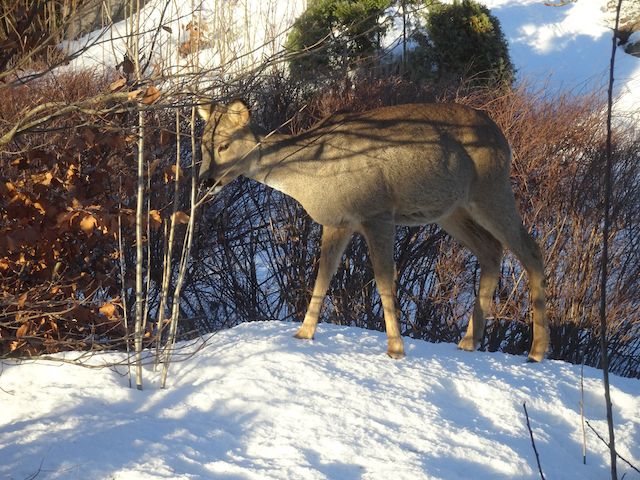
As I have already mentioned in the previous blog, there is a similarity in the fruit of the Bilberry and the Bog bilberry, but the stems are very different for starters. The Bilberry stems are very angular and last year’s branches remain green over winter and into the next season. The deer seem to like them and paw away the snow eating the shoots. The Bog bilberry stems are brown and woody; I talked more about this plant in the blogs published 14th and 18th May.
Serious times – the pandemic!
And additional serious times – moving!
By the middle of 2020 I felt that I had enough sketches for most of my final pictures and had already decided to stop the extended period of ‘productive procrastination’. We were in the middle of the pandemic and for most people, the world had turned upside down. My daughter, living in Norway, felt we were too old to live on our own any longer and she was too far away should anything happen to us.
The decision to move back to Norway was thought about and made quite quickly. I think we started talking about it mid June and sold our home with the large beautiful garden and the ‘shed’ – my studio, quite quickly.
The actual move came in August 2020. I had planned all my compositions before leaving the UK and when we arrived in Norway I was all set to start painting the final artwork.
I won’t talk about all the problems moving during a pandemic caused – we were lucky to be completely healthy. But some of the benefits from moving back to the country I loved included being much nearer to the plants in my series. There were lots of others, but I leave that to your imagination.
Goodbye shed at the bottom of the garden.
In between looking for a new home and sorting out all the official stuff and additional problems caused by Brexit, I started working towards doing the first picture. Of course, it had to be the Bilberry. This plant also grows at sea level and was easy to access now.
I only had to walk up into the woods behind my daughters house where we stayed until we finally moved. There were lots of native plants along the tracks, including loads of Bilberry. In our new home, to which we moved in January 2021 when the area was ensconced in snow, we eventually found it contained a lot of Bilberry plants. Heaven or what!?
I started with a trial piece of Bilberry parts on vellum and began the final artwork in June 2021, finishing March 2022.
You can see my work station in our new home below. As is perhaps obvious, I continued to procrastinate a little longer as I just had to do more sketches. Working on the vellum off-cut was extremely useful as I also tried out various methods of introducing graphite. Getting the colours right for the bloom of the nearly black fruit whilst I had them was also important. Painting this on paper had been a completely different kettle of fish!
Hello new ‘shed’. This is one of the bedrooms on the top floor, but now my working area consists of two bedrooms turned into one large room – with a view!
Bilberry trial piece on vellum off-cut.
Making sure that I had samples from all the plants in the series at the right time of year was like putting together a puzzle. The flower sections had to be done in the spring and the fruit at various times over the autumn. Leaves also changed through the seasons.
But basically, I knew that I had roughly six months of the year to paint the deciduous plants (Bilberry, Bog Bilberry, Cloudberry) and those I didn’t have access to under the snow such as the Cranberry. For the remaining plants I would be able to get leaves throughout the year as long as they weren’t hidden too deeply under the snow. It became a matter of planning and making sure I knew where relevant plants were over the winter.
The native range of this Vaccinium myrtillus is Greenland, Temp. Eurasia, W. Canada to NW. & W. Central U.S.A. It is a subshrub and grows primarily in the temperate biome. Including both Norway and the UK.
Source: Kew Plants of the World Online
Working on the final artwork – graphite and wash section
Mor Astrid’s (my lovely grandmother-in-law) Raw Bilberry squash
3 l Bilberries
2.5 l water
75 gm Cream of Tartar
4.5 kg sugar
Rinse through the berries to clean of soil. They don’t need to be thoroughly cleaned of leaves and small stalks.
Bruise/crush berries in a plastic bucket and leave for 24 hrs.
Mix the Cream of Tartar into the water and add to the berries. Stir thoroughly.
Let the mixture stand for 24 hrs.
Strain through a muslin.
Add the sugar to the strained fluid.
Stir thoroughly until the sugar has melted in.
Pour into bottles.
The resulting squash can be mixed with water. It is DELICIOUS.
Keep out of easy reach of children or it will be finished off in no time!!
A suggestion from Polly o’Leary after the Bilberry part 1 blog. Thank you Polly.
In this part of Wales theyre called Whinberries. We used to make them into whinberry and apple pie, or whinberry jam. Or both. Depending on how many we found. No recipes, except the usual – plain shortcrust pastry, not too much sugar, because they’re lovely and tart. Same with the jam. Never really thought about a recipe, just made it the usual way as they were such a treat.
This came from Jane Hogan following the Bilberry part 1 blog. Thank you Jane
We used to pick bilberries on the North Yorkshire moors when visiting my grandmother. She used to line a pie dish with pastry, pile in the bilberries with sugar and top with another layer of pastry. Served with custard or cream and eaten hot. There wasn’t usually any left to have cold! It used to take ages to pick the bilberries. (A quick look online suggests a pound of bilberries and four ounces of sugar)
On 4 June 2023 I will publish the first part of the Lingonberry blog.
It is considered to be one of the healthiest berries and has one of the richest natural sources of anthocyanin giving the bilberry its blue/black colour. The bilberry, with a high antioxidant content, is believed to be responsible for the many health benefits, more so than many other berry fruits. In traditional European medicine, bilberry has been used for over a 1000 years.
Stained hands from picking
I remember seeing the effect of picking and eating bilberries in western Norway in June 1967. I was being shown how beautiful Norway is and we were on a hill overlooking the Stavanger fjord. A future nephew was picking and eating the berries as he walked along and he turned to me laughing. His face and hands were covered with the juice and his tongue was completely black. It didn’t take me long to realise my face was in a similar state! The blue colour is the anthocyanin that make these berries so good for you. No wonder Bilberry has also been used for dying clothes and food.
I have a lovely picture of my daughter’s grinning face and tongue almost black – but I don’t think she would forgive me if I posted it here!
English bilberry flowers.
Whilst living and hiking in the UK, we often found Bilberry plants in areas on the edge of heathland as it doesn’t seem to do too well in very open areas. The New Forest was a good source an hour away from where we lived at the time.
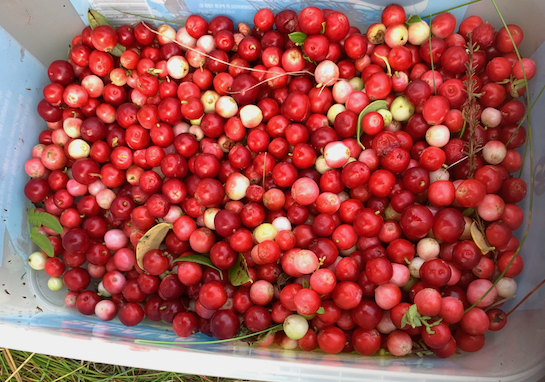
Bilberries and Lingonberries packed and ready to go in the freezer in Norway
In Norway the plants are everywhere in the woods and also grows well in acidic soils on heaths and marshes.
It is easy to forage and stock up each year!
Picking bilberry and lignonberry
Our Norwegian garden is rocky and on the edge of woods. We have Bilberries growing in the garden and unlike my neighbours wouldn’t dream of getting rid of them to replace with other plants. I love being able to pick them for a delicious dessert whenever I feel like it during the season. But even more exciting for this project, was being able to pick them and paint from them in the comfort of my own home.
Roe deer baby nibbling the tips of the Beech in our garden.
As well as nourishment for us, the plants help to provide nourishment for the Roe Deer that visit us regularly during the winter months. I am happy to let them graze and nibble the tips of the branches as they were here long before people lived in this area. Luckily, they don’t seem to do it all the year round. This is a baby from a family of mother and three small ones that we have had the pleasure of seeing develop.
The Bilberry is not to be confused with Blueberries bought in the fruit department of your local shop. Those are Vaccinium corymbosum and a ‘high bush’’ variant. One can clearly see the difference as the High bush type have pale flesh showing they do not contain the same amount of anthocyanin – the good for you factor.
Researching Vaccinium myrtillus was just as exciting as researching all the plants in the series, even though I thought I knew it the best. I am really glad I did so before beginning to sketch as I could easily have been less observant in relation to the number of flowers and resultant fruit on a branch. Unless equally familiar with the Bilberry and Bog bilberry, these two can easily be confused. But in reality there are considerable differences. For starters, the Bilberry only has one flower in a leaf axil, whereas the Bog bilberry has two!
The next blog showing more of how I painted the Bilberry picture, is scheduled for 1 June 2023. We are rapidly approaching the RHS exhibition at the Saatchi Gallery opening to the public16 June.
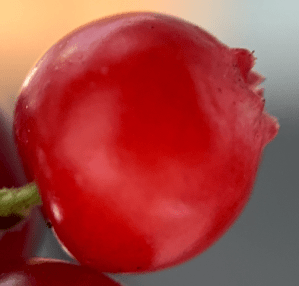
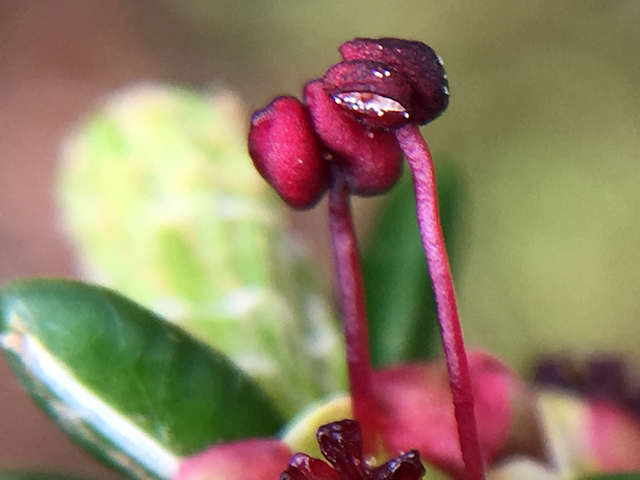
Fertilised flowers.NB the form at the apex.Mixed vegetation at high altitudesNorwegian bilberry flowersBilberry fruit witha Lingonberry sprig poking out at the front.
One day, I woke up to find that the male part of the flower which projects an anther over the flower, had been eaten off. I was lucky enough to find other buds I hadn’t noticed before and managed to keep the eating insects away until the stamens shrivelled up of their own accord. This allowed me to complete the picture as I had hoped.
Of course this process was so exciting that it kept me motivated to paint all the tiny leaves!
Buds openingFemale reproductive organs emergingMale stamens emergingStamen eaten off by caterpillarNew stamens from a different bud also showing pollen.
I used quite a bit of my sketch page information in the final artwork, even the small immature berries I had found when starting to sketch in July 2017 and the trial piece on vellum.
Working out my composition and creating line drawing to trace over.
When researching more on this plant recently, particularly in relation to its use in food, I discovered that although the berries are edible, apparently there is a potential for the leaves to poison the immediately local environment, making its own habitat more secure; the jury is still out on this question but it is wiser to leave the leaves alone.
But, the berries are fine and because the seeds are quite big and the skin quite tough, it is used mostly for juice, either cooked or raw. Additionally, it is suggested that whilst out walking in the mountains that picking and chewing the fruit is very thirst quenching. I will have to remember that.
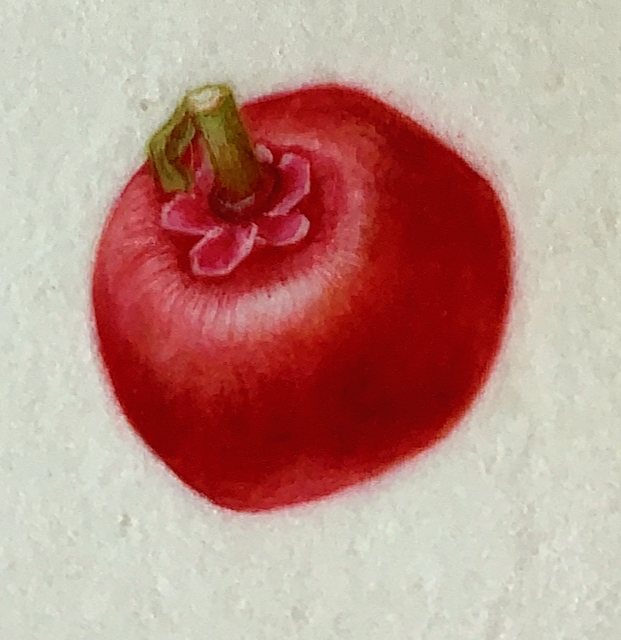
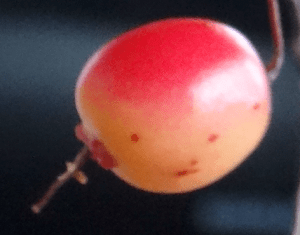
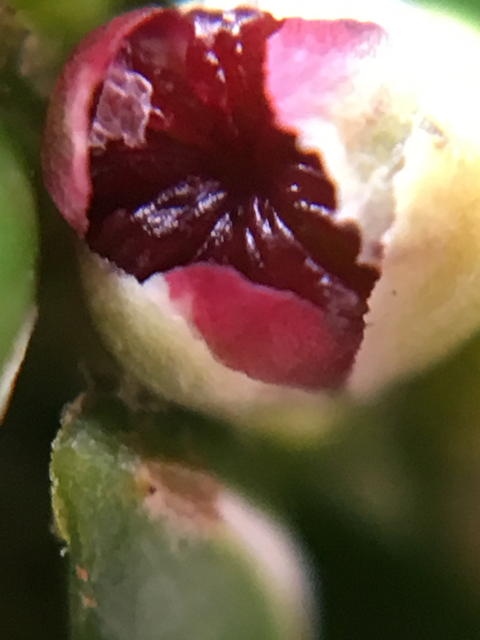
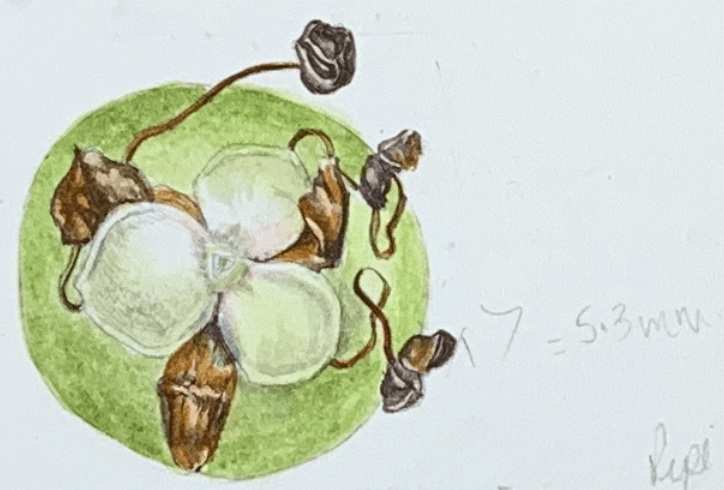
Unripe fruit.Actual size 5.3mm
One sketch I didn’t use in the final artwork was this one from my initial drawings. It is very interesting but, in some respects, didn’t give any more information to the final picture. It is an unripe fruit, enlarged (the original fruit was 5.3 mm across), containing the sepals , the remainder of the female flower and the shrivelled stamens. Compare this with the ripe fruit at the beginning of the previous blog where the same parts are also just visible.
The native range of this subspecies is Subarctic to Subalpine Northern Hemisphere including Great Britain and Norway. It is a subshrub and grows primarily in the temperate biome.
Source: Kew – Plants of the World Online
Having collected enough data and sketches, I started painting the final picture on vellum August 2021 and finished it January 2022.
recipies
Mountain Crowberry jelly
Crowberry contains little pectin. This means that it is difficult, if not impossible, to make Mountain crowberry jelly based only on the berries. To get Mountain Crowberry jelly stiff, mix the berries with other types of berries that are rich in pectin, for example lingonberries. It is also possible to mix with apples, which contain a lot of pectin or gelatine sheets.
3 dl raw mountain crowberry juice (see recipe below)
Juice of a lemon
1-2 dl water
6-7 sheets of gelatine
Soak the gelatine sheets for 5-10 minutes.
Pour off most of the water and dissolve them in a small amount of warm water.
Mix the cold Mountain crowberry juice, lemon juice and water.
Whilst continuously stirring, slowly and carefully pour the juice mixture into the melted gelatine.
Pour into clean small glasses.
This is an excellent accompaniment to venison.
Raw Mountain Crowberry juice
This is a fresh and colourful juice but not very durable, and requires a lot of sugar and a cold storage place. It is easier to freeze the juice in small portions and thawed when needed.
1 kg Mountain Crowberries – or the amount picked.
5 dl boiled and cooled water – equivalent 1:2 of berries
10 grams of citric acid – 25-30 gm per litre raw juice.
750 grams of sugar per litre of raw juice
Rinse and crush the berries well.
Put the berry pulp in a large bowl or bucket, and add pre-boiled, cold water and citric acid.
Leave the mixture covered and chilled overnight.
Pour the mass into a strainer and let the juice drain well.
Measure the amount of juice and add sugar.
Stir well until all the sugar has dissolved.
Skim and pour it into clean bottles/containers.
Can be mixed to taste with water – or something else.