


Get ready for some rapid-fire tips and tricks on how to use Adobe Illustrator. In this tutorial, we'll take a look at 26 AI tips and tricks, from A to Z.
For all the featured images and resources, check out Envato Elements. Subscribe for a low monthly fee and get unlimited access to premium assets such as graphics, video templates, and fonts.
Watch our video to learn how to use Adobe Illustrator with the best A to Z Adobe Illustrator tips and tricks. Check it out on our Envato Tuts+ YouTube channel:

Jump to content in this section:
- A is for Actions
- B is for Illustrator Brushes
- C is for the Crystalize Tool
- D is for Divide Objects
- E is for the Eyedropper Tool
- F is for Feather
- G is for the Gradient Tool
- H is for the Hand Tool
- I is for Image Trace
- J is for the Join Tool
- K is for the Knife Tool
- L is for Live Paint
- M is for the Magic Wand Tool
- N is for the Navigator Panel
- O is for Outer Glow
- P is for the Pen Tool
- Q is for the Lasso Tool Hotkey
- R is for the Rectangle Tool
- S is for Illustrator SVG Files
- T is for Type on a Path
- U is for Unite
- V is for the Vertical Type Tool
- W is for the Warp Tool
- X is for the Hotkey X
- Y is for Control-Y
- Z is for Zig Zag
What You'll Learn
We'll be covering many topics in this article on how to use Adobe Illustrator with the best Illustrator tricks. Here's a quick sample:
- How to use gradients in Adobe Illustrator
- How to save an Illustrator SVG file
- How to use Illustrator brushes
- How to use different Illustrator effects such as Outer Glow and Feather
A is for Actions
Let's start this list of Adobe Illustrator tips and tricks so you can learn how to use Adobe Illustrator.
Use actions to automate tasks such as resizing, applying effects to an image, and saving files in a desired format. Go to Windows > Actions to access the Actions panel, which will enable you to save and load action files.
Download an action like this one from Envato Elements. Load it up by clicking on the Load Actions button, and then simply hit the play button to apply it to your image or text.


B is for Illustrator Brushes
Brushes in Illustrator let you stylize and change the appearance of paths that you create. You can apply a brush to an existing path, or use the Paintbrush Tool to draw a path and apply the brush stroke at the same time.
The brush types you’ll come across in Illustrator are:
- Calligraphic Brush
- Scatter Brush
- Art Brush
- Bristle Brush
- Pattern Brush


C is for the Crystalize Tool
This fun tool allows you to add random spiked details to the outline of your shapes and objects. To access it, simply click and hold the Width Tool and select the Crystalize Tool at the bottom.
Then use the tool by clicking and dragging over any object to create these cool random spikes around the edges.


D is for Divide Objects
Divide Objects Below is a command that acts like a cookie cutter or stencil. This is done by using a smaller object to cut through a larger object.
Once everything is in position, go to Object > Path > Divide Objects Below to cut and divide the objects successfully.


E is for the Eyedropper Tool
Using the Eyedropper Tool is a great AI tip and trick. You can use it to copy or move appearance attributes, such as color fill and strokes.
Select the Eyedropper Tool from the toolbar on the left or by pressing I on the keyboard. If you want to only copy specific appearance attributes of an object, such as the fill or the stroke, simply go over to the Eyedropper Tool and double-click on it to bring up the Eyedropper Options. This will allow you to customize exactly what appearance attributes the tool picks up.


F is for Feather
This is a stylization effect that creates a soft blur at the edge of an object. Blurring the edges of an image de-emphasizes harsh borders and lets an object better blend in with the background.
To do this, first select an object that you wish to feather. Then click on Effect > Stylise > Feather and remember to check the Preview option to see the changes as you adjust the radius value.


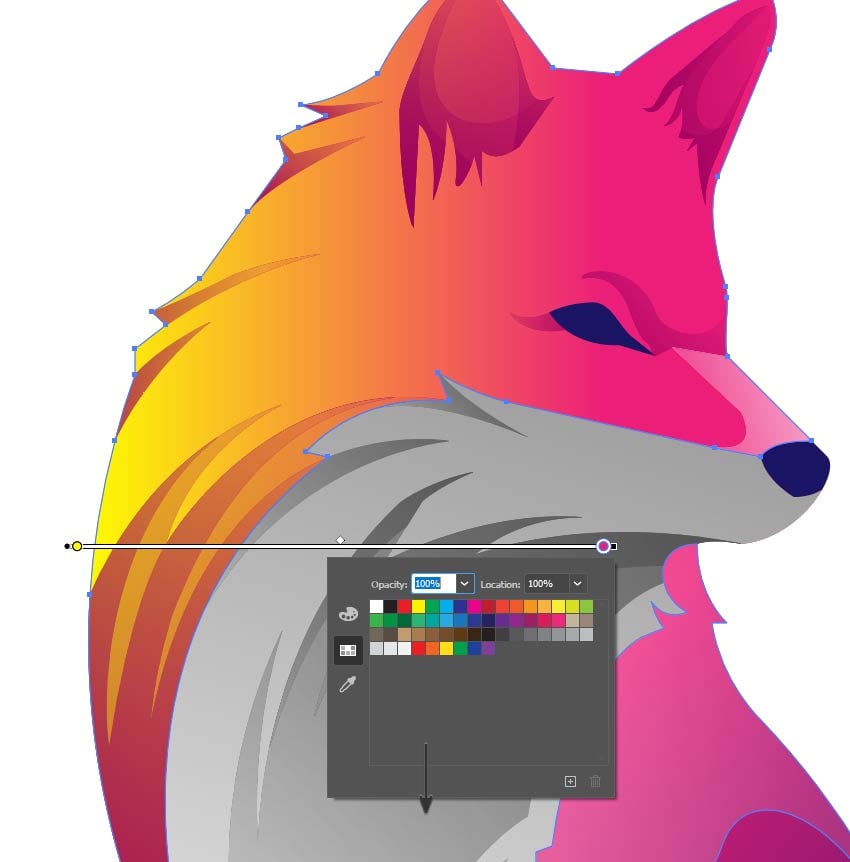
G is for the Gradient Tool
You can create and modify a gradient using the Gradient Tool or the gradient panel. Use the Gradient Tool when you want to apply a gradient directly onto a piece of artwork and see the results in real time.
You can access the Gradient Tool on the toolbar or by pressing G on the keyboard.
Once you have that selected, simply navigate to the object you want to apply a gradient on and click on it. You'll then see the gradient annotator appear on top of the object. The gradient annotator is a slider that allows you to edit the starting point, the end point, and the color stops.


H is for the Hand Tool
Want to navigate around the artboard more easily, without having to use the bottom and right scrollbars all the time? Then the Hand Tool is going to be your best friend!
This often-forgotten tool will help speed up your workflow drastically. You can access it by pressing the letter H on your keyboard, where your cursor will change into the Hand Tool. Now you can just click and drag over your artboard to move around.
If you really want to speed things up, press and hold the spacebar on your keyboard to switch seamlessly between the Hand Tool and any other tool you are using at the time.


I is for Image Trace
Convert a raster image such as a JPG or PNG by selecting your imported image and going to Object > Image Trace > Make, which will convert the image into a black and white vector with the default parameters. We can then choose to expand the image, which will enable us to edit the vector objects as we normally would.


J is for the Join Tool
With this tool, you can connect two ends of a path to create a closed path. This is especially useful when we are cleaning up an illustration.
To select the Join Tool, go to the Tools panel and click and hold on the Pencil Tool to reveal and select the Join Tool. Then with the Join Tool selected, locate the area of the artwork where you would like to clean up, and then click and drag in a scrubbing motion over the two points. When you release the mouse, the two paths will be joined together into a single, complete path, with any excess trimmed off.


K is for the Knife Tool
The Knife Tool is used to cut objects along a freehand path to divide an object into separate components. To access the Knife Tool, click and hold the Eraser Tool and then select the Knife Tool from the options that appear. Then all you need to do is click and drag over an object to cut it.


L is for Live Paint
This tool can be accessed from the panel on the left or by hitting K on your keyboard. Unlike a normal fill, the Live Paint Tool can differentiate between all the different overlapping shapes.


M is for the Magic Wand Tool
This is a handy Illustrator trick. This tool lets you select objects of the same color, stroke weight, stroke color, opacity, or blending mode. Simply select it from the toolbar on the left or press Y on your keyboard.
You can also customise the Magic Wand Tool to select objects based on specific attributes such as color, stroke weight, opacity, or blending mode. To do this, double-click on the Magic Wand Tool in the control panel and use the checkboxes here to specify what you are looking for.


N is for the Navigator Panel
Clicking and dragging the Navigator panel thumbnail display can quickly change the view of your artwork. The red box corresponds to the currently viewable area that you can work in.


O is for Outer Glow
This is an effect that adds a blurry glow of any color outside the edges of the object. To do this, select an object and then go to Effect > Stylize > Outer Glow. Here you can choose the color of the glow and also what opacity and how much blur the glow will have.


P is for the Pen Tool
The Pen Tool allows you to draw paths by clicking to make an anchor point, and then clicking again to join them up.
The Pen Tool allows you to create all sorts of shapes. Simply clicking between anchor points creates a straight line, whereas if you click and drag you will create a curve.


Q is for the Lasso Tool Hotkey
Q is for the hotkey Q, which gives us the Lasso Tool. This allows us to select the anchor points of an object by clicking and dragging it around the anchor points that you want to select.


R is for the Rectangle Tool
The Rectangle Tool will enable you to draw rectangles of any size. Simply select the tool from the toolbar or hit M on the keyboard. Then click and drag to create the desired rectangular shape.


S is for Illustrator SVG Files
You can save your artwork from Illustrator into an SVG file by going to File > Save As and then choosing SVG as the file type.


T is for Type on a Path
This allows you to wrap your text around a circle. Hold down the Type Tool, located on the toolbar to the left, and then select the Type on a Path Tool. Then go over and click the edge of the circle to start typing along the path.


U is for Unite
Unite allows you to combine selected objects and shapes together, taking on all the attributes of the overlapping object. You can find Unite in the Pathfinder panel. Then select the objects that you want to unite and click on the Unite button to combine them together.


V is for the Vertical Type Tool
This tool allows you to create vertical type and type containers. This can be especially useful if writing out content within a given space in Chinese or Japanese, or creating a sign in a vertical format.


W is for the Warp Tool
You can find this tool in the toolbar on the left by clicking and holding the Width Tool and then choosing the Warp Tool. This allows you to manipulate an object in whatever direction you drag the tool across the object.


X is for the Hotkey X
The hotkey X and Shift-X allow you to toggle between the fill and stroke colors. Use Shift-X to swap between fill and stroke colors, and use the X key to toggle between fill and stroke.


Y is for Control-Y
The hotkey Control-Y allows you to view your artwork so that only the outlines or paths are visible. This removes all the color and effects of your artwork and can drastically increase the performance speed if you find a complex image is slowing down your work.


Z is for Zig Zag
This is the last item in this list of AI tips and tricks. With Illustrator, it’s easy to create a zig-zag line or a curvy wave. Simply select the line you want to apply the effect to, and then go to Effect > Distort and Transform > Zig Zag to bring up the Zig Zag dialogue box.
From here, you can have a play with the options such as the size and the ridges to get the effect that you want.


Ready to Try More Adobe Illustrator Tutorials?
Awesome! By now you've learned how to use Adobe Illustrator and how to get better at Illustrator. We've gone through the A to Z of Adobe Illustrator tips and tricks.
If you want to continue learning Illustrator tricks, why not check out some of our more in-depth Adobe Illustrator tutorials on Envato Tuts+ to take your skills to the next level.
Whether you're working on character designs, icons, or infographics, Envato Tuts+ has got you covered. To learn more AI tips and tricks, read the following tutorials.

 How to Install and Use Brushes in Adobe Illustrator


 How to Create a Mascot


 A Comprehensive Guide: Illustrator's Paintbrush Tool and Brush Panel

 How to Create a Pastel Gradient Background

 How to Convert EPS to AI


 How to Remove a Background in Illustrator

 How to Add Fonts to Illustrator

 Adobe Illustrator: Illustration for Beginners

 How to Make a Grid in Illustrator


